Christmas Surprises


A couple of my favorite Christmas gifts this year.
I'm so thankful for everything I received this Christmas and I'm feeling very blessed.  I am also very grateful to have had my loved ones put some extra thought into my surprises.  My daughters both spoiled me with many nice gifts, and I had a couple of favorites I wanted to share.  I especially loved a gift from my oldest Daughter and her husband, a family photo collage.  I love it, and I must admit it made me cry when I saw it, happy tears of course.  It's really nice and I know they spent time on it for me.  

I also especially loved a gift from our other Daughter, of a beautiful hand knitted scarf that she made for me, I know she spent time on it for me too and it is so perfectly me, I love it!  Hubby gave me something very special that sparkles, and also a new laptop that I love and am enjoying everyday, and also sometimes into the wee hours of the morning such as right now{*yawn*}, as I type away on this blog post, but I really wanted to share this.  My eye lids may be a bit heavy right now, but my smile is wide and my heart is full.


Family Photo Collage


So many great photos and they did such a great job on it.  I love all the photos they chose to use.  
Our parents placed beside us on the top row, my parents in the upper left corner and Hubby with his parents in the upper right corner (from a trip they took to Yosemite).  I love that they also added a wedding photo of us, and included our beloved dog Jake (who was part of our family, and shared life with us for almost 14 yrs), and the rest of the photos of daughters, son-in-law and granddaughters, and a group photo in the center.  The photos of our granddaughters sitting in leaves shaped into hearts (I love hearts!) are a couple of my favorite recent photos of them too.  And the phrase just completes this.  "Family memories are always close at heart." 


Hand Knitted Scarf


This is a beautiful scarf.  
This is an interesting and different type of yarn and knitting technique.  (I'm hoping you can see the detail of it, maybe I should have photographed it on a white background?)  She did a very fine job on this, and it's a one of kind made just for me!  I love it and that it really is so perfectly me.  Black and gold are two of my favorite colors and combinations.  I love how it sparkles too.  Its a big HUG around my neck from her each time I put it on!  


Heartfelt Hugs & Smiles...

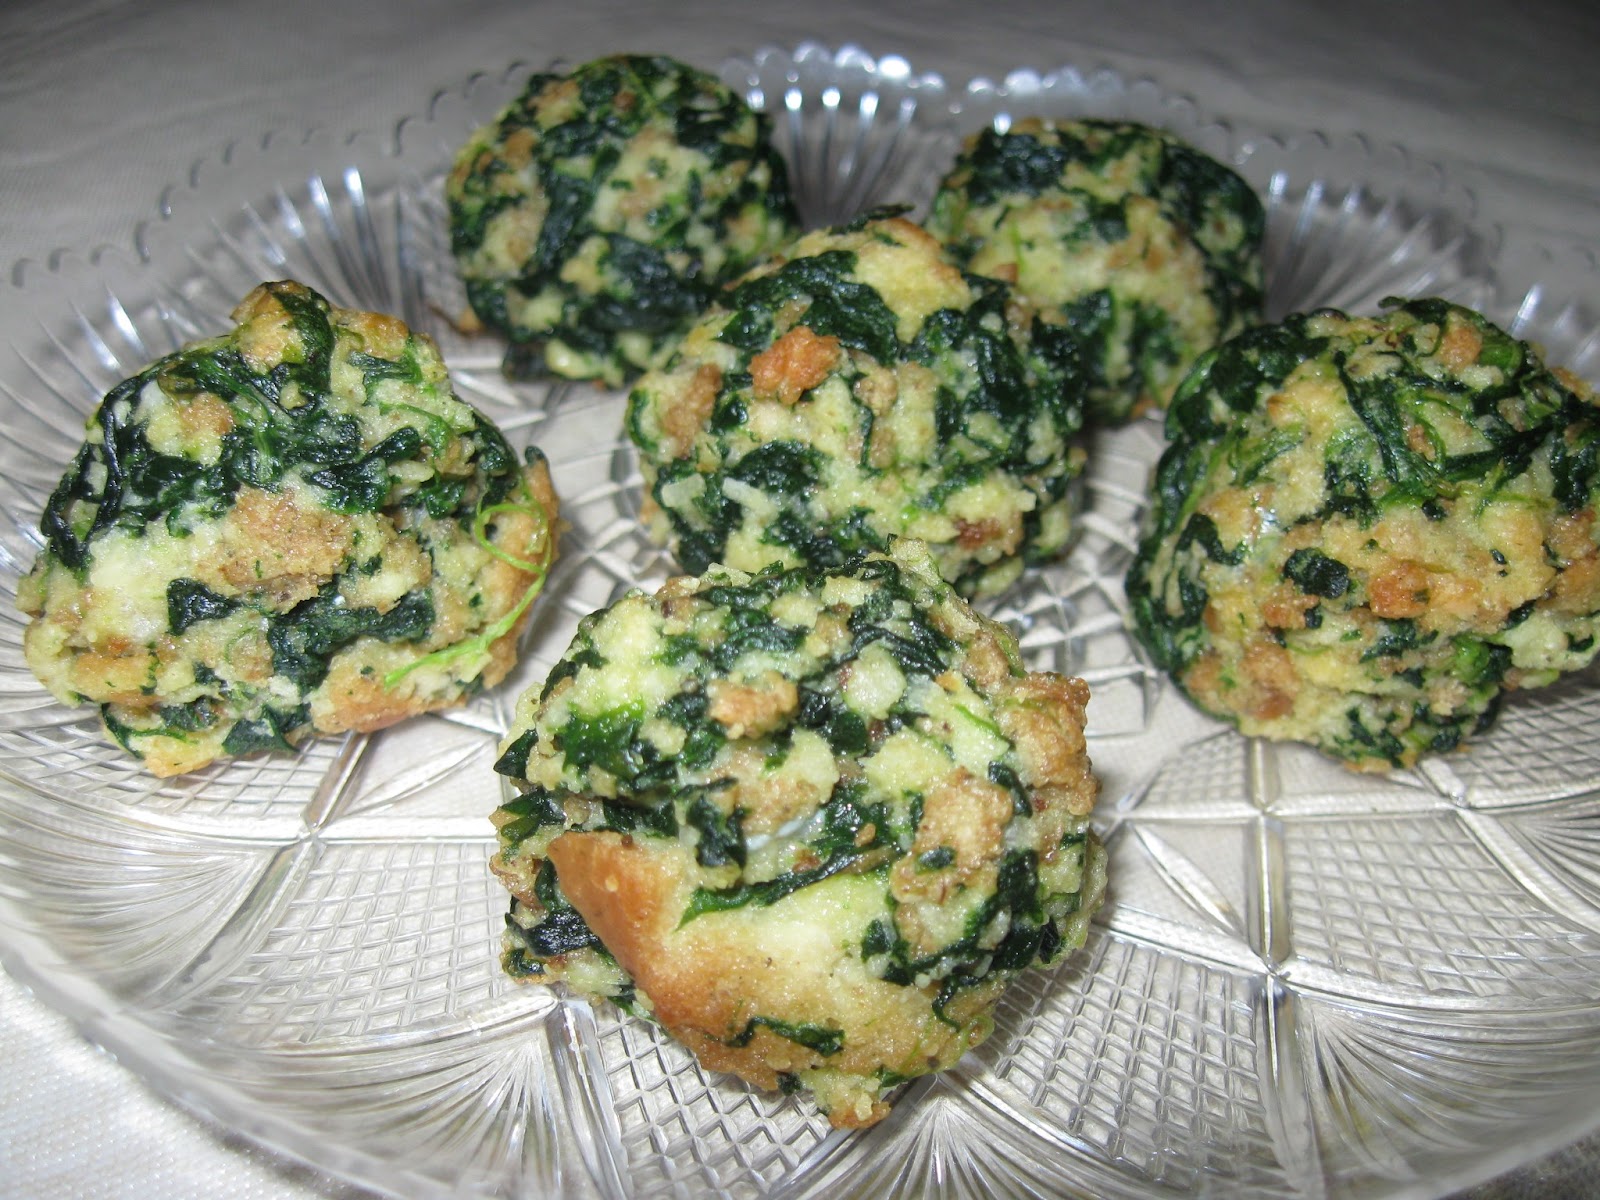
Spinach Balls


As I came across a recipe for these Spinach Balls, I thought that they would be great to serve along with the other holiday foods that I had planned to prepare.  I really like spinach, and knowing that there are so many good reasons to eat spinach, any way that I can include it in my diet I will.  These were even better than I had imagined and they were given the thumbs-up by those that tried them.  Some people don't like spinach though.  Can you imagine that?  Well to each his own as they say, or her.  I'll be making these again since they are so easy and so good.          


Spinach Balls


Ingredients:

  • 2 (10 oz.) packages frozen spinach, thawed & well-drained
  • 2 small onions, very finely chopped or 1 tsp. onion powder
  • 2 1/4 c. stuffing with herbs
  • 6 eggs, beaten
  • 1/2 c. melted butter
  • 1/2 c. Parmesan cheese (the type from a can), finely grated
  • 1/2 c. Fresh Parmesan cheese, shredded
  • 2 tsp. garlic powder or 1 clove fresh garlic, finely chopped
  • 1 tsp. black pepper
  • 1/4 tsp. salt


Directions:

Mix all ingredients until well combined.
Form into about 1" balls; place on a baking sheet sprayed with cooking spray, or lined with parchment paper
Bake at 350 for 20 minutes.  Makes approx. 60 balls

Note:
Spinach balls may be frozen, either baked or unbaked.
For pre-baked balls: Remove from freezer about 30 minutes prior to reheating. Reheat in a 350 degree oven for about 10 minutes.
For unbaked balls: Remove from freezer 30 minutes before cooking. Bake as directed (350 for 20 minutes).


recipe adapted from: Spinach Balls


Strawberry Delight


I just whipped up this delicious dessert for the Hubby and I this evening.  I think I could have had a second helping because it really was that good.  It looked so good that I just had to take a few photos, and I thought it was worthy of sharing.  A simple and easy dessert that is sure to please and one that looks as delicious as it truly is.

It took me less than five minutes to put this delicious dessert together.  Slices of angel food cake topped with sliced strawberries and a nice drizzle of melted chocolate, then topped off with whipped cream.  Sounds pretty good doesn't it?  Well, it definitely was!  You can impress your sweetie with this sweetie!  It's a delicious and light dessert, which is why I named it Strawberry Delight!  


Strawberry Delight


Ingredients:

angel food cake (I used a ready made cake from the grocery store) 
package of strawberries 
2 tbsp. chocolate chips or other melting chocolate (I used semi-sweet chocolate chips)
1 tsp. vegetable oil  (I use this to thin the chocolate for drizzling)
whipped cream for topping - (optional)  (I used the type from a can)


Directions:

Slice angel food cake into serving sized pieces and place on plate.  Cut strawberries in half and then into slices.  Spoon sliced strawberries over the cake.  Place chocolate in a microwave safe bowl and melt chocolate in microwave approximately 1 minute, remove and stir in oil (this will thin the chocolate so it drizzles nicely), continue to stir until chocolate drizzles off of the spoon when lifted up above the bowl.  Drizzle the melted chocolate over the cake and strawberries.  Top with whipped topping.   


Slice angel food cake into serving sized pieces and place on plate.

Spoon sliced strawberries over the cake.

Drizzle with melted chocolate.

Top with whipped cream. (optional)


Enjoy!...


Caramel-n-Nut Grape Bites


When I first heard of this idea it was claimed they tasted just like caramel apples.  I thought "what a great idea."  I knew I just had to try them for myself.  I've always loved, loved, loved caramel apples, so this sounded like something that I needed to try and hoped I would like too.  Let me tell ya...No disappointment what so ever!  And, they were a huge hit when I served them.  

So easy to prepare and it's a great little appetizer or snack.   I served these along with other mini appetizers over the holidays and they were a perfect addition.  Fruit, caramel and nuts, I think that's a perfect combination.


Caramel-n-Nut Grape Bites


Ingredients:

  • seedless grapes
  • package of caramels
  • chopped nuts
  • toothpicks (optional)

Directions:

Melt caramels according to package directions, dip grapes in melted caramel, then into chopped nuts.  Place on wax or parchment paper.   Serve.
(I placed them into the refrigerator after preparing, and then removed them to sit at room temperature before serving.)


Enjoy!...


Three Tiered Stand


This is a simple craft idea that may surprise you when you find out just how simple and inexpensive it is to create!

...___________________...


I had noticed that my daughter had liked a pin on Pinterest for this three tiered stand, so I thought I'd surprise her by making her one for Christmas.  I'll repeat, it truly is simple and inexpensive!

The faux silver trays and candle holders were purchased from the dollar store.  I glued the trays to the candle holders using E6000 Adhesive, it can be found at most craft stores.  The stand looks very nice and I think it's so cute.  We both had a good laugh together when she saw what it was as she opened the gift box.

I have a few ideas for making more of these, and I can't wait to make one for myself.  This would be perfect to use for food or as a dessert stand, as well as a simple inexpensive way to organize items on a vanity in the bathroom or bedroom.  An inexpensive craft project, that makes a great gift too!


...___________________________...


Three different shaped faux silver trays.


Glass candle holders turned upside down (provide more usable space), and glued to the trays.


Bottom view


...___________________________...


Three Tiered Stand

I liked the three trays put together this way, and they would also look great using all
of the same size and shape too.


My crafty mind is on overload with the possibilities!...


Baked Brie Cups

These little treats are bite-sized appetizers that are perfect for the holiday season, entertaining, parties or anytime, easy to make and taste delicious.  I had these for the first time at a holiday party and was I surprised by how good they were, and they only require five ingredients - phyllo shell cups, brie cheese, honey, nuts, and brown sugar.  

You can change the recipe for these by using different nuts, and I've also seen several recipes with using figs, dates or jams, such as apricot or raspberry, or even using pepper jelly.  The first time I had these they were made with chopped pecans, which I do like, but most of my family prefer almonds, so that is what I used for my recipe.  Give these Baked Brie Cups a try for a snack, appetizer or for your next gathering. They are so good that they're additive, and they will disappear quickly!


Baked Brie Cups


Ingredients:
  • 1 package of mini phyllo shell cups (1 pkg=approx 15 shells)
  • Brie cheese - appox 4oz. cut into small cubes 
  • honey
  • pecans, walnuts or almonds chopped or sliced
  • brown sugar


Directions:
Preheat oven to 350.  Place a cube of brie in each phyllo cup, top with a drizzle of honey and a few nuts.  Sprinkle with a pinch of brown sugar.  It's best to not over fill the cups.  Bake for 15-20 minutes until the brie is melted.  Serve immediately.  Use more or less of the ingredients per your preference.


Enjoy!...


Family Christmas/New Year


The house is quiet today...

We had a great Family Christmas/New Year celebration with the kids and grand-kids over the past few days. The house is very quiet today and I miss the extra warmth of having them all here, also the pitter-patter of little feet and hearing those sweet little voices and giggles, and lots of hugs and kisses. We enjoyed having them all here with us and sharing in lots of food and good cheer, our gifts exchange, fun, laughter and maybe a few tears too, some football and having a good time together.

Oh and I must say that I'm also pleased to add that my "Santa baby" said I had been a real good girl, and he brought me a new laptop for Christmas, and I am happily using it right now for writing this! :)  We did get a few photos and I'll add more as I get them.  Enjoy!


Holiday Photos


Family Christmas Celebration 
12/30/12

All smiles and ready for our Family Christmas celebration, and the little girls are ready to open those Christmas gifts! 


Cute little butterflies.  I called them angels.  Their Aunt gave the wings to the girls.


New Year's Eve

Ready for our dinner on New Year's Eve.  We do an Italian style meal for the holiday, a tradition started long ago since we would be turkey-ed out after Thanksgiving.  Roasted Pork Tenderloins, Pasta, Sauteed Asparagus, Stuffed Portabello Mushrooms, Salad, Baked Bread and of course a nice Red Wine. 


New Year's Day

Enjoying some football and hot wings on New Year's Day before everyone goes home.
(Camera phone photos, not the best but a memory of the day nontheless)


Hugs and Smiles...
Happy New year too!


Happy New Year


A very Happy New Year wish to Everyone! 
May you be blessed with abundant good health, happiness and love!


~ Tammy ~


.

.

.

.
Tammy is the design enthusiast behind the blog, Tips, Treats & Treasures, where her creativity is explored with a mixture of her artistic abilities and style through her home decorating, thrifty finds, DIY and creative craft projects, along with her family favorite recipes. She shares through her blog her ideas and helpful tips on everything she has learned over the years and much of which she is passionate about in the hope of inspiring others, with her own unique style storytelling.