Thoughts and Things - This Week ... Where does the time go?~Birthdays, Babies & Brownies


Where does it go?  It seems unreal that our first grand is nine already.  She is growing up so fast!  We were supposed to celebrate her birthday with her last weekend, up in Greenville, SC.  However, due the winter storm that stole our plans, we had to postpone.  We managed to try again with great success today, I'm happy to say!


And just look how happy she was about it.  Two birthday-days aren't so bad after all. 


I treated her to my special, fancy Brownie (I prepared two, one with walnuts and one without), instead of the typical birthday cake.  She was very pleased about that too!  A few candles added, along with all of us singing her the "Happy Birthday" song, had her smiling as well.


A wish was made, and then out went the candles!  I think she may have wished that she could eat the whole thing!


She and little Sis posed for a moment, so I could capture their beautiful smiles!  I'm quite sure they were babies just a minute ago!  Nine and five now, how did this happen?


Their momma was just my little baby not that long ago, as well.  Now she is over 21, and like her mother she also enjoys a nice glass of wine.  And now we both can enjoy a glass together!  But, I'm not gonna state our ages!  Well OK, she is uhhhh, 29 ... and me, I am not much older!  OK?  Got it?  

That's our story and we're sticking to it!  ;)


Where does the time go?...


A touch of "Winter" decor


After the holidays are over and all the holiday decorations are packed away until next year, that is when the winter really sets in, for me.  It's cold outside and warmth is what I seek.  I will admit that I'm not a huge fan of winter, that's no surprise if you know me!  But, it is a part of life and so I find a way to struggle on through it with immense anticipation of the first signs of spring.

This is also the time when there is a clean slate to work with when it comes to home decor, a starting over point, of sorts.  There's definitely a noticeable change in the scenery outside and winter is clearly visible.         


I gave my display shelf a "winter" make-over.  I think it is a reflection of what I see outside, and what I'm feeling on the inside.  Brrrr!  


Over at the 'Bar area' I added this warming message to my  fancy chalkboard.  I think curling up by a nice warm fire and having a "toast to warmth" is a perfect idea!


I hope you are warm, wherever you are!...


You may also like these links:


Celebrating our LOVE for others

With having a day next month that is all about hearts and love, I got to thinking about the things we do in celebrating our love for others and the many ways of showing and expressing it, not just in February, but all throughout the year.

~Giving a "just because" gift to someone you love is always nice.
I like it when I find an item that reminds me of a loved one and I just have to get it for them, and seeing the joy on their face upon receiving it!
Baking something yummy and delicious that I know they love, maybe using a favorite recipe.
A bottle of wine or bubbly to enjoy after a long day.
Surprising them with some of their favorite candy, sweets, or chocolate.
A plant or flowers to add to the home or garden.
A card that expresses my love for them.

~Some just 'because gifts' are not actual items at all.
I find it rewarding to do something special for someone.
An invitation to meet and enjoy lunch or dinner, perhaps at a favorite restaurant.
Offering to give a couple with children a night out alone together, providing child care for them.
A phone call to catch-up, to lend an ear and just listen, or simply to say "I'm thinking of you!"
A big HUG.  I am a hug-ger, hugs can always be expected from me!
A smile, it doesn't cost a thing, and it's very contagious.  And, laughter is too!
Show your appreciation for what others do for you, with gratitude.
Compliment their efforts, achievements, and also their appearance.
Be thankful, kind, and considerate.
Say the words "I love you" out loud, and often!
Small simple gestures with big impact that can brighten someones day.

 ~*~  ~ *~  ~*~      


I enjoy decorating my home and also re-decorating it, too.  That is very apparent for anyone who visits or reads my blog.  I like sharing ideas and tips on home decor, and helping others with what I have learned over the years, both personally and through my blog.  I enjoy sharing my home with my family and friends, and hope they feel a sense of warmth and welcome when they are here.   I feel that my home, and my home's decor, is a reflection of me and my tastes.  It's a part of me, part of the things I love, and part of my heart.  I put time and effort into making my home something I love, and I share it with those I love.

When family and friends are in my home I want them to enjoy being here and have the feeling of wanting to stay a while, being comfortable, relaxed, and most especially, loved!  Having them be a part of my life is important to me and worth celebrating, any day or anytime.  Sharing my home with those I love and care about is one of my favorite ways of showing them my love and appreciation for them.  Whether it's just relaxing on our porch together with beverages and good conversation, or preparing and sharing a delicious meal to enjoy together.


To add to our dining experience, I enjoy setting an inviting table in our dining room, with candles and a beautiful floral arrangement as a focal point.  I love flowers and using them in my home, so I've always enjoyed making my own floral arrangements, often using artificial or faux flowers.  But, I also use fresh flowers, and occasionally combine both fresh and faux.  Fresh flowers make an ordinary day extraordinary and add a special touch. Sometimes I find fresh flowers at the local grocery, it's hard to pass them up once they catch my eye and I literally "stop to smell the roses!"

I recently learned of a flower delivery service.  They reached out to me with the idea for this post.  Upon visiting their website you can enter your zip code to find local florists and unique floral designs that are available.  They also have a blog with a vast amount of information on flowers, and lots of inspiration for those like me who like to make their own arrangements.  But, if you want a professional to do the job for you, or you are planning to send flowers, check them out!  BloomNation, "Unique blooms that are always hand delivered and always local."

~*~ ~*~ ~*~  

I believe flowers are another way of expressing love, whether growing them in your garden to share with those that visit and view them, having them on display in your home to enjoy their beauty and fragrance, making something crafty using flowers for your home or someone else's, giving or sending flowers to lift someones spirit, celebrate their birthday, special occasion, or just to say..."I love you!"

Like flowers, love too, should always be blooming!


Winter Centerpiece


While wondering what to use for a centerpiece on our breakfast table after the holidays were over, I knew I wanted something to dress up our table for the winter season.  So, I went on the hunt around my home for inspiration and ideas.  I like a "use what you have" approach when doing quick change decorating.  That is what I did here for my winter centerpiece.  I put a simple one together in just minutes and I'm happy with what I came up with.

I used one new item though, but it was a gift!  My daughter gave me the bronze hammered tray for Christmas, and I'll tell you I hinted pretty hard that I wanted that beautiful tray, plus it matched another smaller half tray I already had.  Funny thing is, she told me after she gave it to me that before knowing I really wanted the tray, she had already gotten it for me!  So, it was truly meant to be! 


I like the winter feel of this simple centerpiece, and that it has a bit of a tone on tone look.  A sparkly cloth napkin is tucked beneath the wire basket holding a glass candle holder, a sparkly candle inside serves as a base, and lift, for the glass votive candle holder with votive candle.  I like to layer items, I believe it gives more interest.  And, using items to heighten or lift other items, adds interest as well.


I often use flowers, whether fresh or faux, I love flowers and using them throughout my home.  I realize though, there are some who choose not to use flowers in their home decor.  So, I thought putting together a centerpiece without flowers would be doable and also give an example idea for those preferring to not use flowers.
    
I added some cotton around the base of the basket for a wintry snow effect.  I placed some of my lightened pine cones around the basket because I thought they worked well with the over all color and I like to include them in my decorating.  Pine cones especially work well when using them around the holidays and during the winter.  Visit my post on "How to lighten pine cones" if you want to learn how I did mine.  Adding sprigs of greenery gave it a bit of color and worked well with the pine cones, and added to the winter look.


You may have already seen and remember my Christmas centerpiece...


   I shared it in the Christmas Decor 2015 post, I used the smaller half tray for that.


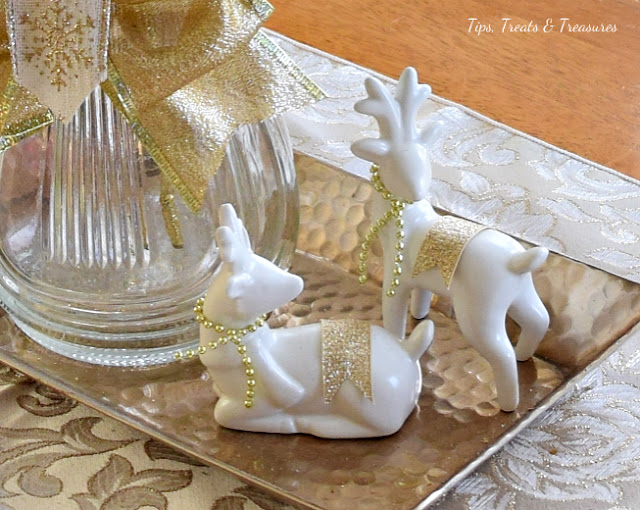
This close-up shows the tray a little better.  I thought about keeping my reindeer out a little longer to use for winter, but instead they were carefully packed away for next year!  Originally a plain white salt and pepper set, I added some sparkle and dressed them up for the holidays.


Yesterday while shopping I was happy to notice, and quickly score, another of the square trays (the last one), so now I have three of them, two large square trays and one smaller half tray.  *smiles*  


In doing something different, I went with my quick and easy winter centerpiece.  I achieved my desire for a centerpiece that didn't cost me a thing and took only a couple of minutes to create.   That's my favorite kind of decorating!


Happy decorating!...


Add Sparkle to Chandeliers & Lamp shades

On a recent visit to the craft store I happened to notice something to add a little sparkle to lamp shades.  I have a chandelier I was fortunate to discover a few years ago at an antique shop.  All it really needed was a little TLC with some new wiring and new lamp shades, which with hubby's electrical skills and my good choice of shades, it was quickly good as new.  And, I really love it!  

Now ...back to present day, or to just a couple of weekends ago actually, when I found something I didn't even know existed, let alone that I needed!
Well, OK, wanted.  Something that sparkles.  Sparkle...for my chandelier!
And, I really love sparkle.  Yes, I do.

What I found are Shade Charms, magnetic lamp shade ornaments.  These can be easily added to lamp shades.
There is wire in those lamp shades, ya know? ...so these little beauties just magnetically *click* on to the bottom of them.  Adding a bit of glamour to your lamp shades!


However, I chose to add the charms to my chandelier instead of the shades.  If your chandelier is metal, as part of mine is, the charms can easily be added to the chandelier just like I did for mine.   And, doesn't it look fancy all dressed up with those pretty charms?!


I sure think it does!  It's like added jewelry for my chandelier.

Here's a close-up of a charm, the little silver part at the top is the magnet.


This is what the package of Shade Charms looked like.  


I'm thinking that I must have more of these now!


Notice in this photo below where I added the left-over of the five in the pack to the bottom of my chandelier, and well, now wouldn't you know I'm considering adding more there?


Although I was a bit disappointed that only part of my chandelier is metal (the scrolls), and the lamp shades of course.  I had thought the charms would also look nice under the round part that is just under the white tubes, but sadly it isn't metal there, either!  UGH! :(  And the very bottom also is not metal, which I considered using the fifth charm for. 

I do like the added sparkle on my beautiful chandelier.  And, now to decide, should I get more or not?!  One of those forty-percent off coupons will most likely come into play in helping with my decision.  I'll be considering it, for now!


Here's to adding a little sparkle!...


~A Dog's day~ Aeon is three!


Our Boy is three today.  Happy Birthday to Aeon!

Everyday is an adventure with this happy dog.  And, we are happy having him be a part of our lives, adding so much joy with his personality, faithful companionship and most of all, his love.
He's quite entertaining, good natured, and is very sweet.


Posing perfectly for a birthday photo.  He is such a handsome boy.
I love his big smiles!


And, I love this sweet face too!  He's so adorable.


We love our Aeon! 


Let's build a Snowman!

Well, I'm feeling grateful that our winter weather, dare I say, hasn't been bad so far.  In fact it has been fairly warm for the most part.  Although it has been cold over the first week of our new year.   It seems that the true feel of winter here in our area is usually January-March, with an occasional snow, or extreme cold.  Snow!...I said the S word!  It will probably happen sooner than later!

Speaking of snow, we didn't have any snow during the Christmas holiday, but it didn't keep me from building a snowman.  I had a few people curiously ask me about the little snowman I featured in my Christmas Decor-2015 post, asking how I made it.  I hadn't thought about doing a tutorial for the snowman, however, with the current interest in it I wanted to share the details of what was used and show just how simple it was to put together. 


Here's my snowman on display in the corner of our kitchen.


I had mentioned that I used stove-burner covers to make my snowman.  I was pleased that it was so easy and that it turned out so cute.  It truly made me smile every time I looked at my snowman.


I used a couple of old stove-burner covers (I had hung on to), to make the snowman, one small and one large.  (Bless my hubby's heart for putting up with my "I might use those for something, so don't throw them away" mentality!)  I literally put my snowman together in just a few minutes with a few items.  I used a binder clip to hold the two body pieces together, clipping them at the edges on the back side.

The binder clip worked well so I moved on to planning what to use for creating a face. 


Magnets came to mind for the eyes and nose since the burner covers were metal.   I quickly found two for the eyes and and a smaller one for the nose.  I needed a hat and scarf now.  I bought the knit hat from the dollar store, and had the other items on hand already.


While wondering what to use for the mouth, a piece of yarn fell from the hat onto the face and it just looked like the perfect mouth shape, so I went with it and simply added a tiny bit of Thumb tack reusable putty to stick it on.  I couldn't believe my luck!


I used a mini plate holder to sit the snowman upright for displaying on my counter top.  I am sure I could have come up with another idea for hanging the snowman too.  Perhaps a small binder clip attached to the top would have worked for that?  


A holiday ribbon of green and gold wrapped around a couple times made a festive scarf for my snowman and finished it off perfectly.  He is staying around a little longer after the holidays because I just couldn't part with him just yet, and it is still winter after all!


This was the easiest snowman I have ever created!  And, I stayed nice and warm, and dry too, in doing so!


Happy crafting!...


A New Year!


 ~Happy New Year 2016~ 

Here we are in a new year, welcome 2016.  I hope this year is a great one for everyone!  Time to say goodbye to the past year while we hold onto the memories and make more memories in this new year ahead of us.  It always feels as if the year flew by so fast, it has me wanting to slow down and savor each new day, and every moment.

And, with each year as we make New Year's resolutions, or promises to do this or that, or do it differently or even better, we get another fresh start to do it again!


Happy New Year!...


.

.

.

.
Tammy is the design enthusiast behind the blog, Tips, Treats & Treasures, where her creativity is explored with a mixture of her artistic abilities and style through her home decorating, thrifty finds, DIY and creative craft projects, along with her family favorite recipes. She shares through her blog her ideas and helpful tips on everything she has learned over the years and much of which she is passionate about in the hope of inspiring others, with her own unique style storytelling.