Showing posts with label Painting. Show all posts

Thrifty Painted Medallion Transformation
~ Simple makeover using paint & wax!


I transformed this beautiful medallion with a makeover using paint.


~*~


I picked up this medallion for two dollars at GW.

I knew I wanted to paint this the second I saw it! I’ve added a few images of the process. And isn’t it lovely with its new look?!


~*~


I gave this a layer of white chalk paint then after dry, distressed it using an emery board nail file.  Next I gave it some clear and dark wax and then did some buffing with a soft cloth.

~*~


It’s now the piece I envisioned it to be! I love the details and how the distressing and wax make them pop! I’ve seen similar pieces for twenty-five dollars and up!

Using chalk paint and wax is the easiest way to transform a piece!  Don’t be afraid to give it a try!


Thrifty Table Makeover

I truly enjoy refurbishing furniture and decor items.
This sweet little table is one I recently completed, I found it at a thrift store for five bucks!

I knew I could make it beautiful by giving it some TLC and chalk paint!


~*~  ~*~  ~*~


It had potential, and I had a vision!  I loved the style, and the iron and wood combo.


First I prettied up the wood top with chalk paint.


And then decided to give the iron a dry brushing of chalk paint too!


I love the new look, and isn’t she so pretty now?!  I mean, I believe she must be a "She" with all those pretty curves!;)

As I so often say..."Don't be afraid to giving painting a try!  It's the easiest way to transform an item!


~ Hope you find some joy today!


Chalk Painted Mason Jar

Well I've painted quite a few things using chalk paint, but this is a first for me!  A Mason Jar!


I've seen a few painted vases and mason jars and wanted to give it a try.  I knew this jar was going to be perfect to chalk paint.  And isn't it so perfect for Fall?!  I found this one at a thrift shop for under a dollar!


I was so excited after distressing it I wanted to share my beautiful results!  I gave it a coat of Americana Decor in the color Timeless, it's a favorite color choice of mine, after white of course!  After the paint had dries I gently wiped/rubbed away some of the paint on the raised areas which really enhanced the design and lettering.   Such an easy project and what a nice transformation!  I'd read and heard that using chalk paint on glass works well, and I definitely believe it now after having done it myself!


I love the magic of paint!

Hello Fall! Hello October!


It feels like Fall is getting here. We had a beautiful last day of September yesterday.  I can't believe it's October 1st already!


Pumpkins are a sure Fall statement. I'm adding some Fall touches and these sweet pumpkins I transformed.
I love the neutral toned pumpkins and Fall decor available these days.  Some of those pumpkins can be a bit over priced or hard to find just the right ones!  I gave some inexpensive orange pumpkins a makeover using chalk paint.  They're much more to my liking and more my style now.  Such an easy way to change their appearance!


I used two different colors of chalky finish paint by Americana Decor, Everlasting, and Timeless.  I liked that the Everlasting was white, and the Timeless was beige.

I painted on the beige color first, then let it dry completely.  After the paint dried I dry brushed (minimal amount on paint on the brush) on a layer of white paint.  Before the white paint had completely dried I wet sanded it, (-simply meaning, wipe away some of the wet paint) on the raised areas, leaving some paint in the recesses and creases.  I like the look it gave the pumpkins.
Typically I would use wax after painting, but chose not to use the wax on these, because I liked the chalky look.   It's hard to imagine that these pumpkins were once bright orange with green stems.

It was so simple to do, and just took a little of my time one afternoon.


I love the magic of paint!


Terra-cotta Pots - Chalk Painted


I often say "if you don't love something the way it is, it can probably be painted!"
That's exactly what I did to these terra-cotta pots! I picked up this faux plant pair at Hobby Lobby on a 'half-off florals' week. I loved them, but knew I'd love them even more after I painted the orange-y terra-cotta!


I used white chalk paint, clear and dark wax to transform them. I'm so pleased with the way they turned out and really, really 'love' them now!


This is how they looked when I brought them home.  I liked their style and size, and felt I would get to use them year round in my decor.  I wanted to lighten them up, and give them a look that would work better with my decor.


I first gave them a coat of white chalk paint, and then let them dry thoroughly.  After the paint was dry I applied a thin layer of clear wax.  I let them sit awhile as the wax dried and then gave them a buffing with a clean dry cloth.

I wanted a different look, slightly darker than the bright white, so I added small amounts of dark wax in a few places at a time, then quickly wiped away the dark wax.  Another buffing with a clean dry cloth gave me the result I was after.


That's more like it!  This was the look I was after.  So much better if you ask me!


They are now much more my style and coordinate perfectly with my neutral decor!

Have you painted anything lately?


~I love what a little paint can do!


Painted Pumpkins


While planning a Fall table setting in our dining room I wanted pumpkins to match the decor in there, which is basically neutral.  My neutral lovin' heart really enjoys the fact that there are a variety of different colors and tones of pumpkins available these days.


I have nothing against the typical colors of fall, or orange pumpkins, and I've used them for my Fall decor in the past.  This year however, my preference was to use lighter colored more neutral pumpkins, in our dining room.  I found some little creamy white pumpkins at the grocery and I just love them, they are the sweetest things, they're called "baby boo pumpkins."  I looked for some larger pumpkins of that color, but didn't find any at the time.  

A visit to a couple craft stores for artificial cream or white pumpkins, led to finding some that were larger than I'd wanted, and they just didn't have the look or feel I was going for.  My 'plan b' would be to just paint some pumpkins instead.  I've had great success with painting some little artificial pumpkins before, so I decided I'd do that.  I wanted to share how easy it is to paint pumpkins.

I found a pair of the perfect sized pumpkins at HobbyLobby and with the forty-percent off Fall sale, they were very reasonable.  Plus I liked their un-perfect shape and the stems were quite real looking too.


My finished pumpkins were just perfect.  The end result was exactly what I had in mind!  Chalk paint and a little of my time spent painting one afternoon was all it took.


The pumpkins started out looking like this one pictured above.  They're not bad or ugly, or anything, I just wanted a different color instead.  This burnt orange color is actually a beautiful color.  I felt a little guilt at the thought of painting them, well maybe for a only moment, since I had envisioned them with a different beautiful look after painting them!


The paint I used is DecoArt-Americana Decor chalk paint, the color Timeless.  It's a dreamy color if you ask me!  I applied the paint using a painting sponge/brush, and then used an artist brush to paint around the stem so I could get nice and close to it.

I had just begun to paint and got to thinking about painting the bottom of the pumpkin, and how I would have to wait for the top to dry first before turning the pumpkin over when dry to then paint the bottom.  I quickly tied on a nice length of jute twine to the stem and figured I could paint the whole pumpkin all at once while holding the pumpkin by the stem...


...and by simply having tied the twine to my cabinet door it could then hang as it dried.  It worked well and I was quite pleased with my great idea!  I do amaze myself sometimes ...as well as amuse!


After the first coat was applied on one pumpkin, I started on another that I'd also hung from a nearby cabinet.  I applied two coats of chalk paint on each, with dry time between the coats, which was only about a half an hour.


And, here is one after the second coat of paint, and while drying.  After the pumpkins were dry they were exactly what I had wanted, the color was perfect! 


I couldn't be happier with the results after painting the pumpkins.  It was so easy, and quick to change the look of them.  I love chalk paint, it is magical!  I decided they were perfect as is.  I didn't do anything further to them.  I didn't use any wax or other layers of paint color, as I have in the past when painting other pumpkins.


Here's a peek at the painted pumpkins on our dining room table.  The color really is so perfect!  I can't wait to complete my table setting.   


I'll be sharing more on that soon!...


Hello Fall!
...time for fall decor


OK, it's official today ...{ per the calendar, anyway! ;) }   So, I've been busy digging out pumpkins and such.


These sweet little pumpkins got a make-over last year using chalk paint.  My love for neutrals had me loving them all the more once I'd painted them.  They're so cute!  I think they look perfect just sitting on these glass candle holders and displayed on a tray.  This little vignette will do for now, as I plan some Fall season decor changes to come.    


It's time to say "Farewell to Summer," and time to fall for Fall!


A Fix for the Fixtures


I'm always singing the praises of paint and what it can do, how it can change things.  I love the magic of paint!  I've learned that when I see something, and perhaps if I'm not totally liking or loving the way it looks, I find I can change it by using paint.


I wanted to share another example of that.  I loved these light fixtures and they were a huge improvement from the original fixtures we had in our master bathroom.  They were perfect ...well, almost.  The silver color on them wasn't going to go so well with all the gold hardware and faucets in our master bath.


Gold paint to the rescue!

I had some acrylic paint in the color metallic pure gold on hand in my paint stash, which I had picked up at the craft store for another project.  I figured it was the fix to my problem.


I dabbed a very small amount of paint onto a thin dry paint brush and gently wiped gold paint over the silver.  I tested a small spot, and then another, and another, and kept going from there.  I repeated that until I got the desired look I wanted.  Now I do have the perfect light fixtures!


I am truly loving the look of the light fixtures, now.  There are actually two of them, they look the same except the other fixture only has three lights on it.  I am so pleased with the results, that I took a chance and I did it!  Now I can even say I have a unique pair of light fixtures, too!


I really love the magic of paint!...


Tray Chic - Thifted Tray Transformation


I love a good makeover.  This one happens to be one that I am especially fond and quite proud of.  This is my latest project, and what a beauty it is!  It is one of my favorite transformations.
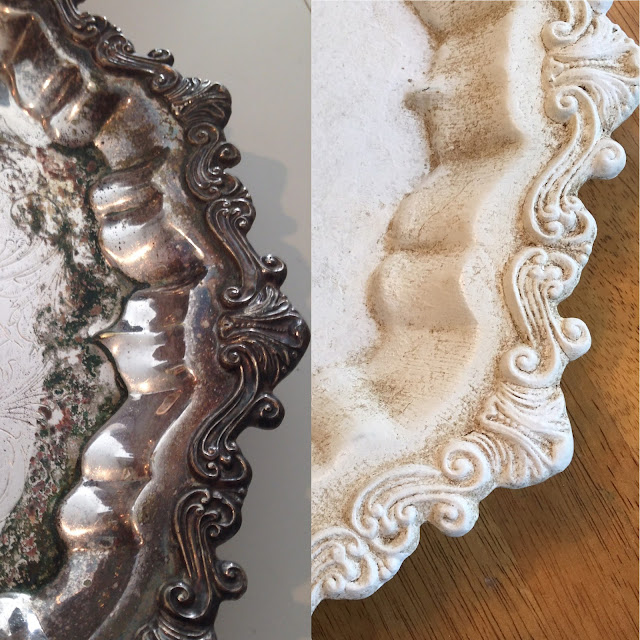


This beautiful tray was a discarded item.  I took one glance at it and had to grab it up quickly to bring home and give it a new look.


  ~*~ ~*~ ~*~

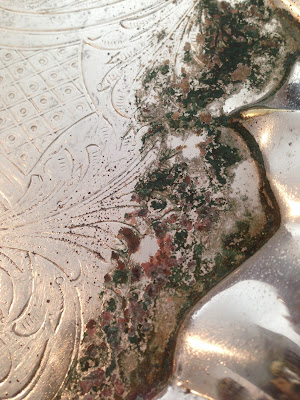
I'm sure it was once a beautiful silver tray, but, when I found it it had rust and damage that had it looking disgusting, ugly, and ruined.  It was easy to see why someone might have considered it trash and had given it away.  A major score for me at a mere six dollars!


Some of the finish had rusted away, leaving it in such a state that simply polishing it wouldn't even have brought it back to looking great again.  But, I had a vision for it, and couldn't wait to make it happen.  


A before and after close-up, what a difference a little time and effort made for this.


I cleaned the tray as best I could by giving it a wipe down with damp paper towels, and then a little scrubbing using a small piece of steel wool to remove some of the rust.  


I applied two thin coats of Chalk Paint by Annie Sloan in White, allowing dry time between coats.  This photo is after one coat that had dried.


After the second coat of paint was completely dry I applied Annie Sloan Clear Wax, buffing it in as I went along in small areas at a time.  Next I applied Annie Sloan Dark Wax in the same manner, applying first with a paint brush and then wiping some of it away with a soft cloth, leaving what I wanted in the areas that had more detail and to add depth to them.  


To finish, a final buffing with a soft clean cloth all over the entire tray to set and bring up the sheen of the wax.


So pleased with the results!  A beautiful trash-to-treasure makeover.  It truly is a beautiful piece now, and is one that I'll treasure.


I have it in the center of our breakfast table for now to show it off.  I smile every time I look at it.  It's a beautiful addition to my home decor.  I'm so glad I found it and was able to give it a makeover, and some much needed love!


Thrifty Treasure - Thrift Store re-do item
- Metal Letter 'M' -

I had the pleasure of doing a little thrift/antique shopping with my daughter over the past few days, and I have to say "I'm so glad she has inherited my same love of finding thrifty treasures and thrifty items to re-love."  The thrill of the hunt has surely been passed down to her honestly.

We were even competitive with who saw it first, or more so she was perhaps, by trying to stay ahead of me while we were hunting.  We have some similar tastes, so there were things I saw first, and things she saw first, and got the jump-on.  I handed over a cute little "Welcome" sign to her, that I saw first, 'cause I knew she really liked it, too!

One of the items spotted was a large Metal Letter 'M' marked 50% off, and I almost loved everything about it.  That is part of the appeal with thrift/antique shopping for me, if I don't completely love something I am always thinking of how I can make it an item I will love by changing it, usually and most often by using paint!  My wheels were spinning with ideas, so, with it being only six-bucks I decided I would get it and plan to make it something I loved.   


There was a chalk-y green colored top-coat with a metallic-gold color shining through from underneath.  I wasn't overly fond of the look so I got an idea the next day while thinking of transforming it by re-painting it, but, instead of painting it, how about removing the paint or un-painting it?!

Well, that is what I should call it because I decided to use a little bit of acetone nail polish remover on a paper towel and lightly rub off some of the green top coat it had on it.  (The picture above is a view from the back, since I started to remove the paint on the front prior to taking a "before" photo.  The color shown is what the front originally looked like.)


I continued using small amounts of the acetone dabbed onto paper towels.  The more I removed of the top green color the more I liked the look.  The metallic gold showed up much more and as I rubbed off more of the paint I got a bronze tone in some areas, and also with pressing harder in places I got down to the original black.  


The final look was even better than I had imagined, and the "M" now has a lovely color combination of gold, bronze, black, and just a hint of the green, with a sort of patina look to it!  The gold really shines through!


It looks perfect next to my beautiful gold mirror.  It's truly one of those "you have to see it in person" to see the real beauty of it!  By removing some of the paint on part of it, I made it all the better and now it fits in nicely with my decor, and it's something that I really do love!


.

.

.

.
Tammy is the design enthusiast behind the blog, Tips, Treats & Treasures, where her creativity is explored with a mixture of her artistic abilities and style through her home decorating, thrifty finds, DIY and creative craft projects, along with her family favorite recipes. She shares through her blog her ideas and helpful tips on everything she has learned over the years and much of which she is passionate about in the hope of inspiring others, with her own unique style storytelling.