Fabulous "Faux" Flowers


I love flowers, and using them in my home to add to my decor.  Fresh flowers always add a nice touch.  There are some people who are fortunate to have fresh blooms from their garden to use indoors.  But those are not always available year round, and let's face it, buying fresh flowers can be quite expensive and they don't usually last very long.   And, what's one to do in the winter when there's nothing blooming outside?

Well, for me, as someone who loves flowers and using them in decorating my home, I look to faux.  


Fabulous "Faux" Flowers


____________________________________________


These days there are many different types of faux flowers, stems, plants and greenery available, and they're so easy to find.  You can use faux flowers and greenery and have them look fabulous if you shop for the best ones that don't look so fake!  There are many different types of gorgeous artificial floral goods available that are very impressive and look quite real.

These too can be expensive.  But, you can shop around and find many discounts, weekly sales, after-holiday and end-of-season sales that can make buying faux very affordable.  And you can do it over time to add to what you already have. 


My advise when looking for a more-real effect, it's often best to use faux flowers that are the type that would be in-bloom outside or what is in season.  There are many varieties that are what you would easily find at the local grocery too, and those would be the exception.  Think roses, tulips, carnations, to name a few.  Meaning - you can usually find these types of fresh flowers readily available year round.

I look for faux flowers that have varying shades and blooms, those types appear more natural and real.  If every flower is the same size, shape, color, etc, they won't look very real!  Use a variety of different types of faux flowers, stems and greenery.  Just remember if it looks plastic-y and fake to you, it will most likely look that way to others as well!


Faux flowers don't have to be boring either.  I like to add a mix of flowers and greenery and other items to an arrangement for a more realistic look.  This arrangement is one I like to add to and change often by using different elements, with different types of faux flowers, dried roses, pine cones, small ivy, etc, as is pictured.  I change it up for the holidays and different seasons by adding items that reflect what holiday or season it currently is.

Your faux flowers can appear quite real if you spend some time and care arranging the petals, stems and leaves.  Open up some of the blooms if you can, spread out the leaves and maybe bend them, and also the stems.  Just sticking them in a vase they will most likely look fake. 


Display adds to the look as well.  How or what you use to contain the faux flowers can scream 'fake' too.  It's best when you have proper proportion for your arrangements, for them to not be more than twice the height and width of your container.  If using clear glass add something to the bottom as filler - rocks, colored glass beads, moss all can make it look much nicer.  I've even seen others use water in the vase to add to the illusion of fresh flowers.


Today it is perfectly acceptable to use faux flowers in your home decorating, how you display them however, can make all the difference in their appearance.  Make your faux flowers look fabulous!


Happy decorating!...


Thoughts and Things - This week ... Summer, Summer, Summer & Father's Day


And then it was Summer!


It's certainly getting a bit warm!  Here in Hotlanta it's feeling like ninety-seven while the actual temp is around ninety-two at the moment.  We have begun our official 'Spring into Summer!'  As they say it down here in the south ...Summer is here y'all!

I picked up this indoor/outdoor thermometer on a recent visit to the home improvement store.  Now I can just take a peek out on the porch before I go out, and I'll know just how hot it really is!  Today as you can see it was topping ninety degrees as it has done for well over a week.  My little bargain of a thermometer is supposed to hang on the wall, but I sat it in a plate stand instead and now I'm able to place it in perfect view upon a shelf on my porch. 


*** *** ***


All about Dad!

I hope everyone had, and enjoyed, a Happy Father's Day.  We celebrated it on Saturday with one of our daughters and her fiancé.  We all enjoyed homemade pizza cooked on our Big Green Egg.  Sorry no photos.  I was all about enjoying the time together and the eating of that delicious pizza!  I shared photos recently of our first go at preparing pizza on the BGE, and this time was surely as good or even better.  

We made a couple of pizzas with pepperoni, shredded mozzarella and fresh mozzarella cheeses, and fresh basil.  Also we fancied it up a bit with one pizza that was prepared with prosciutto, arugula and both of the mozzarella cheeses - a request from the newly engaged couple. ;)  It was quite delicious!  We will do that again for sure.  It was different, but very tasty.


The daughters delighted their Dad with Father's Day gifts to use on or near the BGE... 


One daughter gave 'Dad' a pair of racks to prepare chicken wings on. Looks like they'll be a huge helper with cooking up some tasty hot wings.  Can't wait to give those a try!  Like soon!

Our other daughter gave him an accessory to attach to the BGE-table, it holds utensils, paper towels and even has a handy shelf/tray for condiments, seasonings and more.  I like that the accessory gives him a place for items to use on-the-ready, while also being neat and out of the way!   


And, I found a gift that I thought was a good idea...


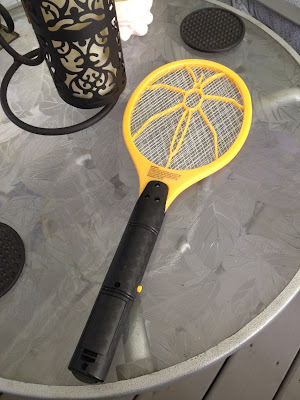
A Bug Zapper!   It's a hand held one that looks like a racket and uses two AA batteries, and at the press of a button, along with a swing through the air, it 'zaps' bugs dead!  Please don't hate on me for this!  The June bugs are out in force already and this will definitely be in use as a force against them!  If you have ever had a June bug in your hair you would be glad to have one on these on the ready let me tell ya!

He really liked the gift and let's just say he was like a little boy with a new toy though.  I was like a Mother reminding him it wasn't!!  Oh geez!  Hopefully I won't have to separate the two of them!


Wishing everyone a fantastic summer!...


Saving Money the "Wholesale" way


Do you have a wholesale club membership?


I do, I have a Costco membership.  I re-new it every year.  But, I have to admit to not using it as much as I should.  I do always ask myself after I have been shopping there, "Why don't I go there more often, or even regularly?"  Honestly, it's that although I have two locations that are both about the same distance from me, they are about a half-hour drive away.  I have the other big name warehouse store right around the corner from me, but I do prefer Costco.

*** *** ***

My friend Clark Howard, well, he isn't my personal, actually ever met him friend.  But, he is dear to me just the same.  You see if you don't know who he is, he's the go-to-guy to listen to when he has something good or even not so good to share.  He offers tips and helpful information, whether it's about something you need or need to check-out, something to steer clear of, or something you must have.  I first learned of him on our local news.  
You can follow Clark Howard on his website if you like, and on other social media from there.

The reason I made mention of him is because recently, Clark featured an article that got my attention, "9 Items That Will Pay For Your Costco Membership," originally written and shared on saveoutsidethebox.com.  After checking it out, I asked myself again, "Why don't I go there more often?"  It's really a no-brainer.  Saving money is always a motivator, or at least it should be!

Tires, gas, movie tickets, luggage, rotisserie chicken, pizza, were some of the items listed.  
One might never have thought to purchase tires at Costco.  I read that they often offer $70 to $80 off certain brands, along with free tire balancing and rotation, plus free flat repairs.  And, they do stand behind everything they sell and offer a money-back guarantee.

Speaking of guarantee, Costco offers a free refund for the full cost of the membership fee if you're ever dissatisfied with your membership, at any point.   There's plenty of savings to be had with the basic membership - the Gold Star Membership - but those who shop there more frequently can benefit even more with the Executive Membership and earn an annual 2% reward or more!  My daughter and her husband validated this bit of info since they know first hand by getting reward checks from Costco.  They are huge Costco shoppers, and fans!

Among the list of nine items was also wine.  That's always an attention getter for me.  I do love wine, and saving money when buying it is definitely a plus.  I have scored some great deals on wine when shopping there before.  I learned there is even a blog featuring all their wine at costcowineblog.com, how cool is that?  I have that link bookmarked in my favorites now for sure!

I never knew you could save money on movie tickets at Costco.  I'll also be checking out that deal.     

I have gotten some fantastic deals at Costco.  One deal in particular is a nice camera the Hubby got me last Christmas (along with a little help from me picking it out, and also from my SIL who saw the deal and shared it with me).  I realized the savings on that purchase alone covered my membership fee for last year!

All this great info has me wondering even more about what all I'm really missing out on, along with getting my membership fee covered via the savings!  I hadn't quite looked at it like that before, and now I'm thinking of the money I could, or should be saving!        


I'm off to Costco to see what latest and greatest bargains are available!...


~ Our Golden Boy Aeon ~


Here was just relaxing and looking very majestic on the patio, and begging me to take a picture!

~Our golden boy Aeon is maturing well and has become such an important part of our lives.  Aeon is now two and half and his weight has been staying around 85-90 pounds.  His beautiful coat has been filling out nicely and is always changing with growth.


A close-up of the same photo.  Such an easy subject to photograph, and such an easy face to love!

~He is a gentle giant with a very good nature.  He shows us his desire to be with or near us, at our side or in sight constantly.  He has such a loving spirit about him.  Eager to please, and always happy to greet us upon our return.  He lives for doggie cookies, walks, and lots of love and attention!  We adore him.


He is very loved!...

CHALK it up to paint!


I have fallin' in love!  Not in a way that the Hunkband would need to be concerned about it ...but, then again, maybe?


I might be a bit late to the party since for a while I have been seeing a lot of inspiration using chalk paint, and let me tell ya, I am now a hands-on, experienced user of the stuff and I'm loving it!!  I mean it, I love, love, love the stuff.  Yep, maybe Hubs should be a little concerned because I may just paint everything in sight!


I picked up these frames for next-to-nothing at the thrift shop and I knew exactly what I would do with them.  They were gonna get a transformation!  I really like the detail and thought they were perfect, well, they would be soon anyway!  I picked up some chalk paint on a trip to the craft store and then I couldn't wait to get started on my project.  


The detail is what really caught my eye!


This one also has great detail and I like the oval shape as well.


This is the chalk paint I used, you can find it at most craft stores.  I also picked up some of their clear creme wax and deep brown creme wax at the same time.  It's another layer of awesomeness that goes with using the chalk paint.  More on that after the painting!


I began applying the chalk paint by almost dry brushing it on.  This is where I got more excited about this project, because I then wiped off some of the paint using a paper towel along the detail area.


See what is happening?  That is exactly what I had envisioned!  


So, I continued adding more paint.


(I figured these would photograph better with some contrast for the background!)

I painted two light coats, letting the paint dry between coats.

-While researching info on chalk painting, one user recommended very lightly wetting the paint brush tips with water prior to dipping into the paint, before painting the additional layers.  By doing this it goes on smoother after the first coat has dried.


I pulled the paint off of the textured areas by using a dry non-scratch scrub pad, the type used to clean a non-stick pan or one that won't scratch dishes.  The green ones are very popular and do scratch so don't use those!!  I carefully buffed across the texture on the frames and revealed the gold/brass underneath.  


Now this is what I had in mind for these frames, the texture and the gold really pops now!


Here is a photo of natural bristle brush and the scrub pad I used!


Then came the deep brown creme wax layer.   (The wax actually feels like thin paint rather than wax, by the way).  I lightly brushed on the wax in sections, then immediately wiped it off gently with a soft cloth.  Taking away or adding more to get the look I was going for.  Some of the dark wax remained in the recesses and this is what creates an antiqued look.

The clear cream wax can also be applied over the darker wax to wipe it back a bit if needed, or desired.  I used that technique a few times when I felt I had too much, or it was darker, than I'd wanted.  I covered the entire frame in this manner.  If not using the darker wax the clear wax can be applied instead.  The wax seals the chalk paint and gives it a protective coating, and after buffing you get a nice sheen.  I let the wax dry then gently buffed the frames, and it gave the chalk paint a nice finish.


Voila!  Those frames are perfect now!!


I am loving the results of this project, and I can't wait to do more!  I'm so pleased with the way it turned out.  Now I can put these frames to use with a project I have in mind for them.  I'll share that sometime soon!


As always, happy crafting!...


Thoughts and Things - This week ... Live, Laugh, Love & more Love


Live, Laugh, Love ...  If you know me or have been visiting my blog you surely know this is one of my favorite phrases.  OK, it's my all time favorite!  Live every moment, Laugh everyday, Love beyond words, are an extension of the phrase and are such wonderful words to live by.  

My Daughters have given me gifts in honor of my love of these phrases.  I have several others that I have collected, and although I don't have them all on display in my home at once, I do enjoy having at the very least, one of them out and visible most of the time. 


I was given this beauty recently by my youngest daughter, she had picked it up at a re-sell sale hosted by her place of employment.  It's in perfect condition, it's perfectly me, and knowing it is a "trash-to-treasure" item so to speak, it just makes me treasure it all the more!  I do appreciate a good bargain, especially when it's a re-use, re-cycle, or re-love kind of item.  So glad she thought of me when she saw this beautiful piece and grabbed it up for me!  I love it! 


Spring Display Shelf - Re-decorating this easy DIY display shelf


It's June too soon!
I find myself in disbelief that it's already June.
Where did May go?  It feels like it was only here for a minute!
It is still Spring though ...for a few more weeks anyway.


I recently shared my new easy DIY display shelf.  I had been wanting, and planning to add this piece of decor to my wall for quite some time, but couldn't decided on the brackets I would use.  So many choices out there!  In making my "final" decision, I was very happy with the wooden type I found.   And, after painting them to match the white shelf I couldn't wait to see it all in place and get to decorating, and re-decorating it!

The hubby helped with the installation, getting the shelf in just the right spot for me.  It was just a couple weeks ago, and at that time I featured my Mother's Day flowers and cards as my first quick and easy display.


Speaking of Spring, this is my latest shelf display, it goes well with my current Spring decor.  I purchased the tall metal pieces from the craft store thinking they would work nicely for displaying or hanging items, or small frames on them.  

After that I found the pretty floral plaques at a thrift store for only a couple bucks each and knew they were perfect for this!  Adding a few other items that I had on hand dressed-up the shelf and now it's decorated in a whole new look.  


That's the reason I wanted this display shelf ...to be able to decorate it, change it, and redecorate as often as I choose.  I can use it like a mantel and decorate it with different themes for holidays, seasons, special occasions and celebrations.  If you don't have a fireplace or mantel this is a great solution if you want to decorate for the holidays and such.  


Simply hanging a picture on the wall was just not gonna do for decorating this wall.  The shelf gives me a lot of creative ability and options.  I can change the look easily and as often as desired.  Like a blank canvas ready for a masterpiece!  


I really like the addition of the "display shelf" to this area.  I spent very little on just a few new, or new-to-me items to decorate my shelf, and also used items I already had on hand.  

This is the easiest way to achieve low cost decorating.  Don't be afraid to move items from one room to another.  Change things up a little.  

You can get a whole new look easily and inexpensively by simply shopping your home.  And, if you already have the items, you probably already love them, too!  Use those things you "love" to personalize your home decor and make it uniquely you!     


Happy decorating!...


.

.

.

.
Tammy is the design enthusiast behind the blog, Tips, Treats & Treasures, where her creativity is explored with a mixture of her artistic abilities and style through her home decorating, thrifty finds, DIY and creative craft projects, along with her family favorite recipes. She shares through her blog her ideas and helpful tips on everything she has learned over the years and much of which she is passionate about in the hope of inspiring others, with her own unique style storytelling.