Christmas Decor-2015 - Dining Room


Our dining room is all set for our Christmas and New Year holiday.  We will enjoy some delicious foods in here with our family as we celebrate Christmas and ring in the New Year!

I gave the dining room table a simple touch for the holidays, adding some gold and lots of sparkle to carry on the theme of the other holiday decor throughout our home this Christmas.  My cut-glass and crystal pieces are on the ready for serving up delicious foods and beverages.


I kept it simple and chose just a few items to dress up the table for the holiday.


For my centerpiece I tucked some gold and glittery floral pieces into my beautiful creamy-white rose arrangement in the urn, giving it some sparkle.  A pretty garland of glittery components and pearls was coiled around each of my cut-crystal candle sconces.  I sat the floral centerpiece and candle sconces on cut-glass octogan shaped plates for some added sparkle.  A round golden sparkly place-mat sits centered under the floral arrangement.


At each place setting a pretty cut glass plate is topped with a white china plate trimmed in gold, along with gold flatware, and a bronze/gold cloth napkin.


I placed an acrylic napkin ring/bud vase filled with holly leaves, a pine sprig and a golden pine cone at each setting for a simple holiday touch.


Over on the side table I added layered plates, one gold and one bronze dressed with a shiny gold ornament and acrylic snowflakes.  My golden sparkle wreath hangs above flanked by a pretty fork and spoon set I hung from the mirror.


I added gold tinsel and small shiny gold ornaments to a small glass bowl under my cloche for a bit of added sparkle.  It's easy to add to any decor by simply placing items under a cloche for display.


A closer look at the side table where I also have other pretty cut-glass and crystal on display.


An even closer look at the side table and decorations.  A blend of gold and bronze, and lots of sparkle over here.


Our traditional Christmas/New Year celebration dinner with our family will be a delicious finish to our holiday!


Merry Christmas and Happy New Year!...


See more of our 2015 Christmas Decor at the links below:


Christmas Decor-2015 - II


I love Christmas, it's one of my favorite times of the year, spending time with family and friends, the joy of exchanging gifts, gatherings with them enjoying delicious foods and sharing in the spirit and wonder of it all.  And, as much as anything else my favorite time to decorate my home.

I get excited when bringing out all of the decorations that have been put away over the past year, it's like an early Christmas gift going through them, and out come all those memories, too. 

My neutral palette is the blank canvas for the different options and colors to choose from when deciding which direction I want to go with the holiday decor.  I love lots of sparkle, glitter and golds, beautiful deep greens and occasionally I do use touches of red, because what says Christmas more than a pop of red here and there?

Although this year I've gone with mostly green, gold, cream and white, and lots of sparkle.  Once the tree location is decided on, since we have a few different locations for the main tree, and a couple of smaller trees, I start with where and what I want to display.  It's hard not to use everything, but sometimes rotating items to use next year makes it much more special to use them the next time.  I've acquired more than I need over the years, and those after the holidays sales get me every time!


I've had a Magnolia theme going this year on our mantel in the family room, and used it through the summer, and the fall.  My plan was to not give it up, and so I edited out some of the fall touches and added in some Christmas touches using greenery, gold and glitter for the holidays.  I also wanted a less is more approach to the overall look of my holiday decor, and have it flow well with our current home decor, and palette.


The floral arrangements were given lots of glittery golden additions tucked into what was already there.  I kept the dressed up faux candles as they were, since they worked perfectly with my "lots of sparkle" theme too.  I added a pretty gold beaded garland and some holiday picks to the mantel, and hung a couple of golden snowflake ornaments.


Below the mantel a table has more gold and sparkle.  A glass vase holds pine cones I spray painted gold a few years ago.


Across from the mantel I have filled a golden urn with ornaments, pine cones and mini-Christmas presents all in gold.  Along with the urn on the table I placed some golden jingle bells, a sparkly golden Christmas tree, and a little JOY.


I got the wooden J and Y from the craft store and used a round golden ornament for the O, I simply have them propped up in front of the urn, resting on each other.


In our living room I kept it simple by adding just a few Christmas touches.  I placed a small Christmas tree on each side table.


My beautiful ceramic Nativity set sits near the tree on the left and usually gets displayed in this spot each year.


A small Santa and a mini golden Christmas tree sits on the table between the windows.


A Merry Christmas greeting front and center on the coffee table, and a pretty candle display add a festive touch.  And, gold tinsel garland tucked into my beautiful crystal bowl adds a little more sparkle.


Across from there is our foyer separating the living room and dining room.  I did a little something different on the stair railings this year.  I wrapped the handrails with gold tinsel garland, and cream and gold ribbon with sparkly snowflakes, and golden ice cycles hang from the garland.  


And, there sits our beautiful Christmas tree in the corner of our foyer, wrapped by the staircase.  We are ready for Christmas and awaiting our loved ones, and Santa Claus!


Merry Christmas wishes to everyone!


Christmas Decor-2015


It's almost Christmas, only days to go!  How quickly the time has come upon us.  The excitement builds as final preparations are completed.


My favorite display shelf is looking festive decked out with a "Merry Christmas" greeting.   A golden Christmas tree with lots of sparkle stands tall with a shining star on top.  My handsome reindeer sports an evergreen wreath embellished with pine cones, bells and bows.

My display shelf was a new addition this year.  I love decorating it for different holidays and change of seasons, and finding new ways to change the look of it with accessories.  This was its first Christmas display. 


Below the shelf is this scene, it has a couple of stars too, and some Joy.


More stars over here, and lots of sparkle.  


This year my holiday decor is a mix of cream, white, green and gold.  And it's all about the sparkle, lots of sparkle!


My faux candles are dressed up for the holiday, I shared a post recently for this easy project and you can see it here if you like.  Santa is busy checking his list.  I think he was the first 'golden' Santa I fell for years ago.  A golden glitter Christmas tree was perfect to accompany him, and for adding even more sparkle.


One of my wreaths I look forward to bringing out each year, along with the sweet little Christmas tree, all decorated in gold.


Over in the corner of the kitchen I have a "Merry Christmas" greeting I added to my mini chalkboard, and I had to dress it up a just a little.


Next to the stove I have an area with condiments on the ready, but it doesn't have to be plain, boring or unappealing.  I had fun dressing up this platter that I hung on the wall, ribbon and a golden beaded garland simply coiled into a wreath, gave it some beauty and sparkle.  


And, a little surprise of added mini-lights, gives it a festive glow of an evening.


Nearby are some goodies on the ready, that were 'mint' to be part of the holiday decor.


At the bar area a reminder to "Eat, Drink and be Merry" by a message I've written on a chalkboard I transformed from a plain white ceramic plaque.
See how to easily do one yourself at this link: Ceramic plaque to fancy chalkboard


Over in another corner of the kitchen is a sweet little snowman I created, I think he is the cutest thing and I smile every time I look at him!  I'm pretty sure he is the only snowman that will be made around here this year.  I'm not complaining about not having a white Christmas since it has been warm here at late, although very wet!


A closer look at my snowman, just in case you love him as much as I do!  And, if you haven't figured out what he is made of ...Well, I used some old stove-burner covers to make him!  See the full tutorial and details at this link: Lets build a Snowman


I tucked a bit of sparkle into a floral arrangement I recently freshened up.  More on that later.


A little more of the view next to the arrangement, my candy dish is full and I'm sure the grands will have sparkle in their eyes when they see it!  My pretty cage lantern is a recent find that got a make over, I have it on display so I can show it off enjoy it during the holidays.


I made a pretty center piece for the table and yes, more sparkle there too.  The mini white ceramic reindeer are salt and pepper shakers that I got from Target, although they were pretty simply being plain white, I just had to embellish them, don't you know?  More gold and sparkle, of course!


I added some sparkly ribbon with point-cuts on the ends to cover the salt and pepper holes, a bit of thumb tack/putty keeps the ribbon in place, and a little gold beaded chain added even more glam to my reindeer.


A little bit of a peek at our Christmas tree.  More to come.


"May your days be merry and bright!"


I hope you are having a sparkling day!...


Holiday Wreath - Easy DIY Tutorial


I love seeing a beautiful wreath hanging on display.  I also love to decorate and make them.  I am often surprised when someone says they can't make or decorate one, or they don't have the time to.  I'm also quite surprised by the price on the decorated wreaths for purchase at the craft and home decor stores.  Especially when there is so much available to pick and choose from these days for decorating them yourself, for far less.


You can go from simple, to over the top, and still save money on decorating your own wreath.  Just adding a bow will look nice, and you can also add other items and embellishments.  It's easy to do, I'll show you how.

I purchased a faux evergreen wreath at 60% off just the other day and decorated it the next afternoon, in just minutes.  I spent just over three dollars for the wreath, and two and a half dollars for a holiday floral pick.  I got some wire-edged ribbon for another project, it was two dollars and used only a little in making a bow.  Total cost was under ten dollars for my finished wreath.  Compared to wreaths I saw that were selling for upwards of thirty dollars, and that was on sale!! *gasp*


Items used:

  • wreath
  • floral pick
  • wired-ribbon
  • floral wire


I began with a plain wreath and a fancy floral pick.


I bent the stem [or it can be cut off] leaving a short amount just past the bottom flower on the stem, and then attached it snuggly to the wreath with floral wire, which I had on hand.   


I pulled one of the smaller stems to the other direction once in place.  I could have called it done at this point, but I also wanted to add a bow to my wreath.


To start the bow I began making loops with the ribbon, leaving a tail longer than the loops.


I continued until I had three loops on each side of the center where I was holding it, and an even tail on both sides.  [Adding more loops will give the bow a fuller look-if desired]


Next I placed a good length of wire [about 8 in] over the center.


The wire was twisted firmly to secure the loops.  [An extra piece of ribbon can be used in place of or to cover the wire]


At this point it starts to look like a bow.


Each loop is pulled out and separated from the other loops, spreading out each side.


The bow looks like this after separating all of the loops. 


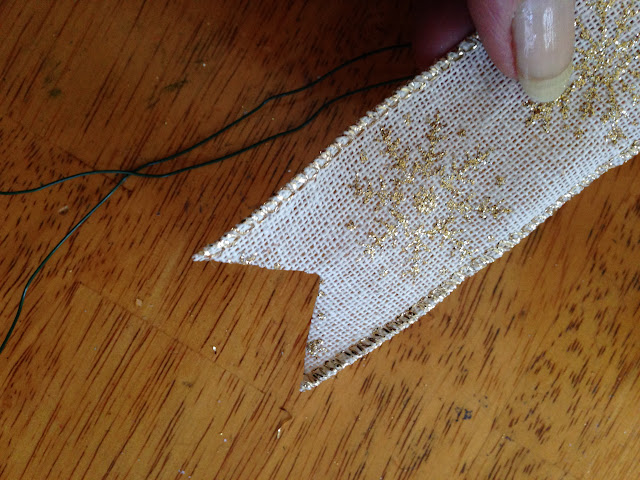
To finish off the tails of the bow I like to point-cut them.  Simply fold the tail in half, then cut upward from the outside edges, that's just how easy it is.  I cut the other tail the same way, and the same length. 


The point-cuts will look like this.


The bow is finished and can be attached to the wreath, then shaped and adjusted once attached.  A great thing about the wire-edged ribbon is the bow will hold its shape.


I placed the bow off to the side of the floral pick and then secured it to the wreath with the wire already attached to the bow. 


I chose to fan out my bow to the side because I liked the look, and since I have limited space between our front door and storm door, I didn't want it to appear smashed.

And, this is my finished holiday wreath.  It literally took me only minutes to make!  I'm hoping this step by step tutorial will help those who say they can't do this, and they will find how easy it truly is! 


Now my beautiful wreath hangs on my front door.  My holiday decor this Christmas is lots of sparkle.  My wreath certainly has that!  


Happy Crafting!...


.

.

.

.
Tammy is the design enthusiast behind the blog, Tips, Treats & Treasures, where her creativity is explored with a mixture of her artistic abilities and style through her home decorating, thrifty finds, DIY and creative craft projects, along with her family favorite recipes. She shares through her blog her ideas and helpful tips on everything she has learned over the years and much of which she is passionate about in the hope of inspiring others, with her own unique style storytelling.