Easy Handmade Pumpkins - No Sew!


I handmade these little pumpkins in only a few minutes time.  I think they are pretty cute!  Let me start off by stating that even if you think you can't make anything, or that you're not crafty, you CAN do this!  I've made some other styles of pumpkins similar to these before, and I mean it when I say "it really is easy, and anyone can do this!"  And hey, there's no sewing required!  Yesssss!


I put these little cuties together by using an old shirt, some craft wire, and for the stuffing I used leftover material and plastic grocery bags.  The great thing about making these is you can use just about any cloth material and make them in just about any color, and coordinate them with your decor.  That is why I used this material since it was bronze and gold, and I liked the stripes, too.  I thought it would work well in my decor.  I had everything on hand so technically it didn't cost me a thing to make them.

It seriously took me only a few minutes to put these cute little pumpkins together.  I think they're adorable!


I used an old shirt to make my pumpkins.  I cut off the sleeves and trimmed both of the ends so I had even edges on both ends, forming a tube.  I turned the sleeve wrong-side-out, gathered one end and used a twist-tie to tightly close it, like you would for a loaf of bread.  Next I turned it right-side-out.  At this point it looked more like a little bag that was gathered at the bottom, the twist-tie no longer visible on the outside.  Using left over material and plastic grocery bags I then stuffed the inside until I got the round pumpkin shape I wanted.


I cut a length of wire approximately 8 inches long and set it aside.  I then gathered the top of my newly formed pumpkin and gave it a little twist.  I centered the piece of wire and used it to gather around the top closing it tightly, also like the twist-tie I used on the bottom and like closing a loaf of bread.  I used a craft stick about the size of a pencil to wrap the left-over wire on both sides to form the curls in the wire.  


After the wire on both sides had been curled I prepared the stem.


Using more wire directly from the spool I began wrapping the top, twisting as I went along, to form the stem.  I tried to keep the wire close and also snug each wrap around.  When I had the stem length I wanted, I wrapped back down a little ways and then cut the wire.  I trimmed off the rest of the material above the wrapped wire.

Using more wire directly from the spool I made a couple wraps around the bottom of the stem, and then wrapped around the pumpkin a few times evenly spaced to form the sections in the pumpkin.  I then wrapped the wire around the bottom of the stem to secure in place before cutting the wire.  And that's it!


***


If you really think that was too complicated, and want to do even less to create a pumpkin, check this out!...


For this pumpkin I simply used the back portion from the shirt and cut a nice sized piece, then pulled the edges up and then tucked them into a ...wait for it ...roll of toilet paper!  Ha!  Now that was pretty simple!  I pulled a little bit of the material back out to form the stem, then used wire to wrap around it and also to make the curls, as I did on the previous pumpkins.


It took only about 15 minutes to create all three pumpkins.  I really like easy projects like that!


Here's another style of pumpkin I created recently.  This is my oh-so-soft and oh-so-simple handmade pumpkin!  A microfiber cloth from the dollar store, filled with plastic shopping bags, then gathered, wrapped and tied with twine, and a wrapping of ribbon formed the stem.


And, another of my previously handmade pumpkins tutorial can be viewed here.


Happy crafting!...


Pumpkin-Pumpkin-Pumpkin!


It's "National Pumpkin Day" today!  I believe October would be considered "Pumpkin Month!"  Are you a fan of pumpkin?  Do you love anything pumpkin related or pumpkin flavored?


Some do, some don't, it's a personal preference kind of thing for sure.  I like pumpkin, and I've always been a fan of squash, so why wouldn't I like pumpkin? 


Pumpkins are a plenty at the moment, and there are so many types and colors available now days.  There are a myriad of pumpkin recipes, and pumpkin flavored this and that, too.


Sights like the one above are real eye-catchers, and common this time of year.  There's just something about a pumpkin patch!  They offer so many choices, from little baby pumpkins to huge ginormous pumpkins, ranging in both size and shape, with something for everyone!


*** 


With it being National Pumpkin Day I wanted to share a few interesting "Pumpkin" recipes I discovered.   These recipes are from what I consider trustworthy and try-worthy names such as, Betty Crocker, Kraft, and one of my favorite blogger turned famous TV and Internet personalities, and all things kitchen, and cooking, country gal and friend, Ree Drummond of The Pioneer Woman.  I call her friend, I've actually never really met her, but she sure makes you feel like she is your friend!


First lets begin with these Pumpkin Spice Latte Cookie Cups from bettycrocker.com.   These had me at pumpkin spice latte!  Oh, and the drizzle of caramel!  I'm thinkin' these would be perfect with a Pumpkin Spice Latte!


Then there's this, Pumpkin Butter.  Can we just say that again...Pumpkin Butter!  This recipe, also from bettycrocker.com, has me wanting to put pumpkin butter on everything!  Well, okay, maybe not everything.  But, I can think of lots of things to spread it on, or to dip into it!


This recipe from kraftrecipes.com for Pumpkin Cupcakes with Cinnamon-Cream Cheese Frosting calls for a package of spice cake mix, a can of pumpkin, and few other ingredients.  These will be a hit with pumpkin fans and those who love cream cheese frosting, and cinnamon.


Here's another recipe from kraftrecipes.comLuscious Four-Layer Pumpkin Cake.  Oh how luscious it looks, too!  A simple recipe that requires a box of cake mix, a can of pumpkin, cream cheese, caramel ice cream topping, and pecans, along with other ingredients that will make this luscious cake a family favorite.


Moist Pumpkin Spice Muffins (With Cream Cheese Frosting), mmmm!  This muffins recipe comes from The Pioneer Woman - Ree Drummond at thepioneerwoman.com.  Call 'em muffins or call 'em cupcakes, I'm sure she wouldn't mind either way!  This lady really knows homemade goodness and how to make-from-scratch, and truly impresses me with her talents in the kitchen!  I've been a huge fan of her for a long time.  She makes it all look so easy, and she adds a bit of real, along with a bit of humor, too.  I just love that about her!  


Create your own homemade pumpkin pie spice!  That spice that is so widely used at this time of year.  This recipe also from thepioneerwoman.com website, was from Maria who blogs at Two Peas and Their Pod over at twopeasandtheirpod.com.  Maria shows the easy steps for How To Make Pumpkin Pie Spice.  I can think of lots things to add this spice to.  


Just a few pumpkin goodies to elevate your desire for pumpkin, and pumpkin spice! 


Enjoy!...


Painted Pumpkins


While planning a Fall table setting in our dining room I wanted pumpkins to match the decor in there, which is basically neutral.  My neutral lovin' heart really enjoys the fact that there are a variety of different colors and tones of pumpkins available these days.


I have nothing against the typical colors of fall, or orange pumpkins, and I've used them for my Fall decor in the past.  This year however, my preference was to use lighter colored more neutral pumpkins, in our dining room.  I found some little creamy white pumpkins at the grocery and I just love them, they are the sweetest things, they're called "baby boo pumpkins."  I looked for some larger pumpkins of that color, but didn't find any at the time.  

A visit to a couple craft stores for artificial cream or white pumpkins, led to finding some that were larger than I'd wanted, and they just didn't have the look or feel I was going for.  My 'plan b' would be to just paint some pumpkins instead.  I've had great success with painting some little artificial pumpkins before, so I decided I'd do that.  I wanted to share how easy it is to paint pumpkins.

I found a pair of the perfect sized pumpkins at HobbyLobby and with the forty-percent off Fall sale, they were very reasonable.  Plus I liked their un-perfect shape and the stems were quite real looking too.


My finished pumpkins were just perfect.  The end result was exactly what I had in mind!  Chalk paint and a little of my time spent painting one afternoon was all it took.


The pumpkins started out looking like this one pictured above.  They're not bad or ugly, or anything, I just wanted a different color instead.  This burnt orange color is actually a beautiful color.  I felt a little guilt at the thought of painting them, well maybe for a only moment, since I had envisioned them with a different beautiful look after painting them!


The paint I used is DecoArt-Americana Decor chalk paint, the color Timeless.  It's a dreamy color if you ask me!  I applied the paint using a painting sponge/brush, and then used an artist brush to paint around the stem so I could get nice and close to it.

I had just begun to paint and got to thinking about painting the bottom of the pumpkin, and how I would have to wait for the top to dry first before turning the pumpkin over when dry to then paint the bottom.  I quickly tied on a nice length of jute twine to the stem and figured I could paint the whole pumpkin all at once while holding the pumpkin by the stem...


...and by simply having tied the twine to my cabinet door it could then hang as it dried.  It worked well and I was quite pleased with my great idea!  I do amaze myself sometimes ...as well as amuse!


After the first coat was applied on one pumpkin, I started on another that I'd also hung from a nearby cabinet.  I applied two coats of chalk paint on each, with dry time between the coats, which was only about a half an hour.


And, here is one after the second coat of paint, and while drying.  After the pumpkins were dry they were exactly what I had wanted, the color was perfect! 


I couldn't be happier with the results after painting the pumpkins.  It was so easy, and quick to change the look of them.  I love chalk paint, it is magical!  I decided they were perfect as is.  I didn't do anything further to them.  I didn't use any wax or other layers of paint color, as I have in the past when painting other pumpkins.


Here's a peek at the painted pumpkins on our dining room table.  The color really is so perfect!  I can't wait to complete my table setting.   


I'll be sharing more on that soon!...


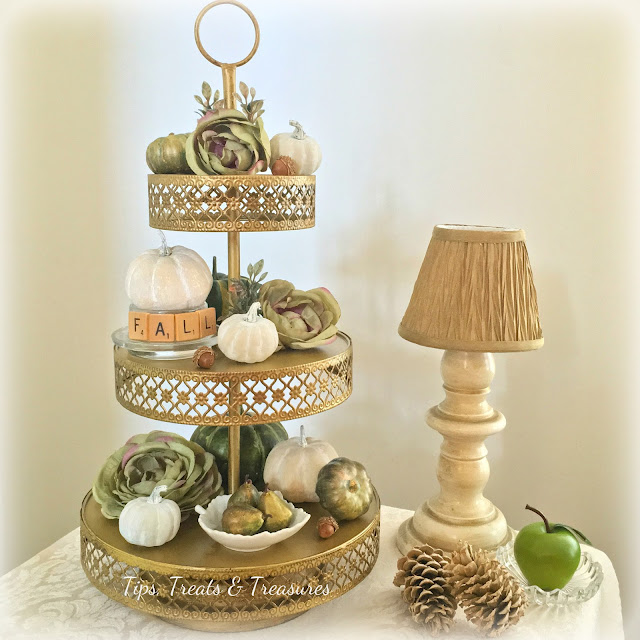
Three-Tiered Tray - Fall Style


When I spotted this Three-Tiered Tray, I'll admit to going all heart-eyed over it.  It was as if it had been made just for me, all fancy and gold, with scrollwork and little hearts in the design, too!  I had to have it, and couldn't wait to get it home to dress it up.  I had fun styling it for Fall!


You may have noticed tiered trays have been growing in popularity and showing up all over at various home decor stores.  I found this metal beauty at Hobby Lobby, and thanks to the forty-percent-off coupon, it was a deal at eighteen-dollars.  Tiered trays are great for using for food display, which is why I originally bought a two-tiered tray a couple years ago.  One of these tiered trays filled with goodies like cookies, cupcakes, and petit fours, or various appetizers is a nice addition when entertaining, or for parties.  And, if you're short on space the tiers/layers add 'more' without taking up additional counter or surface area, or table space.

Tiered trays have become a favorite home decor item.  It's so easy to add items to them for seasonal decorating, or holidays.  And, once again, if you are short on space, tiered trays work well for providing a little extra something to your home decor, when you may prefer to add just a touch of seasonal or holiday flair.  These tiered trays work well for storing items too, place one on the bathroom vaniety for at-hand items, make-up, jewelry, bath accessories, etc.  Tiered trays are a fun way to dispay your favorite little things.

I also wanted to mention another great thing about this particular tiered tray.  I really like that this tray is easy to take apart.  I can disassemble it and store it away if not using it and it won't take up much space that way.  Some types do this, so keep that in mind when shopping for one! ;)  And, if you hadn't noticed, I turned the trays upside-down for this display.  I felt the layers worked better for my small added items, and they would be more easily seen.  This is only possible of course, if the tiered tray can be taken apart! ;)

There are so many possibilities for how to use or decorate with a tiered tray.  I'm already thinking about the upcoming Christmas holiday, and how this will be a nice addition to my holiday decor.


Happy decorating!...


My "Fall" Tablescape


Long before Fall arrived I was thinking and planning with ideas for my fall tablescapes.  One for my breakfast area table and another for the dining room table.  I'll find an item and often it is the inspiration to get me started with my plan.  That is the case for this tablescape.  I found some beautiful plates at Homegoods.  I loved the pattern and the color.  I had to have them!  I felt the plates would work for Fall, and work well for the other seasons as well.

I tend to stick to a more neutral color scheme in my home.  I love creamy whites, bronze and gold, and I often have some form of green, usually from plants and greenery.  I have nothing against the more typical orange colors of fall, they are just not my favorites, and for this year I was hoping for something a little different.  This Fall tablescape idea came about after Fall-ing in love with those oh-so-pretty plates.  That color is gorgeous!   I knew I already had some green and bronze pumpkins, and other fall elements for a centerpiece, so I visited the craft store for some ribbon.  I found the perfect sheer green ribbon that had gold glitter on it and a shiny golden edge.


I always like to layer place settings, but, I didn't want to cover up the beautiful details of these plates, for now I'm enjoying them in all their glory!  I kept it simple and placed a silky bronze napkin into a wooden napkin ring.  I simply fan-folded the napkin before putting the napkin ring on it to create the look, and then tucked in my gold flatware.


The "Live Love Laugh" was a sweet gift from my youngest daughter, given to me last Fall for my birthday.  It's perfect for Fall, and the phrase is a favorite!  I like it as an addition to my Fall table, and it is a great message!


For my centerpiece a gathering of Fall elements were placed around a glass candle holder on an acrylic tray/platter, it sits on a glass cake stand for a little lift.  I simply tucked in 'this and that' around the candle holder, pumpkins, flowers, leaves, berries, pine cones, acorns, and ribbons.  I mirrored the look on the other side.  I looped a few pieces of ribbon in three different lengths, and attached them together with wire, then tucked the looped ribbons into the mix.  It's a simple and easy touch I like to use for adding a little something extra to dress it up, especially when or if adding a bow is too much.


An over view of the centerpiece for a different perspective.  I have a glitter candle inside the glass candle holder serving as the base for a small votive candle holder and votive candle.  That glitter candle is just too pretty to burn so I found a way to use it without burning it!...so, it's a pedestal! ;)


A view of my Fall table and the view beyond,  My table is all set now!


A closer view of my console table in front of the window and next to the breakfast table, it's another area to dress for the seasons and holidays.


I hope you are having a beautiful Fall day!  


Happy decorating!...
~Tammy 


Fall - Shelf Decor
~Fall themed display shelf~


I enjoy having this little shelf and love to decorate it.  Hubby added it to a wall in our breakfast nook a while back for me.  I usually refer to it as my "themed display shelf" since I change it for the seasons, holidays, and other occasions.

With the change of season, it was time to give it a new look.  I challenge myself to create a look for it often using what I already have one hand, or with only purchasing a few new inexpensive items.  Having the overall idea in mind to keep it budget friendly, and offer some ideas and inspiration.  Not having to spend a lot to change decor in my home is my motto, and I try really hard to practice what I preach!  


I had on hand everything except, the three little pumpkins, a couple additions to the vase i.e the fuzzy-spiked thingies (Ha! I just don't know what they're called!), and the cute pumpkin shaped wall decor with "Autumn Greetings" on it.  All of those items were from the dollar store, so they were quite the bargain at only six dollars!  And, they were the inspiration and starting point for this fall themed shelf display.

A little explanation of the process:
I began with a section of wire garden fence, using it to display the pumpkin shaped wall decor which was the first item I had picked up at the dollar store.  I found the pumpkins next, the color was a reflection of the image, and the burlap was a match too!  I used a stack of decorative boxes and a book as a lift for the burlap pumpkin, then tucked some leaves and berries in behind, and a brass tray serves as the backdrop.   Next I added some fall colored stems and such to the vase and placed it on the right.  I then added a tin flower and letters spelling out "FALL" to my wooden clipboard for the other side.  I finished with some tiny pine cones placed on the shelf edges.

It was very simple, and oh so budget friendly.  I'm pleased with it for now and happy to have something new and different to look at in my home!


Autumn Greetings, everyone!


Happy decorating!...


Hello October!
Slowly Fall-ing into Fall - Adding touches of Fall


Adding a bit of Fall decor as I'm slowly Fall-ing into Fall here. Although, our weather in Georgia hasn't quite caught up with the season, and I'm OK with that for now!

I began adding a few touches of Fall in our dining room, I plan to keep it simple and more neutral, in this room, using bronze and gold with muted fall colors and creamy whites.  This beautiful mirror hangs in our dining room.  I created the added wreath a while back and enjoy changing it using different add-on items seasonally.  I described how I made it, at this link here.  The large fork and spoon, purchased last year-(Hobby Lobby), are a playful nod to the dining room, and I thought it would be fun to display them on the mirror.

The table just below the mirror is where I like to display some of my cut-glass and crystal items.  I usually prefer to have some type of floral or centerpiece there, as well.  The bronze vase contains some golden painted eucalyptus, and pearl floral stems.  At the back of the table I layered a couple of my charger plates because, I love bronze, and gold, and while I couldn't decide which to use, I simply chose both.


I placed a couple of my tiny hand-painted pumpkins on top of glass candle holders next to the vase, after taking the photo above.


One of my hand-painted mini pumpkins rests beneath the glass cloche. The cloche was a thrift-store find, also last year.  I like how it easily adds to my decor, and serves as a fun little display for small items.  A few Fall leaves sit under the mini pumpkin and on top of a pretty gold rimmed saucer as the base for the cloche, along with the gold dish below it. 

These little added Fall touches were simple and inexpensive with zero additional cost, since I already had the items on hand.  My favorite kind of decorating!  I like having options, and I like to change my mind and change things.  So, this could possibly change, yet!  That's all part of the fun in decorating for me. ;)


And, now to work on the table...First a clean slate as the fall planning is thought out.  When pulling out seasonal decor it always seems like it gets worse before it gets better as redecorating takes place.  I know it's worth it after all, I just need to jump on in and not worry about the 'mess' part of it.  The end result is really the goal! ;)

I worked on painting some pumpkins over the weekend, and you might guess where they are going to go?  Did some shopping and picked up something new for the table, too.  I'll share all of that soon!


Oh, and here's a peek at a little something else I just worked on over in the kitchen  (I shared a post all about this thrifted and rescued floral arrangement back in early summer.)  I'm loving these colors for Fall this year, bronze, brown, gold, cream and green.  To change up this arrangement for Fall, I flipped-over some of the magnolia leaves to expose their underside color, a golden, bronze-brown.  And, I also tucked in a few extra items for their color and texture.

Would you believe I used freshly dried corn husks?  I sure did!  I have to wonder if anyone will guess what they are before my mentioning it?    I had dried the husks over night for a craft project and the next day they had curled up and took on a new look.  I had wanted them to be flat for the project, and didn't know they would curl up like that!  However, they appealed to me in their new state and had me thinking they would work in my floral arrangement.  The color made me do it! :)  So, I added them to my arrangement and now I like that it is something different, and something new!

***

You can make little seasonal changes to your home decor without spending a lot to do so.  Adding a floral pick or some individual cut pieces of floral, greenery, or leaves, or a pretty bow to an already made wreath is simple to do.  Add just a pretty bow to a grapevine wreath.  Some artificial/faux flowers tucked into a vase, decorative pot, or pitcher.  Pumpkins are everywhere, both fresh and artificial, and they are available in many different shapes and colors, too!

When decorating your home, I recommend using what you have, and use what you love.  Don't be afraid to get creative with non-tradition items or use them in a different way.  You will be happiest with what you choose if it is what you love and makes you happy!


Happy decorating!...


.

.

.

.
Tammy is the design enthusiast behind the blog, Tips, Treats & Treasures, where her creativity is explored with a mixture of her artistic abilities and style through her home decorating, thrifty finds, DIY and creative craft projects, along with her family favorite recipes. She shares through her blog her ideas and helpful tips on everything she has learned over the years and much of which she is passionate about in the hope of inspiring others, with her own unique style storytelling.