Showing posts with label What's on my door?. Show all posts

Patriotic Decor

Happy 4th of July!

A little patriotic decor in our upstairs hallway.

Wishing everyone a happy Independence Day! And even though it may be different this year, I hope we all can enjoy a wonderful celebration of this beautiful country and our home sweet home!

“Happy Independence Day & Happy Birthday America!”

Our Golden boy Aeon isn’t so sure about all of the noise associated with this holiday, but we keep reassuring him that it’s all good and everything is fine, that he’s safe here with us, has our love and protection, and extra hugs!
We celebrate our flag, our independence and this great country today. It’s a great day to celebrate, a great day for America!


God bless us all and God bless America!

Be safe!
XOXO ~ Tammy


Hello JULY

And, then it was July!

::: A new day, a new month and new beginnings...And, a patriotic welcome in our foyer.

I love this beautiful heart shaped tin flag, a Cracker Barrel find from a few years back.

It's perfect for the month of July displayed on our door.


We’ve had a beautiful first day of July. A lovely summer’s day. 


I look forward to many more ahead!...


Fall Wreath


I made something pretty for our front door today!  This lovely Fall wreath.  We are just inside the second month of the Fall season and some of the beautiful Fall colors are appearing outside.  

It's been so hot and dry here that I've wondered if we will even see much Fall color change before the leaves just dry up and fall off!


We have a storm door, so a lower profile wreath is needed due to the narrow space between the two doors.


I chose to use a simple wire wreath form and covered it with burlap/mesh ribbon folded in half.


Next I cut-off part of the stems from two floral picks, placed them in opposite directions and attached them and a pre-made bow, using floral wire.


It was simple, easy and low cost!  And, I can easily change the look for another season or holiday, too!


- Items List, Sources & Prices:
Floral Picks - Hobby Lobby 1/2 off =1.99 ea
Ribbon - Hobby Lobby 1/2 off =3.98 per 10 yd roll (Used appox 1 yard)
Wire wreath - Dollartree =1.00
Bow - from a recent gift pkg =.00


This will easily adorn my door until Christmas decor makes its way there!

I hope you've found this easy wreath inspiring and you'll make something pretty for your door too!


Happy Crafting and Decorating!...


Our Welcome Space
~The Foyer

Home is where my heart is!

::: It’s my happy place where I feel most welcome. And, where we get to welcome others...


::: Our foyer is one of my favorite spaces in our home. Our “Welcome” space.

Currently, I’m enjoying this look for Summer.


~ I hope you’re having an awesome Summer day!...


Welcome SUMMER!


In welcoming summer I added this beautiful Butterfly wreath to my door.  I found this beauty and simply added a little embellishment!  Perfect for summer and as a sweet welcome on our front door!


We're expecting a beautiful first weekend of Summer!


Happy SUMMER!...


Holiday Wreath - Easy DIY Tutorial


I love seeing a beautiful wreath hanging on display.  I also love to decorate and make them.  I am often surprised when someone says they can't make or decorate one, or they don't have the time to.  I'm also quite surprised by the price on the decorated wreaths for purchase at the craft and home decor stores.  Especially when there is so much available to pick and choose from these days for decorating them yourself, for far less.


You can go from simple, to over the top, and still save money on decorating your own wreath.  Just adding a bow will look nice, and you can also add other items and embellishments.  It's easy to do, I'll show you how.

I purchased a faux evergreen wreath at 60% off just the other day and decorated it the next afternoon, in just minutes.  I spent just over three dollars for the wreath, and two and a half dollars for a holiday floral pick.  I got some wire-edged ribbon for another project, it was two dollars and used only a little in making a bow.  Total cost was under ten dollars for my finished wreath.  Compared to wreaths I saw that were selling for upwards of thirty dollars, and that was on sale!! *gasp*


Items used:

  • wreath
  • floral pick
  • wired-ribbon
  • floral wire


I began with a plain wreath and a fancy floral pick.


I bent the stem [or it can be cut off] leaving a short amount just past the bottom flower on the stem, and then attached it snuggly to the wreath with floral wire, which I had on hand.   


I pulled one of the smaller stems to the other direction once in place.  I could have called it done at this point, but I also wanted to add a bow to my wreath.


To start the bow I began making loops with the ribbon, leaving a tail longer than the loops.


I continued until I had three loops on each side of the center where I was holding it, and an even tail on both sides.  [Adding more loops will give the bow a fuller look-if desired]


Next I placed a good length of wire [about 8 in] over the center.


The wire was twisted firmly to secure the loops.  [An extra piece of ribbon can be used in place of or to cover the wire]


At this point it starts to look like a bow.


Each loop is pulled out and separated from the other loops, spreading out each side.


The bow looks like this after separating all of the loops. 


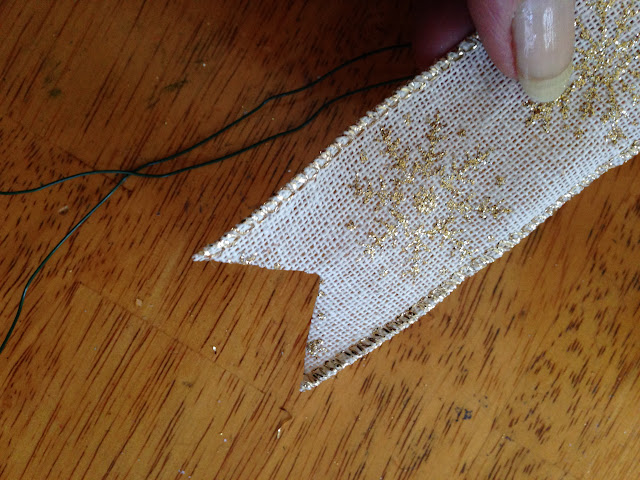
To finish off the tails of the bow I like to point-cut them.  Simply fold the tail in half, then cut upward from the outside edges, that's just how easy it is.  I cut the other tail the same way, and the same length. 


The point-cuts will look like this.


The bow is finished and can be attached to the wreath, then shaped and adjusted once attached.  A great thing about the wire-edged ribbon is the bow will hold its shape.


I placed the bow off to the side of the floral pick and then secured it to the wreath with the wire already attached to the bow. 


I chose to fan out my bow to the side because I liked the look, and since I have limited space between our front door and storm door, I didn't want it to appear smashed.

And, this is my finished holiday wreath.  It literally took me only minutes to make!  I'm hoping this step by step tutorial will help those who say they can't do this, and they will find how easy it truly is! 


Now my beautiful wreath hangs on my front door.  My holiday decor this Christmas is lots of sparkle.  My wreath certainly has that!  


Happy Crafting!...


Fall Mesh-Ribbon Wreath
~Easy How-to tutorial


I tried my hand at creating a mesh ribbon wreath, I've been wanting to make one like those popular types seen all over pinterest!  I actually tried to make one of them before, and well, instead of having one like those to hang on my door, my patience ran out the door on me!  

Still, I did mange to make a beautiful mesh wreath, even though it wasn't the type I set out to make in the beginning.  I worked it out by making one that I ended up loving, so it was all good!   You can see it here if you'd like, and I explained how I made it.-(also at the time of this post, the wreath I mentioned is featured in the photo at the top of my blog).  Now on to this wreath below! 


I suppose it got to me that I had not made one of those 'typical' puffy or poofy mesh wreaths yet, and that pushed me to give it another go.  I found several tutorials online and lots, and lots of photos.  I took all of them into consideration and applied what I had seen, and learned, to achieve this project once and for all!

I viewed several videos where the mesh is attached to a wire wreath form via twist-ties or chenille stems/pipe cleaners.  And, I also viewed several videos for making wreaths using burlap ribbon, where the burlap is pulled through the sections of the wire wreath form into loops.  I used the latter method to make my 'fall mesh-ribbon wreath' because I liked the effect and didn't want to fuss with all the twist-ties.  And, truth be told, I didn't have enough twist ties, let alone chenille stems at the time.

Also, this method made the project just seem to flow so easily, and it really went quickly as well.  And, I actually preferred the look overall, especially since it wasn't over the top poofy.  Either way would work, but this is the look I was going for! 

I used a small wire wreath form, and a roll of mesh ribbon in a burlap/tan color with a white band down the center of it.  I thought the color was perfect to go with my neutral decor and would also work well for fall.

I'm loving my new mesh wreath.  I think it turned out well and now it hangs on my door, on the inside, so I can view and enjoy it.  Hmmm, I guess I could say I technically still really haven't made a 'typical' mesh wreath.  Leave it to me to do things my own way.  It's what I do!

Below are the steps used and items needed to make this Fall Mesh-Ribbon Wreath.

Wooden Pumpkin Sign - makeover.


I transformed a thrifty, discounted, wooden pumpkin sign into a piece of art to display on my door, by giving it a makeover using chalk paint!


While at the grocery store I took a moment to look through some discounted fall items located on their seasonal isle, I came across a wooden sign, among the other items.  I wasn't really in love with it at first glance, but the three-dollar price had me giving it another look.  My thoughts of planning a makeover for it had me quickly deciding it just might be worth the purchase and so I grabbed it up.


I liked the pumpkin shapes, the metal leaves and bells, but the burlap with the word HARVEST printed on it, not so much!


A bit of tugging, pulling, and some cutting had it down to a bare surface in short order.  A little sanding with fine grit sandpaper had it free of any glue residue, smooth, and ready for some paint.


I was going for a neutral look, since that is more my style, and has been my theme this year for fall.  With my stash of paint to the rescue, I gave it a base layer using white chalk paint, followed by a paint technique I used by applying another color of chalk paint called-timeless, and wiping it off slightly with a damp paper towel.


I kept at it until I had the look I wanted, and it looked like a pumpkin.  Uh, make that four pumpkins!


I have to admit that I kind of fell in love with it after it was all finished.  I was considering adding some letters to it, maybe spell out "Fall" or something?  But, for now, I like it just the way it is!


Fall Door Decoration - My Fall Floral Basket

Although I do have a love for neutral colors and have chosen to use them more this year with my fall home decor, I haven't completely dismissed the orange or more typical fall colors all together.  In sharing my other fall decorating, I hadn't shown what's on my door at the moment.  

And, since my front door is white-(oh the color-lovers are shaking their heads at me now, I can just feel it!), I thought these fall colors that I chose to use in my tin basket would be much more visible and stand-out better on my front door, reflecting what is true outdoors for fall! 


The sun's afternoon glow adds to the vibrant hues of my fall arrangement.  Sunflowers always seem to make a statement no matter how you use them.  And, they always seem to look happy to me!


A gathering of silk fall flowers and foliage, simply tucked into my fancy tin basket gives a pretty 'fall' welcome on my front door!


Easy Door Decor


Now that it's May, I went for something easy and oh so simple for my door.  I shared this gorgeous piece of iron back in the fall.  I knew the minute I saw it at Hobby Lobby I had to have it, and that it would make a great wreath!  One I could change easily and often.

I picked up some half-off flowers on my recent visit to Hobby Lobby, these lovely hydrangeas in pretty shades of purple!  I removed the flower heads and leaves from their stems and simply tucked them into the open areas on the iron.  A bit of wire secured them in place.  Voila!  That should take care of making my door pretty for a while!


These purple hydrangeas look very pretty, and welcoming on my front door!


Feeling Lucky!


Yay!  It's MARCH.  The month when Spring arrives!   I am counting the days, too.  Although the cold isn't over yet I am hopeful it will end soon, and it is a lovely sixty-five degrees here today.

St. Patrick's Day is just around the corner and there is green and shamrocks galore at the craft and hobby areas of most stores at the moment, along with lots of Easter decorations and goodies mingled in among them.  Sure signs that Spring is coming.  Just yesterday while out and about with my family, I noticed some daffodils popping up through the ground.  Come on Spring!

I'm not planning on decorating my house in a St. Patrick's Day theme, but I thought a little something in it's honor for my door would be nice.  As luck would have it the dollar store had lots of St. Patty's things on display, and so I just had to get this cute sparkly shamrock and bring it home with me!  I mean I didn't even have a shamrock, and that just wasn't leaving me feeling very lucky!  And hey it was just a buck, what luck?!

I added a little Irish verse to the photo, since my shamrock hangs on my door I felt the verse was quite fitting.


And here are a couple more...

For each petal of the shamrock... This brings a wish your way... Good health, good luck and happiness...  For today and every day!


"Wherever you go
and whatever you do,
may the luck of the Irish
be there with you."
- Irish Blessing 


An interesting read on the history of:  The Shamrock.


Lots of Love and Luck to you!...


Happy LOVE Day!


Happy Valentine's Day!  

A day of LOVE.  

So what better to display on my front door than those four letters!


LOVE... 


Lots of LOVE to you and yours!...


Tin Basket - Easy Decor


This pretty Tin Basket was a gift to myself and a real must-have for sure, and even more so thanks to my 40% off coupon, too!  Not only is it perfectly me with the bronze, gold and scroll work, it's perfect because it can be changed simply by using different fillings!  Plus I like the low profile of it to hang between our front door and the storm door!  I tucked in some faux evergreens and berries for a nice winter touch, adding to my holiday and winter decor. 


I enjoy things that I can easily change the look of!  These types of items make decorating so easy!


Happy decorating!...


Not so ordinary Fall Wreath


I took one look at the wrought iron piece and it screamed "I'm half off, you want me and you know it!", and I knew we needed to be together!  Then instantly in my mind I was planning something out of the ordinary ...crafting a wreath using it!  It was perfect for me.  Not only do I love just about anything wrought iron,  I also love wreaths and making them.  I see this having great potential for many different looks and changes in the future too.  It's one of those gifts that keeps on giving!


I wanted to decorate it and add to my Fall decor, but I didn't want to over do it!  I made a bow for it first.  You may recognize the material I used for the bow ...it's from a mesh bag, the type that contain oranges or grapefruits-which is what mine contained originally.  I can't tell you why I saved that bag, but I'm glad I did and I think it made the perfect Fall bow!  It works perfectly too with the Fall floral picks which I simply secured to the wrought iron with craft wire.  And also the pretty clip-on sunflower, which completes the look.  I added another bow too, one made from jute twine, because that jute twine just works so well with all things Fall!

I love my new 'Not so ordinary Fall Wreath', and I now have it hanging on my front door for all to see and to greet my visitors.  


Something out of the ordinary to extraordinary!...


.

.

.

.
Tammy is the design enthusiast behind the blog, Tips, Treats & Treasures, where her creativity is explored with a mixture of her artistic abilities and style through her home decorating, thrifty finds, DIY and creative craft projects, along with her family favorite recipes. She shares through her blog her ideas and helpful tips on everything she has learned over the years and much of which she is passionate about in the hope of inspiring others, with her own unique style storytelling.