Showing posts with label DIY Tutorials. Show all posts

Thrifty Painted Medallion Transformation
~ Simple makeover using paint & wax!


I transformed this beautiful medallion with a makeover using paint.


~*~


I picked up this medallion for two dollars at GW.

I knew I wanted to paint this the second I saw it! I’ve added a few images of the process. And isn’t it lovely with its new look?!


~*~


I gave this a layer of white chalk paint then after dry, distressed it using an emery board nail file.  Next I gave it some clear and dark wax and then did some buffing with a soft cloth.

~*~


It’s now the piece I envisioned it to be! I love the details and how the distressing and wax make them pop! I’ve seen similar pieces for twenty-five dollars and up!

Using chalk paint and wax is the easiest way to transform a piece!  Don’t be afraid to give it a try!


Fall Wreath


I made something pretty for our front door today!  This lovely Fall wreath.  We are just inside the second month of the Fall season and some of the beautiful Fall colors are appearing outside.  

It's been so hot and dry here that I've wondered if we will even see much Fall color change before the leaves just dry up and fall off!


We have a storm door, so a lower profile wreath is needed due to the narrow space between the two doors.


I chose to use a simple wire wreath form and covered it with burlap/mesh ribbon folded in half.


Next I cut-off part of the stems from two floral picks, placed them in opposite directions and attached them and a pre-made bow, using floral wire.


It was simple, easy and low cost!  And, I can easily change the look for another season or holiday, too!


- Items List, Sources & Prices:
Floral Picks - Hobby Lobby 1/2 off =1.99 ea
Ribbon - Hobby Lobby 1/2 off =3.98 per 10 yd roll (Used appox 1 yard)
Wire wreath - Dollartree =1.00
Bow - from a recent gift pkg =.00


This will easily adorn my door until Christmas decor makes its way there!

I hope you've found this easy wreath inspiring and you'll make something pretty for your door too!


Happy Crafting and Decorating!...


Fall Framed Art
~Easy Craft DIY


And then it was FALL!

Adding a simple touch of Fall. So easy to create, too!


I picked up a cute copper colored frame and a Fall greeting card at the Dollar Tree. Yep, just two bucks! The frame was a bit shiny, so I took a metal nail file and gave it some distressing! I loved the beautiful pumpkin scene on the card. I simply cut it to fit the frame and voila!


I just love a quick inexpensive project that gives me new & beautiful decor. Oh, and white pumpkins, I LOVE little white pumpkins!


Happy Fall Ya'll!


Thrifty Treasure
Wooden Pedestal and Vase/Candle holder


My latest thrifty treasure and fabulous find is this beautiful wooden pedestal and wide glass cylinder vase/candle holder.
~ A cost of six dollars total for the two items!
I dressed them up with a pretty candle and some faux greenery I already had on hand.


The tray is a thrifty treasure from awhile back.  I chalk painted it white since I have another one that I originally purchased from “Southern Living at Home” some years ago for much more than the five bucks I paid for this thrifted one!
(Upon doing a little search, the pedestal above may also be a SL@H item?)

I’m so pleased with my thrifty treasures!  And, I love the beautiful arrangement I created using them!  All it took was just a few dollars, a little imagination and some creativity!
Decor doesn’t have to be expensive to be beautiful!!!


~ Happy Decorating!...


Centerpiece Makeover

This lovely centerpiece is the result of a thrifty makeover.  I much prefer the way it looks now compared to when I found it at a thrift store!  I thought it had potential and I could make it look better, so I grabbed it up!


Below is the before.


It really wasn't to my liking as it was, but I felt I could give it some love and make it my own.


I then searched the glass area in hopes of finding some candle holders for it, and found three glasses that were perfect to use as candle holders, and they fit nicely.


Now I felt it all coming together and had a plan in mind for it!  At that point I was excited to transform my treasure!


I got it home and removed the old faux greenery and fruits, then gave everything a good cleaning.
I actually liked the look after I stripped everything off and considered leaving it as it was.


But, I decided I’d add some Lamb’s ear greenery, which I already had on hand, for a fresh Spring/Summer look at the time.  I was so pleased with the final results!

I’ve enjoyed having this pretty centerpiece on our breakfast table.  It makes me smile knowing that it looks much better than it did and I spent under five bucks in all!  I now look forward to giving it some Seasonal changes!

I just love finding a good thrifty treasure!  Especially the kind I can change the look of seasonally, that's even better!


My Fall Tablescape

~ My Fall Tablescape ~

I've said many times before that setting a pretty table is one of my favorite things to do, when it comes to decorating.  And, I enjoy finding inexpensive items to add to my tablescapes, which give me the ability to change up the decor easily and without spending a lot of cash to do so!


I found some cute little green leaf plates at Target dollar spot, then at Hobby Lobby I picked up some 12x12 craft/scrapbook paper sheets with a Fall image of trees & leaves to use as placemats, and to add more fall color.  These were the only new items I purchased, everything else I already had on hand!


I simply layered the craft paper with a white paper doily, then a glass plate, a cream cloth napkin, the green leaf plates, and topped each place setting with a mini white pumpkin.


I’m pleased with the results and think it looks even better than I’d imagined!  


Plus, it was inexpensive to create.  I love thrifty decor!


Happy Decorating!


Crafted Wooden Display Ladder

I created a little display ladder!  I wanted one mostly to use for my cute dish towels.  I am pattin’ myself on the back, since it worked out so well.  I love the results!


And, then of course I had to get at styling it for Fall!

I made the cute little chalkboard banner, too!  I couldn’t find my chalk pen, so I had to write those letters with a big ol’ piece of chalk.  A mini wreath I simply decorated, and a pumpkin finished off my sweet display.


I made another smaller ladder, I wanted to give an example of how I created it since I didn't take photos of the process on the first one.  It was so simple to make!


I purchased the wood pieces at the craft store.  I measured the pieces for each of the sides, and the ladder sections/rungs, then after cutting them I used Scotch clear glue to hold all the pieces together.  I considered painting it, then decided I liked it natural...for now!;) 

My original ladder is 20 ins. long by 7.25 ins. wide.  It fits just under my cabinets on my countertop, where I wanted it for displaying my dish towel.  I am very happy with the results and how it looks with my sweet Fall dish towel displayed on it!  I think it's very cute!


Happy Crafting!


Thrifty Table Makeover

I truly enjoy refurbishing furniture and decor items.
This sweet little table is one I recently completed, I found it at a thrift store for five bucks!

I knew I could make it beautiful by giving it some TLC and chalk paint!


~*~  ~*~  ~*~


It had potential, and I had a vision!  I loved the style, and the iron and wood combo.


First I prettied up the wood top with chalk paint.


And then decided to give the iron a dry brushing of chalk paint too!


I love the new look, and isn’t she so pretty now?!  I mean, I believe she must be a "She" with all those pretty curves!;)

As I so often say..."Don't be afraid to giving painting a try!  It's the easiest way to transform an item!


~ Hope you find some joy today!


Cutting Board/Serving Board
~ Chalk Painted & Stenciled


It’s always nice to love something all the more. And, so gratifying when you’re pleased with your own work!
- I changed the look of my sweet cutting board with some chalk paint, and a stencil!


I just love what a little paint can do. And, I love the new look of my cutting board. It gets used as a serving piece rather than a cutting board, so I chose to paint it!


I really loved the cutting board, I was just wanting a different look for it.  I decided to paint it to lighten it up.


I gave it a coat of white chalk paint, then let it dry completely.  After that I used a stencil.


I did the stencil in the same white paint so it was a subtle embellishment. I gave the board a coat of wax after everything was all dry to seal the paint and add a little sheen.


~ Happy is my crafty heart!


Gold Leaf Project


My first experience using gold leaf, and I’m in love!


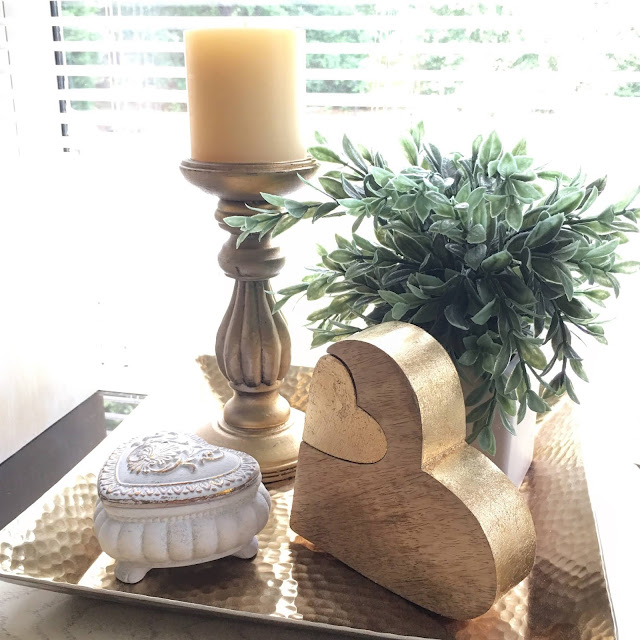
This gift from my daughter, a wooden heart with a little heart cut out had silver leaf where I have added gold leaf!  She said as she gave it to me “I know you’ll probably chalk paint this!”  She knows my love for gold, and for changing items to better suit my taste, or for using paint to do so!

Painting it just wasn’t going to do it, and since it already had silver leaf on it, I figured gold leaf was definitely the way to go!  I love this beautiful heart set all the more now!


Materials needed:
leaf metal
metal adhesive
small paintbrushes

I purchased my supplies at the craft store.  The Leaf metal and metal leaf adhesive, they were about fifteen bucks total, and I had some small paintbrushes on hand already.  There are easy to follow instructions on both items.  There was more than enough materials to do this project and I have plenty left over.  This project was super easy, a little messy, but easy!  It took some drying time for the adhesive to become tacky, but the project didn't take long overall.


Basically all that is needed it brushing on the metal adhesive, let it dry until tacky, then use small torn pieces of the metal leaf and place on the tacky areas, then brush or rub over the metal covered areas.


The edge of the large heart here is finished, the small heart is still in the original silver leaf.   I just prefer gold more than silver!


I'm so pleased with the results! 

It was a fun and rewarding project!  Now I’m looking around my house and wondering “hmmm, what else can I gold leaf!”

PS: I did chalk paint the other heart piece here, it once was all gold - I used white chalk paint to paint it and then after dry wet sanded away the paint on the raised design revealing the gold detail.
I am so pleased with the results of these beautiful heart items!


Bread Box Makeover


I love a good a makeover!  Especially if it's done by using paint.   I picked up a simple and plain looking bread box at the thrift store.   I knew I could give it a new look with paint.


I gave this bread box a new look using chalk paints and wax.  I’m so pleased with the results.  Paint it such an easy fix!  I am always amazed at what a little paint can do!


I used two different colors of chalk paint.  I watered down the paint a little and used the lighter color all over first.  Then used the darker color.  I alternated between the two to achieve the look using long slow strokes and a mostly dry brush.

I chose the colors "timeless" and "lace" both are from DecoArt.   I got these paints from the craft store, they are easy to use and clean up easily with water.


After the paint was dry I gave the bread box a light coat of clear wax and then gently buffed it.  The wax gives it a protective finish.


Here is the before of the bread box.  It was in great condition, just not what I'd envisioned or wanted it to look like.  I even painted the metal handle!  That is another thing that I really love about chalk paint, you can paint just about any type of surface or item.


A recent thrift store find for only three bucks, some paint, an afternoon of my time, and now it looks so much better!  I love it!


For now, I’m using it here next to my breakfast table to store cloth napkins on the ready.  It looks right at home here with my Spring decor.


I really love what a little paint can do!


Chalk Painted Mason Jar

Well I've painted quite a few things using chalk paint, but this is a first for me!  A Mason Jar!


I've seen a few painted vases and mason jars and wanted to give it a try.  I knew this jar was going to be perfect to chalk paint.  And isn't it so perfect for Fall?!  I found this one at a thrift shop for under a dollar!


I was so excited after distressing it I wanted to share my beautiful results!  I gave it a coat of Americana Decor in the color Timeless, it's a favorite color choice of mine, after white of course!  After the paint had dries I gently wiped/rubbed away some of the paint on the raised areas which really enhanced the design and lettering.   Such an easy project and what a nice transformation!  I'd read and heard that using chalk paint on glass works well, and I definitely believe it now after having done it myself!


I love the magic of paint!

Hello Fall! Hello October!


It feels like Fall is getting here. We had a beautiful last day of September yesterday.  I can't believe it's October 1st already!


Pumpkins are a sure Fall statement. I'm adding some Fall touches and these sweet pumpkins I transformed.
I love the neutral toned pumpkins and Fall decor available these days.  Some of those pumpkins can be a bit over priced or hard to find just the right ones!  I gave some inexpensive orange pumpkins a makeover using chalk paint.  They're much more to my liking and more my style now.  Such an easy way to change their appearance!


I used two different colors of chalky finish paint by Americana Decor, Everlasting, and Timeless.  I liked that the Everlasting was white, and the Timeless was beige.

I painted on the beige color first, then let it dry completely.  After the paint dried I dry brushed (minimal amount on paint on the brush) on a layer of white paint.  Before the white paint had completely dried I wet sanded it, (-simply meaning, wipe away some of the wet paint) on the raised areas, leaving some paint in the recesses and creases.  I like the look it gave the pumpkins.
Typically I would use wax after painting, but chose not to use the wax on these, because I liked the chalky look.   It's hard to imagine that these pumpkins were once bright orange with green stems.

It was so simple to do, and just took a little of my time one afternoon.


I love the magic of paint!


.

.

.

.
Tammy is the design enthusiast behind the blog, Tips, Treats & Treasures, where her creativity is explored with a mixture of her artistic abilities and style through her home decorating, thrifty finds, DIY and creative craft projects, along with her family favorite recipes. She shares through her blog her ideas and helpful tips on everything she has learned over the years and much of which she is passionate about in the hope of inspiring others, with her own unique style storytelling.