Showing posts with label Dessert. Show all posts

Individual Banana Pudding Treats

I love banana pudding!

But having a huge amount here for just hubby and I would not prove a lesson in good self control!

So I made these little individual banana pudding treats and they were so good!


I like that I can put together a single serving (or two for us) when I’m having the craving for this yummy treat! And, aren’t they so cute?!

Hubby really likes this because I can add the mini nilla wafer cookies before serving and they aren’t soft/soggy, I’m fine either way!


These are the ingredients used for my simple and quick version of banana pudding!  Mini Nilla wafers, Vanilla pudding cups and fresh banana.
~ For each Individual Banana Pudding I used two vanilla pudding cups, added banana slices and mini Nilla wafers.  That's it!  So easy and so good!

Note: To prevent bananas from browning dip banana slices in equal parts lemon & water mixture!


Enjoy!


Double Chocolate Zucchini Bread


Mmm!...Double Chocolate Zucchini Bread.


If you’ve never had zucchini bread, this is one to start with because you won’t believe there’s zucchini in it!  And, if you already like zucchini bread, and if you like chocolate too, you’re gonna love this!
I used a recipe I found awhile back and tweaked a bit to make it my own.  The double dose of chocolate from cocoa & chocolate chips makes this taste more like cake or brownies.  It’s so delicious!


Double Chocolate Zucchini Bread

Ingredients:

2 large eggs
1/3 cup honey
1/2 cup coconut oil (or vegetable oil)
1/2 cup brown sugar
1 teaspoon vanilla extract 
1 + 2/3 cups all purpose flour 
1/2 teaspoon baking powder
1/2 teaspoon baking soda
1 teaspoon salt
1/3 cup cocoa
2 cups finely shredded zucchini, (peeled-optional) gently pressed
1 cup chocolate chips
1/2 cup walnuts, chopped (optional)

Directions:

Preheat the oven to 350°F.  Lightly grease an 8 or 9 inch loaf pan.
In a large mixing bowl, beat the eggs, honey, oil, sugar, and vanilla until smooth.
In a separate bowl add the flour, baking powder, baking soda, salt and cocoa, mix well then combine with eggs and sugar mixture.  Mix until well combined. 
Stir in the zucchini and chocolate chips.    
Pour the batter into the prepared pan.
Sprinkle walnuts on top.(optional)
Bake the bread for 65 to 75 minutes, until a toothpick inserted into the center comes out clean.
Remove the bread from the oven, and let it cool for 10 to 15 minutes before removing from the pan onto a rack.
Cool completely before slicing; store well wrapped and at room temperature.


Enjoy!...


Lemon Zucchini Bread


This delicious Lemon Zucchini Bread is amazingly good!  Yep, there’s zucchini in it!
I adapted an original recipe found on Pinterest a while back and made it my own.  Now don’t be afraid of the zucchini if you’ve never had any type of zucchini bread because you won’t taste it!  Plus, I shred the zucchini very finely and it’s barely even noticeable.  You could peel the zucchini, but I don’t peel mine.  The zucchini is important though, because it makes this delicious bread amazingly good!
And, it’s amazingly easy to make, too!
If you like sweet breads you’ll love this!  I think it tastes very similar to the lemon cake at Starbucks!


~*~


This was fresh from the oven and the house smelled so good!  I found the recipe back in late summer and we have had it a few more times since.  We really like this sweet bread and I think it's perfect any time of the year, no matter the season.  It truly is delicious!  My husband was skeptical at first but he was surprised that it doesn't taste like there is zucchini in it!  I hope you'll give it a try!

I figured it would be great as something different on the dessert table for Thanksgiving!


Lemon Zucchini Bread


Ingredients:


1 1/2 cups all-purpose flour

1/2 teaspoon baking powder

1/2 teaspoon baking soda

1/2 teaspoon salt

3/4 cup granulated sugar

Zest of 1 large lemon

2 large eggs

1/2 cup oil (vegetable or canola oil) -I used melted coconut oil

3 teaspoons fresh lemon juice

1 teaspoon vanilla extract

1 cup grated zucchini


Glaze: Optional 


1 cup powdered sugar

4 teaspoons fresh lemon juice


Instructions:

Preheat oven to 350 degrees F. Grease and flour a 8 x 4 inch loaf pan.  Set aside.
In a large bowl, whisk together the flour, baking powder, baking soda and salt.
In another bowl, combine sugar and lemon zest, and stir well. 
Add eggs, oil, lemon juice, and vanilla, and stir until smooth.  Stir in the dry ingredients until combined. 
Fold the zucchini into the batter and pour the batter into the prepared loaf pan. 
Bake for 45-50 minutes, or until toothpick inserted in the center comes out clean. 
Allow to rest in the pan for 10-15 minutes before removing the loaf onto a wire cooling rack to cool completely.
While the bread is cooling, make the glaze by combining the powdered sugar and lemon juice in a small bowl until smooth. 
Drizzle the glaze over the bread.  Slice and serve.


Enjoy!...


Grilled Pineapple ~ A simple delicious dessert treat!


A simple, yet delicious dessert or treat we like to enjoy, is Grilled Pineapple.  This is a favorite when we are grilling.  And, since the grill is already fired-up, it's easy to add the pineapple near the end of cooking other foods on the grill, or just after finishing the other foods.  Fresh pineapple is best for this, but, in a pinch canned pineapple also works, I've used the canned, sliced pineapple rings.  I pick a fresh pineapple that isn't soft and by giving it a sniff at the bottom.  If I get a strong scent of pineapple then that is the one I want!

I like to prepare a fresh pineapple by first trimming off the top and bottom and then down the outside edges cutting off the rind.  Next, the pineapple is cut in half length-wise, then cut in half length-wise again, cutting it into wedges, and then cutting away the core area.   The pineapple can also be cut into round slices after removing the rind, then the slices can also be cut into triangles before serving.

Indirect heat is best for grilling the pineapple and as not to burn it.  It only takes about 10-20 minutes depending on how hot the grill is.  I like to make a simple baste by melting a little butter and adding some brown sugar, with a bit of honey and a dash of cinnamon.  Mmmmm it's sooo tropical!  If using canned pineapple use a splash of the juice in the baste, and/or omit the butter.  But, to me the butter is better!-(And, I mean real butter, not margarine!)  It adds a caramel-ly goodness that makes this extra special!


About 4 servings

Ingredients:
1 fresh pineapple cut into wedges or 1 can pineapple slices, drained and reserve juices
2 Tbsp. butter, melted
2 Tbsp. brown sugar
1 tsp. honey
dash of cinnamon


Directions:
Cut fresh pineapple by slicing off the top and bottom.  Trim off the rind, and cut in half length-wise, and half length-wise again forming wedges, cut off core.  Baste, then place on hot grill, baste as needed to keep moist and turn often for approximately 10-20 minutes, until golden and warmed thoroughly.  Serve warm.


Enjoy!...


Celebration of "World Nutella Day" today!


"Chocaholics know that there is chocolate and then there is Nutella. The creamy and delicious chocolate and hazelnut spread has been around since the 1940s, and despite the many imitations that have appeared in the market, Nutella continues to be the favourite guilty pleasure of chocaholics around the world. It is not surprising that die-hard Nutella fans decided to start the Nutella Day tradition back in 2007. This sweet celebration was launched through social networks by a blogger and Nutella fan, and soon tens of thousands of like-minded Nutella devotees showed their appreciation for the chocolatey delight online.
So, Nutella fans of the world unite! Celebrate the existence of this delicious chocolate spread by grabbing a spoon and getting creative with hundreds of Nutella recipes. Start your Nutella Day with a classic Nutella-on-pancakes breakfast and follow with a shaken espresso with a dash of Nutella. On this day, add Nutella to your cupcakes, ice cream, mousse, or even to savoury dishes. Your imagination is the limit!"

Happy "Nutella" Day!

~A day to celebrate Nutella, well, that's my kind of day! ...Yes, Please!  This chocolate loving woman most definitely, and happily, is all in for joining in a day of celebration that's all about Nutella.

I love Nutella!  I discovered it late in life, and I must say I have been making up for lost time.  I search for new and exciting ways to use Nutella in recipes now.

I've featured a few recipes here on the blog using Nutella
     
         ~This is impressive and delicious!  Enjoy for breakfast, as a dessert, or anytime!

         ~Want to bring french toast to a whole new level?  Try this recipe!

    * Nutella Brownie Bites
       ~This recipe has been very popular.  The Nutella Brownie Bites are so easy to make, are made using three ingredients, and they're a must try!


~Here's the latest recipe I have found that is a delicious and decadent dessert idea that's out of the ordinary.  A Dessert Panini. a Nutella-Dessert Panini!  This is something else, and something delicious!  I altered the original recipe that called for marshmallow creme, and used mascarpone-(a sweet Italian cream cheese) instead.  The choice is yours to do whichever you prefer.


Nutella Dessert Panini


Ingredients:
2 tablespoons sliced almonds
2 slices sourdough bread
2 tablespoons chocolate-hazelnut spread
1 tablespoon mascarpone 
4 strawberries, sliced
2 tablespoons salted butter, softened
1 teaspoon powdered sugar


Directions:
Toast the almonds in a pan over medium heat until golden brown, 2 to 3 minutes.

Spread one slice of the sourdough bread with a thick layer of the chocolate-hazelnut spread. Spread the other slice of bread with the mascarpone. Layer sliced strawberries on top of the chocolate-hazelnut spread, then top with a sprinkling of almonds. Next place the other slice of bread on top, mascarpone-side down. Press the 2 slices together.

Butter the top side of the sandwich and then put it on a hot panini maker butter-side down. Butter the other side that is now facing-up.  Close the lid and cook until the sandwich is toasted and warmed through. (If you do not have a panini maker, you can grill the sandwich in a skillet, laying another heavy skillet on top of the sandwich to press it together, or use a grill press. Turn to grill the other side of the panini in the same way.)

Sprinkle with powdered sugar, cut in half and serve!

Recipe adapted from: http://www.foodnetwork.com 


Enjoy!...


Here are some interesting facts about NutellaNutella facts -Things you dont know about Nutella

There is also a bookNutella World: 50 Years Innovation


Peanut Butter Caramel Dip


I have a tasty treat to share today!  Well the info all about it, anyway.  I enjoyed every last bit of what I made of it earlier all by myself.  But, had you been here with me I would have shared my treat with you.  I really would have!    

Doesn't it look yummy?  It is! ...or was!    


I noticed a recipe printed on the lid of my Smucker's Peanut Butter for Peanut Butter Caramel Dip.  Yum!  I was salivating as I read through the ingredients, while I made note of what would be needed on my next trip to the grocery store so I could make 'my own' version of the recipe.  I was making plans!

I love Caramel Apples and this dip got me thinking that it's almost that time of year when they start to make an appearance.  Dare I use the 'F' word and say Fall, even though we do have the better part of September to enjoy the remainder of Summer yet, since Fall doesn't officially begin until the 23rd of this month.  I don't really hate Fall mind you, I'm just one who likes Summer much better!


I altered the recipe printed on the lid above!  To make my Peanut Butter Caramel Dip I picked up some crunchy peanut butter, because I only had smooth at home, and I thought the crunchy would give me more of a 'caramel-apple' appeal.  After all there are usually nuts on caramel apples, and that's just one more thing I like about them.  I left out the cinnamon, and I used the regular sweetened caramel topping.  Actually, I didn't even see any of the sugar-free variety at the store, and I figured I'd prefer the regular caramel topping anyway.

I only used about two tablespoons each of the first two ingredients since I was making this only for myself, and I also added just a couple teaspoons of milk (you can use honey if you prefer to not add milk, either way works, I've done it both ways), this recipe can be altered to your preferences, and I sliced up one apple for dipping.  The Gala apples are a favorite of mine and were perfect with this delicious dip, but I'm sure what ever type of apple you prefer will be good too.


Peanut Butter Caramel Dip


Ingredients:
1/2 cup peanut butter, crunchy or smooth 
1/2 cup caramel topping
2 tablespoons milk / or use honey instead
2 apples cored and cut into wedges


Directions:
Mix peanut butter and caramel topping in bowl until blended.  Stir in milk to make a smooth consistency, adding more milk as needed.  Serve with apple wedges.
Makes 2 to 4 servings


Enjoy!...


Make candy 'Graduation Cap' treats


Are you or someone you know having a graduation soon?  It's about that time of year.


In celebration of the graduate, here's a fun and sweet treat that can easily be put together to serve on graduation day.  Make their day extra special, and sweet!


These Graduation Caps are just too cute and so simple!

Just a few ingredients is all you'll need.


Graduation Caps

Ingredients:
24 thin mints
24 m&m's
1 tube decorating icing - (use a color to match the graduation colors)
24 miniature peanut butter cups

Directions:
Begin by removing paper liners from peanut butter cups, then place each cup upside down on waxed paper.  Put a small amount of frosting on each peanut butter cup then center a mint on top of each.  Using frosting make a loop for each cap's tassel.  Place an m&m on top of each loop.

Other Optional Ingredients:
Rolos in place of peanut butter cups.  Chocolate covered graham crackers, Ghiradelli squares or two Hershey's bar segments-smooth side up- in place of thin mints. Pull apart twizzler in place of icing for the tassel.  Hershey's chocolate drops or reese's pieces, up side down chocolate chips in place of the m&m's.

These would be so cute as pops too!  Just add sticks, you can find those at the craft stores.

Recipe adapted from: tasteofhome.com


-Update-  Check out this fun video for making these into Graduation Cap Pops!


Enjoy!...


Baked Stuffed Apples

{This recipe is part of my Slightly-Homemade recipes collection.  I like short cuts and easy to make recipes, my Slightly-Homemade recipes save time and often have ingredients that make it easier and quicker to create them.  I enjoy using these Slightly-Homemade recipes that are often easier, quicker and time saving, and I hope that you find they do that for you too!}


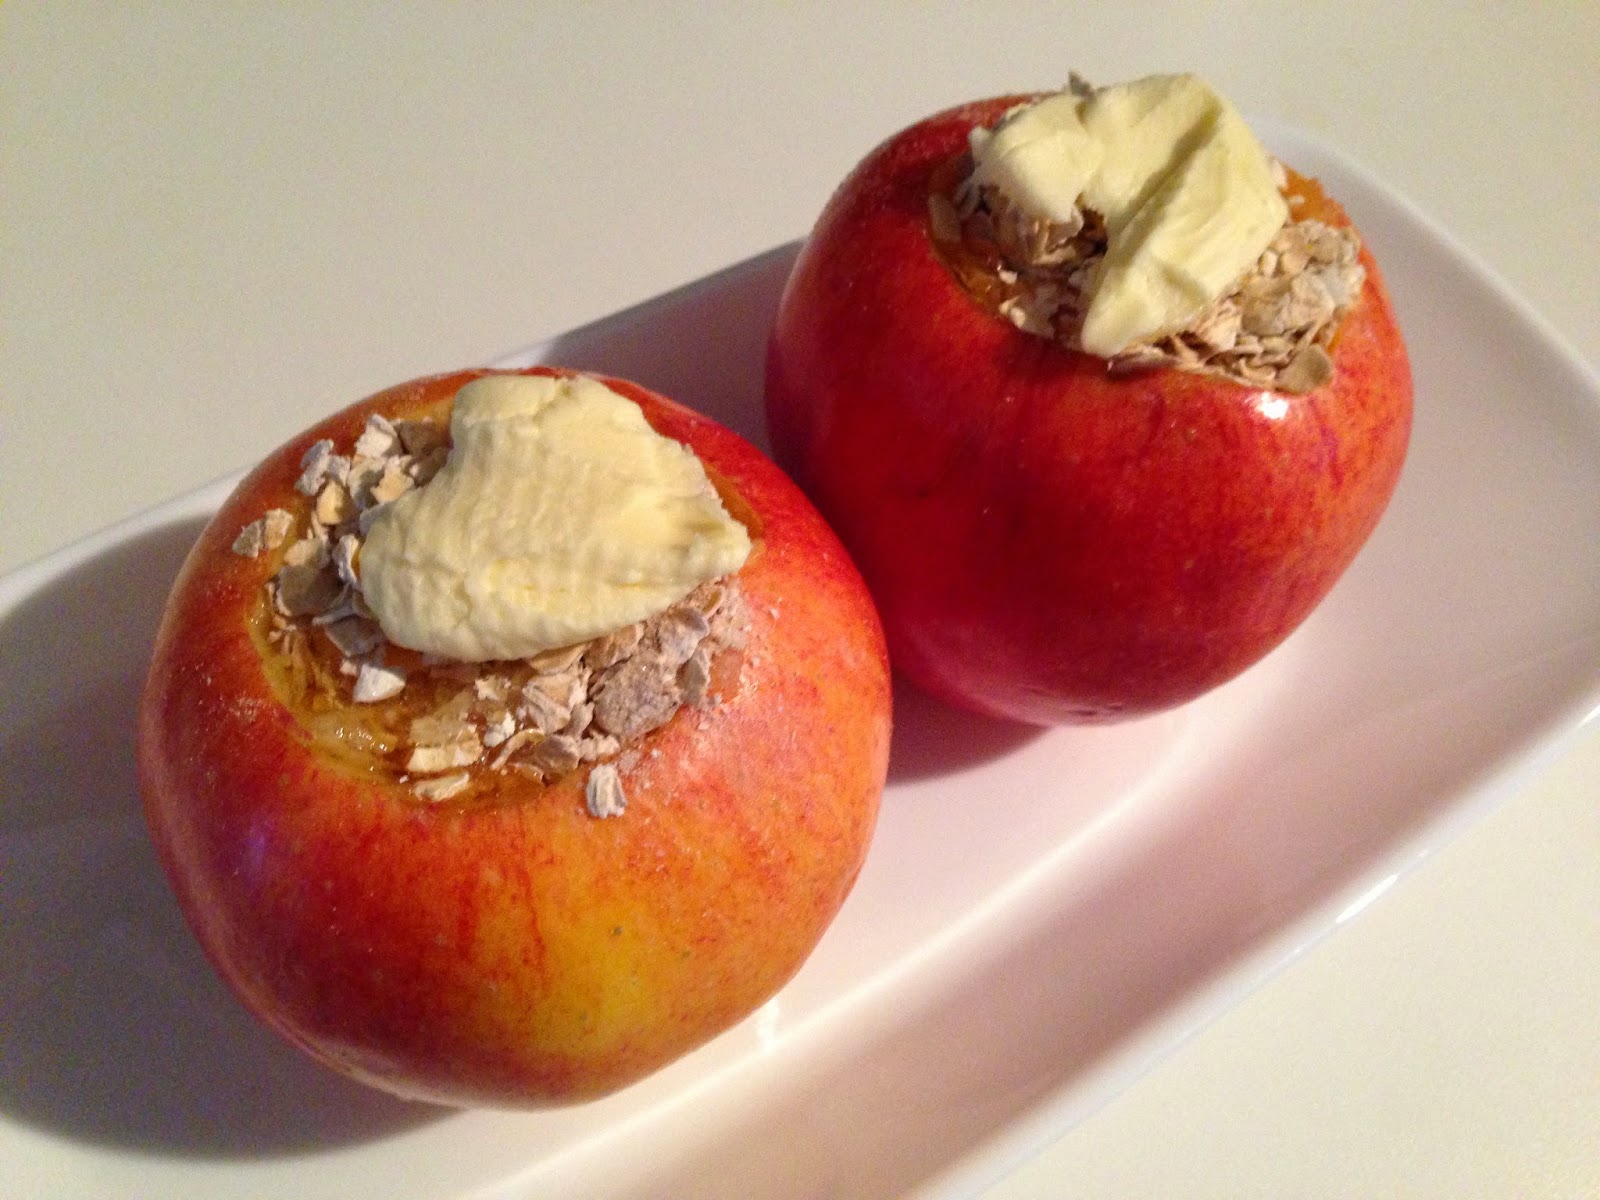
Sometimes the sweet tooth needs some satisfaction so after going on the hunt I found myself staring at a bowl of apples.  I wasn't in the mood for that, but a warm baked apple pie sounded real good.  That led to visions of bubbly apple crisp but, I didn't have oatmeal, and only had very little brown sugar, so that wasn't going to happen either.  Then it came to me, I did have a couple packets of instant oatmeal and fortunately they were of the maple and brown sugar variety.  I had a plan for joy to my sweet tooth and warmth to my soul ...warm, delicious, baked, stuffed apples! 


..._________...


The first steps of the preparation were to core the apples.  I made about a one and half inch opening, leaving about a quarter of an inch at the bottom.


After stirring well to keep it mixed, I added some of the instant oatmeal to about half way up the center, then added a couple teaspoons of water.  I then drizzled a bit of honey (just a little) on top of that.


I added more oatmeal mixture to fill the apples, then a little more water, and added another little drizzle of honey.  I topped them off with a touch of butter.


I placed the apples on a small shallow baking dish, then added a little water to the bottom of the dish, covered them loosely with foil, and then baked them to perfection!


After cooling I added chopped walnuts, and I made a sauce to drizzle over the tops.  In just a few minutes I had delicious baked, stuffed apples topped with a yummy warm sauce.


And here's something that is gonna make you love me, and if you loved me already ...well, you're gonna love even more!

That yummy sauce I put on top, it is as simple as simple can be.  Take a heaping spoon full of brown sugar and put that in a glass pyrex bowl and add to that about the same amount of butter.  Now zap that in the microwave for just a few seconds, I mean few!  Don't walk away, don't sneeze, don't do anything else, just stay right there watching it til you just see the butter melting, now stop!  Carefully remove it and stir it to combine well as the sugar and the butter have a happy union, and then you'll notice that it looks a lot like caramel sauce.  Uh huh!  You're welcome!  Now just drizzle that lovely sauce all over the top of those apples.  Mmmmm.  I know!  Trust me it sounds as good as it really is!  If you like apples, apple pie, or apple crisp, you'll like this.


..._________...


mmmmm, baked stuffed apples = sweet tooth satisfaction!  


Baked Stuffed Apples

Ingredients:
4 sweet apples, (I used Gala)
2 packets instant oatmeal-maple and brown sugar flavor
1/4 tsp cinnamon
1/8 tsp nutmeg
1/4 cup toasted walnuts, chopped or pecans (optional for topping)
1 tablespoon butter divided into four parts
approx 2 tablespoons honey
1/2  cup water


for sauce:
2 teaspoon butter
2 teaspoon brown sugar

Directions:
Preheat oven to 375F.  
Use an apple corer or paring knife to remove apple cores, cut within a quarter inch of the bottom.
Cut about an inch and a half wide opening for stuffing.  
Open oatmeal packets into a small bowl and stir well before filling apples half way full with oatmeal mixture.  Add a teaspoon of water on top of oatmeal to each.  Drizzle about 1/2 teaspoon honey on top of oatmeal mixture in each apple cavity.  Mix oatmeal again and repeat filling each apple with the oatmeal mixture, a small amount of water and finish each with honey.  
Top each apple with one piece of the divided butter.
Add water to the bottom of the dish and cover loosely with aluminum foil.
Bake in center of oven for 20 minutes, then remove foil. 
Continue baking up to 20 to 30 minutes until apples are soft and the skins appear wrinkled.  Test by poking a fork through the oatmeal and into the apple, if it goes in easily and if they feel soft the apples are done.
While apples cool slightly, make caramel sauce.  Drizzle sauce over warm apples and serve.


Enjoy!...


Nutella Brownie Bites - Three Ingredients


I have a true love for Nutella!  You may already know that about me, but if not let me tell you, I do love the stuff.  Love it!  So how happy was I when I came upon a recipe for Nutella Brownies using only three ingredients even?  Happy-Happy that's for sure, and a little skeptical as well.  But I had to get right on my investigation and see, uh taste for myself.  


Wow!  Nutella-icious is the best way to describe them!  Oh and easy too.  I made some that were plain, and some with chopped walnuts on top.  But the best for me was adding a little something extra special to the tops...more Nutella!  Oh yes!  What's better than a Nutella Brownie Bite?  A Nutella Brownie Bite topped with Nutella!  They're absolutely drool worthy!


Nutella Brownie Bites


Ingredients:
For Brownie Bites-
1 cup Nutella
2  Eggs
10 Tbsp Flour

For Optional Toppings-
Chopped Nuts
Nutella
Mini-Chocolate Chips*

Directions:
Mix together 1 cup Nutella, 2 eggs and 10 Tbsp of flour in mixing bowl.  Using a mini muffin pan and mini-cupcake liners fill each muffin 3/4 full.  Add nuts to the tops.(Optional)  Bake at 350 for approximately 20-25 minutes, or until toothpick inserted in center comes out clean.  Cool.  Spread Nutella on tops before serving.(Optional)  Or melt chocolate chips and spread on tops.(Optional)
*Add mini-chocolate chips to the batter before baking.(Optional)  


Recipe adapted from Instructables


Piña Colada Cupcakes


With it being Fall I know that most of the recipes right now are all about pumpkin, but perhaps not everyone is into that, present company included!  Don't get me wrong, I don't dis-like pumpkin, but it's not a huge favorite of mine either.  How about a taste of the tropics?  Pineapple and coconut!  Yum!  Do you like piña coladas?  If you have ever had a piña colada beverage you know what I'm talking about, that pineapple and coconut combination is a wonderful pairing.  The smell and taste provoke thoughts of tropical islands, and are a delight to the senses.  I can just image sitting on a beach with my piña colada drink in hand, dressed up with it's little umbrella.  Are you with me?  These cupcakes make for a great dessert after dinner or a nice snack.  They're a perfect treat for Fall, Summer, or anytime!


Thanks to Kraft for having this great recipe idea.

SIZE-WISE - These refreshing tropical cupcakes, with their built-in portion control, make enough to serve a crowd.

HOW TO STORE - Keep refrigerated.

STORING COCONUT - Store unopened packages of BAKER'S ANGEL FLAKE Coconut at room temperature. After opening, place the package in an airtight container and refrigerate or freeze for up to 6 months.


~ ~ ~  ~ ~ ~  ~ ~ ~


I certainly didn't know that Cool Whip makes a Whipped Frosting!  They sure do. They have different flavors too, such as Vanilla, Cream Cheese and Chocolate...mmm!


~ ~ ~  ~ ~ ~  ~ ~ ~ 


Here's a funny ad for Cool Whip Frosting.

COOL WHIP Frosting | Mistreated Cakes Commercial


Enjoy!...


S'more S'mores


Say "S'mores" and I think of summertime, and an evening campfire.  Although we can also make them late into the fall sometimes too, since here in the south it is often nice enough to have an evening that is warm with a bit of chill in the air, perfect for a cozy fire in the backyard.  Also having a fire pit in the yard is common now days.  A campfire or backyard fire is always a great time for making and enjoying s'mores.  The thought often reminds me of the many times I would allow my kids and their friends to camp-out in the backyard during the summertime.  They just thought is was the coolest thing, real tents and everything, and especially the campfire!  I liked it because they were right here at home with all the benefits of home, but enjoying the benefits of camping too.  No camp-out would be complete without making s'mores, so they were always included in the plan.  

On one occasion, while having the campfire all ready and the kids excited to make s'mores, I realized I totally forgot to pick up some graham crackers when I had been shopping for all the camp prep.  "Seriously?"  Well it didn't stop me from making s'mores fun.  Sometimes you have to try something a different way.  Luckily I had chocolate chip cookies on hand...Yep, good ole Nabisco Chips Ahoy, chocolate chip cookies.  They were a huge hit, and most of the kids liked them even as much or better than the traditional way.  Personally, I to this day still prefer to make them using those chocolate chip cookies.  Give it a try, you might be surprised and find that you do like them too.  You can still add the chocolate candy bar if you like, or the chocolate chips in the cookies may be enough chocolate for you.  Although there's always room for more chocolate if you ask me!  Toast up those marshmallows and then squish 'em (don't you just love that technical term?), between two Chips Ahoy chocolate chip cookies, and mmm, mmm!  S'more please!


...__________________...


...__________________...


This got me thinking about making s'mores cookies.  I found many recipes on my search and there are a gazillion different recipes for s'mores cookies that look easy and tasty, and would offer that s'mores flavor.  I came across a couple that can be made on the grill.  That's something I had never tried.  And who wants to turn on the oven when it's 90 degrees outside?


This S'more Pizza makes for a great dessert, also a fun treat for the kids to put together.  After cooking dinner on the grill, you make dessert on the grill too!  Yummy!

Grilled Chocolate Chip S’more Pizza


Recipe from  Pillsbury


...__________________... 


I'm a huge fan of Nutella, and I also love bananas so this is very much to my liking.  Another interesting way to make s'mores on the grill.

Banana-Nutella S'Mores


image source
Recipe from Food and Wine


I think both of these could also be adapted to prepare in the oven.  How about a treat during winter to make you feel like it is summer again?!  I'll have to give that a try later on.  Oh my, did I just say...winter?  Pffft!


No worries!  It's still summertime, it is August 31st, and the temperature was 88° today! ;)...


Cookie Dessert Bowls


This is a great idea and oh so cute.
Make cookie bowls for serving desserts, ice cream or fruits.
Turn the muffin pan upside down and put cookie dough over the top of each cup then bake.


You could use any regular muffin type pan for this, or mini muffin pans would work too for making small cookie cups or bite sized desserts.  Although this cute pan was used for the example above, and it would be great for mini cakes too.
I found this one at the online store at Wilton.com.  


Sugar Cookie Bowls

Ingredients:

2 3/4 cups all-purpose flour
1 teaspoon salt
1 cup (2 sticks) unsalted butter, softened
1 1/2 cups granulated sugar
1 egg
1 1/2 teaspoons vanilla extract
1/2 teaspoon No Color Almond Extract
Makes:

12 bowls.

Instructions:

1. Preheat oven to 350°F. Spray the outside of each bowl cavity of Ice Cream Cookie Bowl Pan with vegetable pan spray.

2. In medium bowl, combine flour and salt. In large bowl, beat butter and sugar with electric mixer until light and fluffy. Beat in egg and extracts. Add flour mixture to butter mixture, 1 cup at a time, mixing after each addition.

3. Roll out dough on generously-floured surface to 1/8 in. thickness. Cut 4-1/2 in. circles from dough.. Drape one circle over each bowl cavity of pan, pressing to form smooth surface.

4. Bake 11-13 minutes or until cookie cups are firm and golden brown. Cool on pan on cooling rack 10 minutes. Loosen bottom edges of cookies from pan using small spatula. Carefully remove cups from pan and cool completely. Wash, dry and spray pan; repeat with remaining dough.


Dessert is even better when you can eat the bowl!...
~ Tammy ~


Peanut Butter Cookie Cups


A cookie with a little something extra.  
Peanut butter cookie cups with mini Reese's peanut butter cups inside.

If you like peanut butter, peanut butter cookies and or Reese's cups, well this is thee cookie!  I happen to love all three so, when I got this idea I just couldn't wait to make them!  They were delicious and all I can say is mmmmm!


Peanut Butter Cookie Cups


Ingredients:

1 Peanut butter cookie mix
1 Bag of Reese's mini peanut butter cups


Directions:

I used a packaged peanut butter cookie mix and Reese's mini peanut butter cups.  Prepare the peanut butter cookie mix according to the package directions, fill mini muffin cups about half full, press cookie dough evenly down into cups.  Bake for approximately 10 minutes until puffy and light golden in color.  After removing cookies from the oven, cool slightly , then push mini peanut butter cups into center of the cookies until flush with the top.  Mini peanut butter cups will begin to soften and melt, carefully remove from muffin pan and let set until cooled and chocolate looks firm or hardened again.  Centers may be hot for a while so take care if you try them while still warm!(and yes I know from experience)  They are worth the wait though and even better the next day, if they are still around.*wink*  Enjoy!


Sweet-sational!


Strawberry Delight


I just whipped up this delicious dessert for the Hubby and I this evening.  I think I could have had a second helping because it really was that good.  It looked so good that I just had to take a few photos, and I thought it was worthy of sharing.  A simple and easy dessert that is sure to please and one that looks as delicious as it truly is.

It took me less than five minutes to put this delicious dessert together.  Slices of angel food cake topped with sliced strawberries and a nice drizzle of melted chocolate, then topped off with whipped cream.  Sounds pretty good doesn't it?  Well, it definitely was!  You can impress your sweetie with this sweetie!  It's a delicious and light dessert, which is why I named it Strawberry Delight!  


Strawberry Delight


Ingredients:

angel food cake (I used a ready made cake from the grocery store) 
package of strawberries 
2 tbsp. chocolate chips or other melting chocolate (I used semi-sweet chocolate chips)
1 tsp. vegetable oil  (I use this to thin the chocolate for drizzling)
whipped cream for topping - (optional)  (I used the type from a can)


Directions:

Slice angel food cake into serving sized pieces and place on plate.  Cut strawberries in half and then into slices.  Spoon sliced strawberries over the cake.  Place chocolate in a microwave safe bowl and melt chocolate in microwave approximately 1 minute, remove and stir in oil (this will thin the chocolate so it drizzles nicely), continue to stir until chocolate drizzles off of the spoon when lifted up above the bowl.  Drizzle the melted chocolate over the cake and strawberries.  Top with whipped topping.   


Slice angel food cake into serving sized pieces and place on plate.

Spoon sliced strawberries over the cake.

Drizzle with melted chocolate.

Top with whipped cream. (optional)


Enjoy!...


.

.

.

.
Tammy is the design enthusiast behind the blog, Tips, Treats & Treasures, where her creativity is explored with a mixture of her artistic abilities and style through her home decorating, thrifty finds, DIY and creative craft projects, along with her family favorite recipes. She shares through her blog her ideas and helpful tips on everything she has learned over the years and much of which she is passionate about in the hope of inspiring others, with her own unique style storytelling.