Showing posts with label Side Dish. Show all posts

Apple Slaw

I made this delicious no-mayo coleslaw that’s so good!  I prepared a huge bowl of it for my hubby and I a couple weeks ago and enjoyed it most of that week.  It gets better next day or more.

I just had to make it again this weekend and also wanted to share my recipe.  It’s so basic and so easy to make.

Cabbage, apple, carrot and red onion, dressed with olive oil, apple cider vinegar, white balsamic vinegar, lemon juice and salt & pepper.  I love it!  It tastes good and it looks good, it’s so colorful too!

Hubby named it...”Tam’s Apple Slaw.”  I hope you’ll give it a try and love it as much as we do!


~*~


~ Apple Slaw ~
- Ingredients:
1 small head Cabbage - shredded
1 Apple - cored, shredded (I used Gala)
1 Carrot shredded
1/2 red Onion - shredded
3 Tbsp Apple cider vinegar
3 Tbsp Extra virgin olive oil
2 Tbsp Lemon juice or from 1/2 Lemon
1 Tbsp White Balsamic vinegar
Salt & Pepper

- Instructions:
Shred the cabbage, apple, carrot and onion, I carefully used my mandoline or simply use a grater/shredder or food processor.
Combine all ingredients and mix well, adjust to taste. (If it seems too dry add more oil and vinegar, etc.)


~*~

I love the combo of the the main ingredients and the tang of the vinegars and lemon juice.
If you don’t like onion, leave it out. And, take an easy short-cut by using a prepared coleslaw mix. I made it without carrots before since I didn’t have any, but I prefer the sweetness and color that the carrots add!

This dish is perfect for any picnic, bbq, pitch-in or take-a-long, especially due to no-mayo!
I like getting extra veggies and fruits into my daily meals. This is a great way to do it!


Enjoy!


Patriotic Red White & Blue Salad

Serve up some patriotic food with this beautiful and delicious salad!

This salad is perfect for the Fourth of July holiday, or anytime!  A perfect summer salad too!

~ Red, White & Blue Salad ~

Salad greens, fresh Strawberries and Blueberries, Feta Cheese, and Walnuts
Serve with a salad dressing of your choice. We like a lite-Italian or Vinaigrette.


Wishing everyone a fun, safe and spectacular Fourth of July celebration!


~ God Bless AMERICA!...


NOT Hot Wings!
Lighter Version -'Tip'


Well, it's that time of year where most of us make resolutions and say "we are going to eat lighter and healthier and vow to lose to weight!"

Every little bit helps so I try to find ways to lighten up or cut the calories of foods I love.

I’ve found a way to satisfy my craving for “Hot Wings” in a much healthier way.
I call this NOT wings!  Grilled Chicken Breast with Buffalo Wing Sauce.

I completed my meal with Roasted Broccoli and a simple side Salad with Chunky Blue Cheese-Yogurt Dressing.   All the flavor without all the guilt!


Yummy!  Enjoy!

You're welcome!


Brussels Sprouts
Easy and delicious!

Mmmmm! I made these Brussels Sprouts for a side dish this evening. They’re a favorite and are so delicious.  And, so easy to prepare, too!


I hesitate to call this a recipe, it's pretty basic really.  A tablespoon or two of Coconut oil and a little salt & pepper is all I used.  Using fresh Brussels Sprouts, after rinsing and drying off on paper towels I trimmed off the ends and simply sliced each one in half.  I then cooked them cut side down for about 10-15 minutes in the coconut oil on med-high heat, then turned them over and lowered the heat for a few minutes until we were ready to eat.  My test for done-ness is when they soften up and are nicely browned or look caramelized.

I really love the flavor that the coconut oil adds, and it's a good for you "fat" too!  However, if you prefer you can use a different type of oil, olive oil, vegetable oil, etc.  I just think the coconut oil is what really makes these taste soooo good!  I love Broccoli prepared this way as well.  Oh, and I also like to sometimes add a little drizzle of Balsamic Vinegar reduction at the end of cooking.  This adds another layer of flavor. 


I find most people either love Brussels Sprouts or they ...simply don’t know what they’re missing!!!;)

If you love Brussels Sprouts, I think you'll love 'em prepared  like this!


Enjoy!...


Cucumber, Tomato, Onion and Dill Salad

I am hanging on to Summer here, and that is easy to do with the temps still being around the high 80s and low 90s most days.  I'm fine with it for now, and I would honesty be fine with it year round!  With that being said, I am still enjoying cool and refreshing salads, along with foods prepared out on the grill.  We are fortunate to be able to continue to grill out most of the year here in Georgia, too.  Our Big Green Egg works for us all year long!

When it comes to sides, or salads, I enjoy changing it up.  There are favorites though that get a repeat 'cause they're so good and they're so easy.  This cucumber salad is definitely one of those.  I'm sure there are numerous cucumber salad recipes out there, this is my take on one.


It doesn't get much easier than simply chopping up some cucumbers, slicing some onion and adding grape tomatoes, then tossing them around with some balsamic vinegar, and fresh dill!


I like the simplicity of this salad and most of all I love the taste!  A tasty and delicious, low calorie salad that I often think I could eat the whole bowl of at one sitting!  I enjoy having it on hand for a quick side for lunch, or dinner.  And, it doesn't have to be summer to enjoy this salad, you can find the ingredients year round and make this when ever you like.


Cucumber Tomato Onion and Dill Salad


4-Servings

Ingredients:
2 Cucumbers, sliced into quarter inch slices
1/2 cup red onion, sliced thinly
1 cup grape tomatoes
2 tablespoons fresh dill, chopped finely or 1 tablespoon dried(fresh is better!)
1/4 cup white balsamic vinegar

Directions:
Partially peel cucumbers, I use a peeler and peel down the cucumber four times around the outside, or remove peel completely if preferred.  Slice cucumbers in half lengthwise, scoop out seeds, then slice crosswise into quarter inch slices.  Slice onion thinly, cut and separate into strips.  Add cucumber and onion to a large bowl, add grape tomatoes, fresh dill, and white balsamic vinegar, then toss lightly to combine all ingredients.  Chill in refrigerator at least an hour and until ready to serve.


Enjoy!...


Cheesy, Macaroni and Cheese!

When it comes to comfort food anything cheesy gets my vote!  If you love macaroni and cheese [and who doesn't?] you should definitely give this recipe a try.  Once I learned of this macaroni and cheese recipe I could not wait to get the ingredients to make it myself.

I'll admit that I took a bit of a risk in making this for the first time to serve for a little gathering with my family, with the hope that it would be every bit as good as it sounded and appeared to be.  I'm pleased to say that it did not disappoint, and was in fact a huge hit!  I'll certainly have this recipe on the list for future gatherings, especially since my family loved it and so did I.  It was a shining star at that -little family gathering- our Thanksgiving dinner!


I will confess to having loved a certain famous store-bought brand of frozen macaroni and cheese.  It has typically been my go-to mac and cheese since my family and I have always enjoyed it so much, it has a homemade taste, and it's so easy to prepare by simply putting it in the oven or microwave.

Well, now this macaroni and cheese has become the new favorite, topping that store-bought one for me, and my family too.  Yep, I'm ditching our former favorite for this delicious macaroni and cheese ...it's that good!  And, I can feel even better about it being homemade.  Plus it's very simple to make.

I baked my macaroni and cheese in the oven, although the recipe stated that it can be cooked in a slow cooker.  I had other foods cooking in the oven anyway that day, so I prepared it using a 9x13 pan, and it was perfect.

This Macaroni and Cheese is some serious cheesy goodness.  Plenty of cheese in it, and a layer of cheese on top too, all golden-brown and bubbly.  C H E E S Y!  It's the perfect special occasion or holiday dish.  Make this at least once and see for yourself.  My bet is you'll love it too!


Macaroni and Cheese


Serves: 8-10
Ingredients

8 ounces cooked elbow macaroni (I only cooked it for half the time on the box)
1 (12-ounce) can evaporated milk
1-1/2 cups whole milk
1/4 cup (1/2 stick) butter, melted
1 teaspoon salt
Dash of pepper
2 large eggs, beaten
2 (8-ounce) bricks sharp Cheddar cheese, grated (about 5 cups)
Dash of paprika

Directions

Grease a 9 x 13 baking dish and add macaroni, evaporated milk, whole milk, butter, salt, pepper, and beaten eggs.
Stir in all but ½ cup of the cheese.  Spread mixture evenly in pan.
Sprinkle the remaining cheese on top and then sprinkle with paprika.  Bake in 350 degree oven for 50 minutes.

Notes:
This recipe can also be cooked in a slow cooker - Spray a 4-quart slow cooker with cooking spray, add the mixture per instructions above, then cover and cook on LOW heat for 3 hours 15 minutes.

It may also work well adding in uncooked macaroni in instead of the partially-cooked macaroni.  Although, I have not tried this method, yet.


Enjoy!...


Recipe adapted from: food network recipes


Crock-pot Mashed Potatoes


The first time I made Crock-pot Mashed Potatoes using my crock-pot/slow cooker I was hooked and quickly said "I'll never make mashed potatoes any other way!"  So easy and so delicious.  Seriously the easiest and best way to make mashed potatoes!


I had just made Crock-pot Mashed Potatoes for my family, and after having told other family members and friends about how easy they are to make, and how delicious, I was then asked for the recipe.  Sometimes I tend to cook using an -a bit of this and a bit of that- method, and measurements are more of a guesstimation, as it is with this dish.  So, I put together a recipe, it can easily be tailored and tweaked, and additional ingredients can be added.

I simply tossed chopped red potatoes into a greased crock-pot, placed the lid on and cooked them until tender, then I added some butter, milk, salt and pepper, and mashed everything all together.  That's about it basically!  I used my small crock-pot [pictured above] for the recipe below, I would double the recipe and use a large crock-pot for a larger serving. 

I really love that these crock-pot mashed potatoes are practically no-fuss, require only a little attention, and are much less mess then the old way I use to make mashed potatoes, and these are far better than any boxed type.  It's one less thing to worry about when preparing a meal, especially when it is a large gathering like Thanksgiving or during the Holidays.  And just one pot to cook and serve in, too!

I hope you will give this method a try, and you will also see that it really is the easiest and best way to make mashed potatoes.


Crock-pot Mashed Potatoes


4-6 servings

Ingredients:
2 lbs red potatoes, chopped -skins on is my preferred method
1/2 to 1 cup whole milk, cream, or half and half
4 Tbsp butter
1 tsp salt
1/2 tsp black pepper


Optional Ingredients:
fresh minced garlic or shallots
fresh parsley finely chopped
dried herbs -basil, oregano, thyme parsley
sour cream or plain yogurt
grated cheese-cheddar, monterey jack, parmesan
cooked bacon bits or pieces


Directions:
Add chopped potatoes to a greased crock-pot/slow cooker.  Do NOT add water!  Cover with lid and cook on high 2-3 hours, or on low 5-6 hours.   When fork tender, add butter, milk, salt and pepper.  Mash with a masher or use electric mixer.  Add any optional ingredients, combine well.  
No need to mash completely, leave a bit of texture to the potatoes.  Leave at low on the ready in the crock-pot until ready to serve.  Serve as is, or with gravy, cheese, bacon, sour cream or other toppings.


Enjoy!...


Bruschetta - Tomato, Basil and Garlic

Bruschetta
However you choose to say it...
bru·schet·ta [broo-sket-uh,  -shet-uh;  Italian broo-sket-tah] = an Italian appetizer consisting of toasted bread slices drizzled with olive oil and usually topped with tomatoes and basil.

...is an Italian favorite of mine.

It's very easy to prepare and tastes delicious.  I make Bruschetta with fresh tomatoes, basil, and garlic, along with some good extra virgin olive oil, finished off with a dusting of freshly grated parmigiana reggiano cheese, because I think it's the best and it is a preferred favorite!...but you can use other freshly grated parmesan cheese if you prefer.

I happen to love anything garlic, and this is one food where I do like to taste the garlic.  I also love tomatoes, especially fresh, ripe and juicy tomatoes!  It's great having fresh tomatoes during the warmer months.  If you have some fresh, or home grown tomatoes this is a great way to make use of them.

What I really enjoy about this dish is the fresh ingredients.  I have made Bruschetta using fresh tomatoes and I've also made it using canned tomatoes.  I do prefer making Bruschetta using fresh tomatoes, but it's not always possible to get really fresh or home grown tomatoes, so if you use good canned tomatoes that will work well, just drain most of the liquid.  Bruschetta can be served as an appetizer or a side dish, and it will compliment most dishes, and goes very well with Italian foods.


Bruschetta - Tomato, Basil and Garlic


Ingredients:
3 medium or 2 large tomatoes-diced (or 1 - 14 oz can diced tomatoes, drained
2 tablespoons chopped fresh basil leaves
extra-virgin olive oil
1 fresh head of garlic, separated into cloves, peeled
1 bread baguette to make 8-10 1/2 inch slices
Fresh grated parmesan cheese or parmigiana reggiano cheese


Directions:
Start by slicing baguette into 1/2 inch thick slices, then toast lightly on both sides.  Cut two garlic cloves in half, then rub cut side of garlic onto one surface of the toasted baguette slices, this will be the top side(this step can be omitted if preferred).  Chop 1-2 garlic cloves finely-(use garlic more-or-less to your liking).  In medium bowl mix tomatoes, garlic, a drizzle of olive oil, and fresh basil(and/or fresh basil can be sprinkled on top as a garnish at the end).  Using a pastry brush, lightly brush a little olive oil on the top side of each slice(this step can be omitted if preferred). Spoon mixture onto toasted bread slices.  (Olive oil can be drizzled over the tops at this point if desired).  Garnish with a sprinkle of fresh grated, or thin slices of parmigiana reggiano cheese/parmesan cheese.  Serve immediately.


Enjoy!...


Sauteed Spinach


We like spinach, and so I look for new ways to use and prepare it.  Plus, with it being a healthy 'green' addition to our daily meals, that makes it an extra incentive to try to do so. This dish was the result of a simple throw together that I created by adding crispy cooked bacon and a touch of garlic for big flavor, along with the sweetness of caramelized onions, with fresh spinach.   

I tried to keep it a on the lighter side, even though I used cooked bacon in it, by using olive oil instead of bacon grease.  By all means if you want to put it in there it would only add to the flavor I am sure!   We often use the pre-cooked bacon that we finish in the microwave, and that is what I had on hand, but cooking up fresh bacon pieces first and using the bacon drippings to prepare this recipe can be done instead.

The caramelized onion with the bacon really makes this sauteed spinach a delicious and tasty treat.  It's easy and quick to prepare too, so when I am in need of something quick this comes to mind, and I know it will be a tasty addition to about any meal!


Sauteed Spinach


Ingredients:
4 cooked bacon slices, crumbled into pieces
1 garlic glove, minced
1/2 cup chopped sweet onion
3 tbsp olive oil
1 lb fresh clean spinach

Directions:
Heat a medium to large skillet over medium high heat, add 2 tbsp olive oil and onion, cook the onion stirring occasionally until caramelized.  Remove the onion from pan with slotted spoon and set aside.  Add remaining olive oil to skillet, then add garlic and cook over medium heat for 1 minute.   Add the spinach, the bacon crumbles and onions.  Remove pan from heat and toss spinach with tongs until slightly wilted.  Season with salt and pepper.  Serve.


Enjoy!...


Skillet Potatoes


Potatoes are one of those versatile foods and there are numerous ways to prepare them.  They are a breakfast, lunch or dinner food.  Potatoes are always easy to find, pretty inexpensive, and they can really stretch a meal.  The term meat and potatoes comes to mind and with those two, one is as important as the other.

These skillet potatoes are delicious and full of flavor, are both creamy and crisp.  A great side dish that will satisfy your potato lovin' palette.  Try these the next time you want something different.

Whether serving them with your steak, chicken, or whatever meat dish they will stand-out and you'll want to make them again.  So simple and easy to prepare, this just might become a new favorite potato side dish choice.  If you like fried or sauteed potatoes, you'll love these, and they require only a small amount of olive oil and just a touch of butter.  Try my skillet potatoes, I don't think you'll be disappointed!     


Skillet Potatoes


Ingredients:
baby golden potatoes-whole (about 30-35, 1 inch size)
2 cups-low salt chicken broth
3 tbsp extra-virgin olive oil
1 tbsp unsalted butter
1/2 teaspoon salt
1/2 teaspoon garlic powder-(optional)
1/2 teaspoon onion powder-(optional)


Directions:
Place enough potatoes to form one layer, leaving a little room into a 10-inch non-stick skillet .  Add chicken broth along with olive oil, butter and salt to the potatoes-(I also add garlic powder and onion powder at this point.)  Bring to a boil over high heat.  Reduce heat to medium then cover pan leaving lid just a little off set and boil until potatoes are fork tender, about 15 to 20 minutes.  Remove pan from heat, then using a small ceramic bowl/ramekin or glass measuring cup press firmly but gently on each potato until it cracks open.  You are just trying to crack them open, not completely smash them.  Place pan over medium heat and cook uncovered, until all liquid has evaporated and potatoes sizzle until browned, and are crispy on one side, about 10 minutes. Gently turn the potatoes and brown other side.  Serve.


Baby golden potatoes-whole.  
(As you can see next to the tablespoon these are small/baby potatoes.)


Boil until fork tender, press firmly to crack open.  
Cook until all liquid has evaporated and potatoes sizzle until browned.


Turn potatoes and brown other side.  Serve.


Enjoy...


Asparagus - Prosciutto Wrapped Asparagus


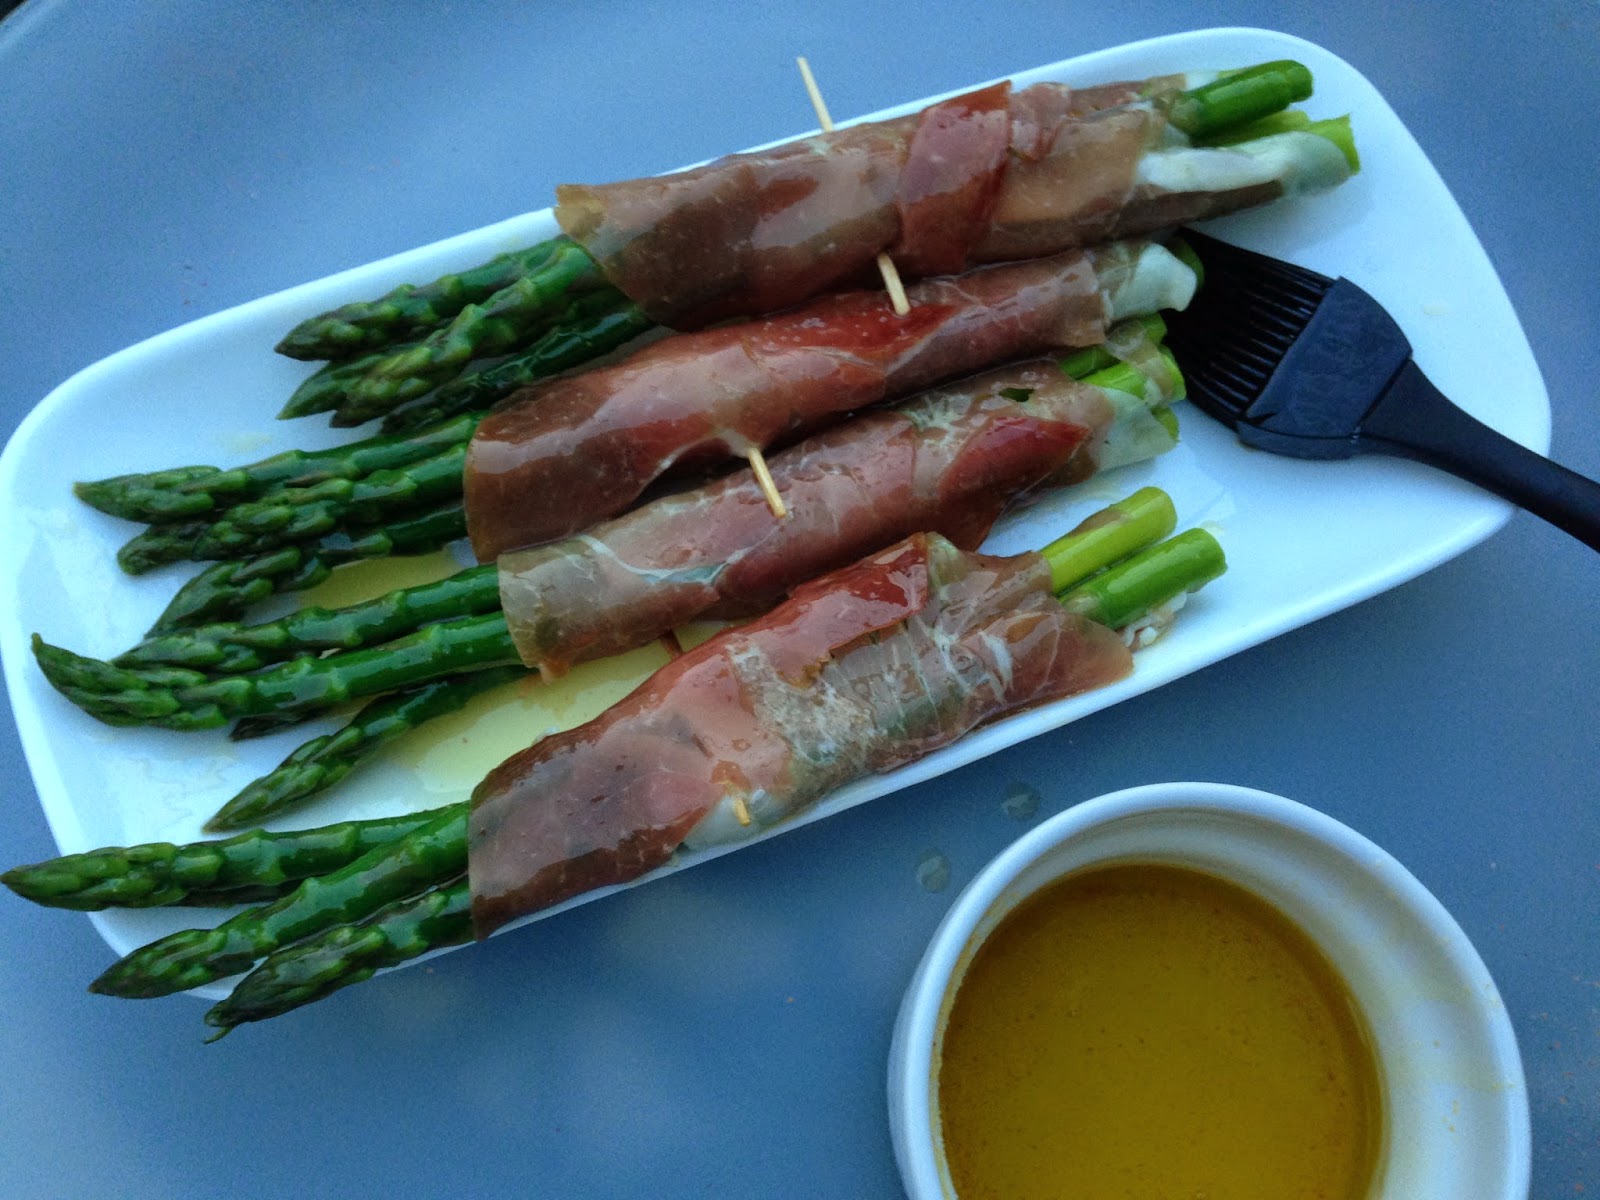
Asparagus is one of those foods, you either love it or you hate it.  I happen to love it and find that it goes well with most dishes, plus it's easy to prepare. I have shown my grilled asparagus wrapped in prosciutto on a previous post,  I was asked "how I make it" so I wanted to share how I prepare and cook it.  This is a fancied version of asparagus.  We love asparagus, we also love prosciutto, so putting them together seemed a no brain-er to me.

Prosciutto is an Italian style cured ham, it is usually sliced paper thin.  It has a mild taste and is slightly salty.  My first experience with prosciutto was while dining at an Italian restaurant where it was served as an appetizer on a antipasto platter, along with other meats such as salami, also various cheeses and olives.  It was a nice beginning to the meal!  I have been making different versions of the antipasto platter since then using a variety of ingredients, but I always include prosciutto when I prepare one.  Prosciutto can be found at most deli counters these days and also in package form too, the thin slices are usually separated by layers of paper.  It costs more than most sliced meats, but I believe it is worth every penny!


Prosciutto Wrapped Asparagus


Ingredients:
fresh asparagus - 16 stalks=3-4 stalks per wrapped bundle, one to two bundles per person to serve 2 or 4
prosciutto - slices
1/2 cup olive oil
1 garlic clove crushed, or 1/2 tsp. garlic powder
black pepper

Tools Need:
toothpicks to secure bundles
large pot of boiling water 
large bowl of ice water 
hot grill

Directions:
Prepare asparagus by cutting hard stalk ends and making them even in length.  Blanch the asparagus in boiling water for 2 minutes until it turns bright green in color.  Immediately remove from boiling water and place in ice water to stop the cooking.  Drain asparagus.  Gather 3 or 4 pieces of asparagus, wrap them carefully with one slice of prosciutto, secure with a toothpick.  Continue making bundles of wrapped asparagus, then set aside until all bundles are completed.  Add garlic to olive oil  Coat each bundle with garlic-olive oil using a basting brush.  Sprinkle with black pepper-(I don't add any salt since the prosciutto already has a salty taste).  Cook on hot grill for about 10 minutes until prosciutto is crisp, flip once to brown both sides.  Serve.


A simple side dish that adds great color and flavor to almost any meal!  
If you like asparagus, give this a try!


Enjoy!...


~ Tammy's Tip Today ~ Easy Corn-on-the-cob with no silk thread mess!

I love corn-on-the-cob.  Fresh corn-on-the-cob says "Summer" to me.  The smell, the taste.  I have always enjoyed cooking corn-on-the-cob right in the husks on the grill.  I also learned that I could cook it in the microwave, or even in the standard oven (I've cooked it that way in the wintertime before).*wink*  I had noticed somewhere out there on the wide, wonderful, web, a claim that you could cook corn-on-the-cob, then remove the husks without the silk threads mess that one usually encounters when dealing with the whole shucking of the husks, or removal of the husks, either way you want to put it.  Well, being the lover of corn-on-the-cob that I am, I had to give it a try myself.  I mean the proof is in the pudding, right?...well corn-on-the-cob in this instance.  


Much to my surprise and complete delight, I am happy to say this is AWESOME!
This makes me love corn-on-the-cob even more!  Wow...what a wonderful thing!
Why haven't I known this my whole life?


I often say "You learn something new everyday", and this lesson learned is definitely worth sharing with others, so I prepared this tutorial to show just how simple and easy it truly is!


Here is how to achieve this.  It's so simple!


Start with fresh corn-on-the-cob with the husks on, cook it with the husks still on in what ever way you choose, grill, microwave, or oven.  (I usually soak mine in a water bath before grilling) I cooked mine for 4-5 minutes in the microwave.  If using the grill I would give it a half hour or more and turn it often, away from direct heat.  In the oven at least 20 minutes at 400 degrees.


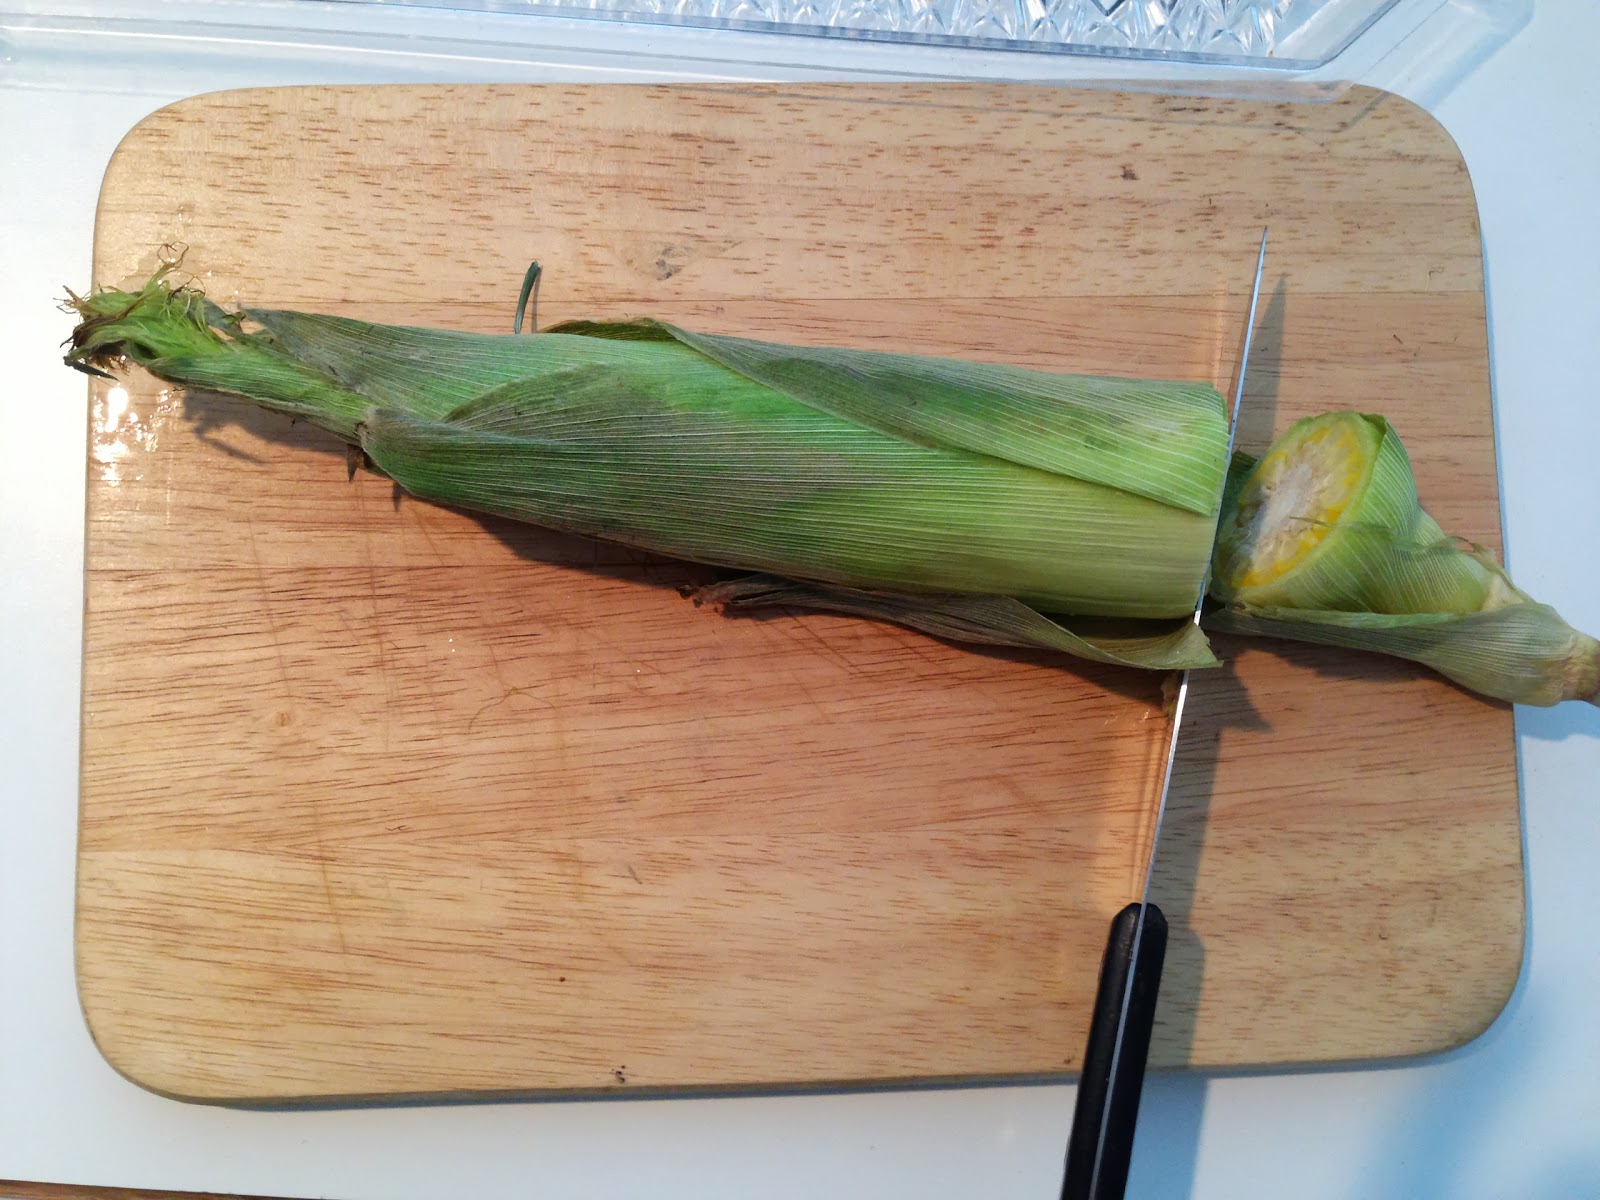
After cooking, be careful it's hot so carefully hold with a pot holder or gloved hand, then cut just up from the bottom end where you can feel the cob, about an inch.  Cut through the cob completely.


This is where I made my cut.


Now, remember it's hot, and squeeze the top end pushing the cob out the other end.


Continue pushing the corn cob out.
Look how nice and clean the corn-on-the-cob looks!


Wow!...Amazing!


"mmm, it's ready for some butter, salt and pepper", I say!


Or cut the corn from the cob, and have some very fresh corn-on-the-cob flavor!


Enjoy!...
~ Tammy ~


Cool & Creamy Cucumber Salad


After all of the holiday goodies and sweets, I thought it about time to get at some healthy cuisine!  Here's a nice refreshing salad.  Cool as a cucumber would put it nicely.  But seriously, this is a light salad/side dish you can feel good about.  Cucumbers are a great vegetable to use for many types of salads, they are low in calorie, zero fat, mostly water, and they are mild in flavor but taste good.  I think it's great that you can find cucumbers all year long and that they always seem to be there when you want them.

I like to eat sliced cucumbers with just a little salt and pepper sometimes.  I remember my Mother would often make cucumbers & onions salad, (I need to ask her about making that, so I can share that too!)  I also like to use cucumbers instead of crackers, as in cheese and crackers or hummus and crackers etc, using the cucumbers instead, makes for a lower calorie snack, and the carb conscience can love on that idea!

When a recipe calls for using sour cream, I often use plain non-fat greek yogurt instead, which I did for this recipe, but you may want to use sour cream. I just happen to love greek yogurt and find it works well as a replacement, and I feel it is a healthy choice.  This is something I like to make for myself as a snack, or as a side to go along with lunch.  Just double or triple the recipe of course to make a larger quantity.  


Cool & Creamy Cucumber Salad


Ingredients:
1 medium to large cucumber
1 tbsp plain non-fat greek yogurt or light/fat-free sour cream
1 tsp finely chopped onion or 1/4 tsp onion powder
1 tsp fresh dill, chopped or 1/2 tsp dried dill
1 tsp sugar or 1 packet of no calorie sweetner
1/2 tsp vinegar
salt and pepper to taste
use more or less of the ingredients to your taste.

Directions:
Begin by either peeling the cucumber or not, (I leave a little of the skin on by running a peeler down four sides, and/or scrape down the skin with a fork) and then slicing the cucumber into thin slices (approx1/4 inch).  Set cucumber slices in colander and place where they can drain off some of the moisture.  Meanwhile in a large mixing bowl, mix together the yogurt (or sour cream), onion, dill, sugar and vinegar.  Dry off cucumbers with paper towel if they appear too wet.  Add cucumber slices to yogurt (or sour cream) mixture and toss lightly.  Refrigerate until ready to serve.  Best if it sits in refrigerator for a little while before serving. (I usually just toss in the ingredients as a guess-ta-mation, so I tried to put this together with measurements for sharing, the ingredients can be adjusted per your taste.)


Enjoy!...


Potatoes - Oven Roasted


One of my favorite ways to cook potatoes is oven roasting them.  I have always liked fried potatoes, but let's face it, now it's all about trimming the fat and eating more healthy foods.  I first made oven roasted potatoes during the winter time, and of course having the oven on is a plus when it's cold outside.  I have a toaster oven and it gets used often for a variety of foods.  Now that Hubster and I are empty-nesters I use the toaster oven even more often since I am only cooking for two most of the time.  Also even if it's warm outside the toaster oven doesn't heat the kitchen like the my regular oven often does. 

(back to the oven roasted taters) I made these for dinner tonight and remembered how much I really enjoy them, he does too, so I decided to add my recipe for those who might be interested and would enjoy a healthier version that tastes like fried potatoes.  I like the simplicity of these potatoes, with easy preparation and clean-up too.  I prefer the small red new potatoes and I like to add a little diced sweet onion often too.  I find it easiest to cut the potatoes into bite sized chunks rather than slices, so I can sit the pieces up on their skins.  This helps with less sticking, less turning them, and more even browning on the cut potato part.  I cover the broiler pan with foil, this makes for easy clean-up after cooking too!


Prepared and ready for the oven.


Roasting in the toaster oven.


Finished and golden brown.


I think I could eat this everyday!


~ Oven Roasted Potatoes ~

  1. 6-8 small/medium red potatoes chopped - (for two servings)
  2. 1/2 c. diced onion
  3. 2 tbsp. olive oil
  4. seasoned salt
  5. garlic powder
  6. onion powder
  7. black pepper


Place potatoes and onions on foil lined broiler pan, coat with oil and seasonings, toss to coat well and then place in 400 degree oven for approximately 45 minutes to 1 hour, or until golden brown.  Serve or keep warm in lower oven temperature for a few minutes.


Enjoy...


Grilled Potatoes - Cooked in foil on the grill


- Grilled Potatoes - 

This is an easy and delicious way to cook potatoes, using chopped potatoes with lots of added seasoning for flavor, along with olive oil, wrapped up in a foil pouch and then grilled.  Smoky paprika and chili powder give it great flavor, and a beautiful color too.  I usually make this dish to be cooked on the outdoor grill, but it can be done in the oven also.  Requiring only a small amount of prep time, this is an easy side dish, especially when grilling out, and it's a no fuss crowd pleaser at my place.  It's a family favorite! We call it "Potatoes in foil."


Grilled Potatoes 
In Foil 


My basic recipe for grilled "Potatoes in foil" (as we call it):
 (Use what you like to make them your own and the amounts to your taste.)

Ingredients:
potatoes of choice, chopped/cubed - (I prefer unpeeled small red potatoes - use a 2-4 per person ratio depending on size)
sweet onions chopped or sliced (optional)
Approximate measure of other ingredients below
3-4 Tbsp olive oil
1 Tbsp chili powder
1 Tbsp paprika
1 tsp garlic powder
1 tsp onion powder
1 tsp dried herbs  - ie. mixed italian or of choice (optional)
1/2 tsp season salt
1/2 black pepper

Directions:
Cut potatoes into quarters, and then slice into about half inch thick slices. Add olive oil and seasonings, mix well.
Everything can be mixed in a bowl first or prepared on a large sheet of the foil the potatoes will be wrapped in.  I make it all up on large sheets of foil, toss all the ingredients by hand and then fold the edges up a few times, folding into pouches and close tightly.   Wrap again if necessary.  This keeps the heat, oil, and steam inside as the potatoes cook.  Place pouch (or pouches if making smaller ones) on the grill.  Turn often!
Cook for about 20 to 30 minutes.  The amount of time to cook until done will depend on the heat of the grill.  A light press on the foil pouch with oven gloved hand or a spatula will help determine the potatoes are getting softer.  The pouch can also be removed from the grill or moved from direct heat source and remain unopened and warm for a period of time, while more space is needed on the grill for meats etc.


Enjoy!...


.

.

.

.
Tammy is the design enthusiast behind the blog, Tips, Treats & Treasures, where her creativity is explored with a mixture of her artistic abilities and style through her home decorating, thrifty finds, DIY and creative craft projects, along with her family favorite recipes. She shares through her blog her ideas and helpful tips on everything she has learned over the years and much of which she is passionate about in the hope of inspiring others, with her own unique style storytelling.