Showing posts with label Appetizers. Show all posts

Caprese salad

A favorite simple side dish, salad or appetizer!


~ Insalata Caprese ~ Tomatoes, Basil and Mozzarella Cheese.


Fresh ingredients of soft mozzarella cheese, basil & tomatoes and a drizzle of balsamic vinegar.

I usually prefer to use roma tomatoes, however many garden varieties of tomatoes are perfect right now, and if you’re growing your own basil this is a great use for it too!


We enjoy a drizzle of balsamic vinegar or a simple drizzle of olive oil is good also, or use both for added flavor. And salt & pepper.


So easy to prepare. Arrange sliced tomatoes and mozzarella on a plate or platter and then tuck basil leaves in between, drizzle with balsamic vinegar/olive oil, serve immediately!


I’ve shared two differently styled ideas for serving.

Serve this as an appetizer or a side to your meal. A good anytime dish and so perfect for summer. We love it and think it’s delicious!


~ Enjoy!


Chicken Taquitos Cooked in the Air Fryer


I made these delicious Chicken Taquitos in our air fryer.

Taquitos are typically fried in oil, however these air fryer taquitos are just as crispy and tasty.

I used a store bought rotisserie chicken, some Mexican style cheese, soft corn tortillas and a few spices, that’s it! So easy and so delicious.

I also made some guacamole and used it as a dip for my taquitos along with some salsa and sour cream.  A new favorite treat for us!


- Chicken Taquitos -

Ingredients:
2 cups shredded chicken
1+1/2 tsp ground cumin
1 tsp chili powder
1 tsp paprika
1/4 tsp garlic powder
1 cup shredded Mexican style blend cheese, cheddar or pepper jack
12 Soft white corn tortillas
Olive oil cooking spray

Additional ingredients for toppings or dipping:
Salsa
Guacamole
Sour cream
Shredded Lettuce
Diced Tomatoes
Diced onion
Pico de Gallo


In a medium bowl add shredded chicken, spices, and cheese, mix to combine all ingredients.
Place tortillas between two damp paper towels and microwave for 20-30 seconds, this makes them easier to roll and helps prevent tearing.
To make the taquitos, place about a tablespoon of chicken mixture down the length of a warmed tortilla slightly off to one side and then roll tortilla edge over chicken mixture and continue to roll up tightly then place seam side down on air fryer basket or pan if baking. Continue for each taquito.
Spray generously with cooking spray.
Air fry or Bake at 425° for 15-20 minutes until golden brown and crisp.
Remove and serve warm along with additional ingredients for topping or dipping.

Enjoy!


Air Fryer Corn Tortilla Chips


Snacking happy!  I’m always looking for new ways to eat healthy, lighter or cut calories.  Snacks are important to help one stay satisfied between meals, but they can throw the balance way off if not careful!


We’ve been enjoying these guilt free Air fryer corn tortilla chips and salsa!  Two whole corn tortillas are only 100 calories, and Salsa is almost no-calorie at only about 10 calories per 2 TBSP!

These air fryer chips are so simple to prepare and so delicious!

To prepare:  I cut the whole soft corn tortillas into chips, put them in a single layer, spray lightly with olive oil spray, place them into the Air fryer and cook at 400° for approximately 8-10 minutes, then serve with some tasty salsa.


~*~


Happy “Cinco de Mayo!”

Today we are enjoying this!  We always love my homemade Guacamole with Salsa and fresh Air Fryer Corn Tortilla Chips!


~ Happy Hour goodness today!


Peanut Butter Caramel Dip


I have a tasty treat to share today!  Well the info all about it, anyway.  I enjoyed every last bit of what I made of it earlier all by myself.  But, had you been here with me I would have shared my treat with you.  I really would have!    

Doesn't it look yummy?  It is! ...or was!    


I noticed a recipe printed on the lid of my Smucker's Peanut Butter for Peanut Butter Caramel Dip.  Yum!  I was salivating as I read through the ingredients, while I made note of what would be needed on my next trip to the grocery store so I could make 'my own' version of the recipe.  I was making plans!

I love Caramel Apples and this dip got me thinking that it's almost that time of year when they start to make an appearance.  Dare I use the 'F' word and say Fall, even though we do have the better part of September to enjoy the remainder of Summer yet, since Fall doesn't officially begin until the 23rd of this month.  I don't really hate Fall mind you, I'm just one who likes Summer much better!


I altered the recipe printed on the lid above!  To make my Peanut Butter Caramel Dip I picked up some crunchy peanut butter, because I only had smooth at home, and I thought the crunchy would give me more of a 'caramel-apple' appeal.  After all there are usually nuts on caramel apples, and that's just one more thing I like about them.  I left out the cinnamon, and I used the regular sweetened caramel topping.  Actually, I didn't even see any of the sugar-free variety at the store, and I figured I'd prefer the regular caramel topping anyway.

I only used about two tablespoons each of the first two ingredients since I was making this only for myself, and I also added just a couple teaspoons of milk (you can use honey if you prefer to not add milk, either way works, I've done it both ways), this recipe can be altered to your preferences, and I sliced up one apple for dipping.  The Gala apples are a favorite of mine and were perfect with this delicious dip, but I'm sure what ever type of apple you prefer will be good too.


Peanut Butter Caramel Dip


Ingredients:
1/2 cup peanut butter, crunchy or smooth 
1/2 cup caramel topping
2 tablespoons milk / or use honey instead
2 apples cored and cut into wedges


Directions:
Mix peanut butter and caramel topping in bowl until blended.  Stir in milk to make a smooth consistency, adding more milk as needed.  Serve with apple wedges.
Makes 2 to 4 servings


Enjoy!...


Bruschetta - Tomato, Basil and Garlic

Bruschetta
However you choose to say it...
bru·schet·ta [broo-sket-uh,  -shet-uh;  Italian broo-sket-tah] = an Italian appetizer consisting of toasted bread slices drizzled with olive oil and usually topped with tomatoes and basil.

...is an Italian favorite of mine.

It's very easy to prepare and tastes delicious.  I make Bruschetta with fresh tomatoes, basil, and garlic, along with some good extra virgin olive oil, finished off with a dusting of freshly grated parmigiana reggiano cheese, because I think it's the best and it is a preferred favorite!...but you can use other freshly grated parmesan cheese if you prefer.

I happen to love anything garlic, and this is one food where I do like to taste the garlic.  I also love tomatoes, especially fresh, ripe and juicy tomatoes!  It's great having fresh tomatoes during the warmer months.  If you have some fresh, or home grown tomatoes this is a great way to make use of them.

What I really enjoy about this dish is the fresh ingredients.  I have made Bruschetta using fresh tomatoes and I've also made it using canned tomatoes.  I do prefer making Bruschetta using fresh tomatoes, but it's not always possible to get really fresh or home grown tomatoes, so if you use good canned tomatoes that will work well, just drain most of the liquid.  Bruschetta can be served as an appetizer or a side dish, and it will compliment most dishes, and goes very well with Italian foods.


Bruschetta - Tomato, Basil and Garlic


Ingredients:
3 medium or 2 large tomatoes-diced (or 1 - 14 oz can diced tomatoes, drained
2 tablespoons chopped fresh basil leaves
extra-virgin olive oil
1 fresh head of garlic, separated into cloves, peeled
1 bread baguette to make 8-10 1/2 inch slices
Fresh grated parmesan cheese or parmigiana reggiano cheese


Directions:
Start by slicing baguette into 1/2 inch thick slices, then toast lightly on both sides.  Cut two garlic cloves in half, then rub cut side of garlic onto one surface of the toasted baguette slices, this will be the top side(this step can be omitted if preferred).  Chop 1-2 garlic cloves finely-(use garlic more-or-less to your liking).  In medium bowl mix tomatoes, garlic, a drizzle of olive oil, and fresh basil(and/or fresh basil can be sprinkled on top as a garnish at the end).  Using a pastry brush, lightly brush a little olive oil on the top side of each slice(this step can be omitted if preferred). Spoon mixture onto toasted bread slices.  (Olive oil can be drizzled over the tops at this point if desired).  Garnish with a sprinkle of fresh grated, or thin slices of parmigiana reggiano cheese/parmesan cheese.  Serve immediately.


Enjoy!...


Stuffed Jalapeno Peppers


I thought I'd spice things up a bit today and share something hot!  These Stuffed Jalapeno Peppers are a must have lately when we are grilling up something outdoors.  We like to enjoy them as an appetizer while we are grilling other items, or before hand.  I mixed up a yummy cheese filling using cream cheese and some of my favorite store bought pimento cheese spread, because it is the perfect addition I discovered (and actually it's what I had on hand the first time I made them), along with some bacon bits, and a few other ingredients.  We really liked the results and enjoyed every bit of them.  Sometimes you just work with what you've got and then ...'new recipe' to enjoy!


I like the mix of cheeses for the filling with the added smokiness of the bacon bits, but if you prefer, you can always make them more vegetarian-friendly without bacon.  Also using shredded sharp cheddar cheese and a bit of mayo would work instead of the pimento cheese spread.  I look for nice medium to large sized jalapenos to use for preparing this.

We enjoy eating spicy foods and don't usually shy away from anything spicy, or on the hot scale.  Although, on one occasion when I made these I used one red jalapeno, and let me tell you it was like a five-alarm fire that I thought I would never extinguish, and I like hot!  But wow...that was flaming hot!  The green jalapenos are the right amount of heat for us!

I feel the jalapenos do mellow a bit and become milder during the cooking process, and also having removed the seeds helps in that as well.  Mild chili peppers or poblano peppers would most likely work well too, if jalapenos are not to your liking, or are too hot.  I have served these yummy Stuffed Jalapeno Peppers to family, and friends.  They are usually surprised by how good these really are, and that they are not as hot, as they are thought to be.  We love 'em!  


___________________________


___________________________


___________________________


___________________________


Stuffed Jalapeno Peppers


*this recipe makes 10 stuffed jalapeno halves
Ingredients:
5 jalapeno peppers, halved - *seeds and membranes removed
3/4 cup pimento cheese spread, (or 3/4 cup shredded sharp cheddar cheese, mixed with 1 tbsp mayo)
1/4 cup cream cheese, softened
1/2 clove fresh garlic, minced, or 1/4 tsp garlic powder
1/8 tsp onion powder
1 tbsp cooked bacon bits


Directions:
Prepare peppers by slicing each pepper lengthwise, then remove seeds and membranes. *Note: Careful with the juices, seeds, and membranes and don't touch your eyes after handling these cut jalapenos! (I often use disposable gloves when preparing these), wash hands thoroughly after prep.
Mix cheeses and the other ingredients in a bowl.
Divide the cheese mixture equally among the peppers, filling each about level.
Grill the stuffed peppers over medium indirect heat (300 to 350 F) until they are warmed through, slightly tender but still crisp, about 15-20 minutes. Serve warm, and enjoy after a couple minutes of cooling.


Enjoy!...


Jalapeno Popper Dip


This dip is amazingly good, and is reminiscent of jalapeno poppers, hence the name.  A creamy, cheesy, spicy delicious dip that is sure to please.  I had made note of a dip recipe sometime ago and wanted to put my own spin on it, and give it a try.  I had forgotten about it until I started planning my holiday foods list and stumbled upon it in my recipe notes.  This was another great choice to serve with my other holiday foods at that time.  I just made this yummy dip again over the past weekend and since I hadn't taken photos of it before, I did capture some this time and wanted to share them and the recipe!

I think I could actually eat my weight in this stuff.  It really is that good!  I love this dip, it's creamy, cheesy, spicy goodness.  If you like hot and spicy, this is definitely going to be something you will enjoy.  If you don't, you can back off the jalapenos called for in the recipe and it would be good too, maybe even try using canned mild chilies instead?  I didn't have any complaints at all from anyone that tried this.  In fact everyone really enjoyed it.  I get requests to make it again, and again!


Jalapeno Popper Dip


Ingredients:
3  8 oz packages of cream cheese, softened
1 cup mayonnaise or light mayonnaise
1-1/2 cups 4 cheese mexican blend cheese, shredded or cheddar cheese, shredded
3/4 cup mozzarella cheese, shredded
3 or 4 heaping tbsp diced jalapeno peppers or 4 to 6 fresh jalapenos-deseeded(seeds make it very hot)
1/4 cup of real bacon bits or 4 slices of crispy cooked bacon-diced
1/2 tsp onion powder or 1 tsp diced fresh onion


Topping:
1 cup of crushed ritz crackers
1/2 cup parmesan cheese - finely grated-the type from a can
1/2 stick of butter, melted


Directions:
Preheat oven to 350.
Prepare an oven safe dish by spraying with non-stick cooking spray.
In mixing bowl, combine cream cheese and mayonnaise.  Add all of the other ingredients into the mixing bowl and stir together well. Spread into a baking dish, dip should be about an inch thick. Thicker dip will require longer time to cook.
Finely crush up the ritz crackers (I place them into a zip-lock baggie and smash them).  Mix crushed crackers, the parmesan cheese and melted butter together to form topping. Sprinkle topping evenly all over the dip.  Bake for 20-30 minutes of until bubbly and warmed through, and topping is slightly browned. Serve with ritz crackers for dipping, or other crackers or tortilla chips.


Spread into baking pan.


Add topping.


Bake until golden brown and bubbly.


Serve with crackers or tortilla chips...It will disappear quickly!


Enjoy!...


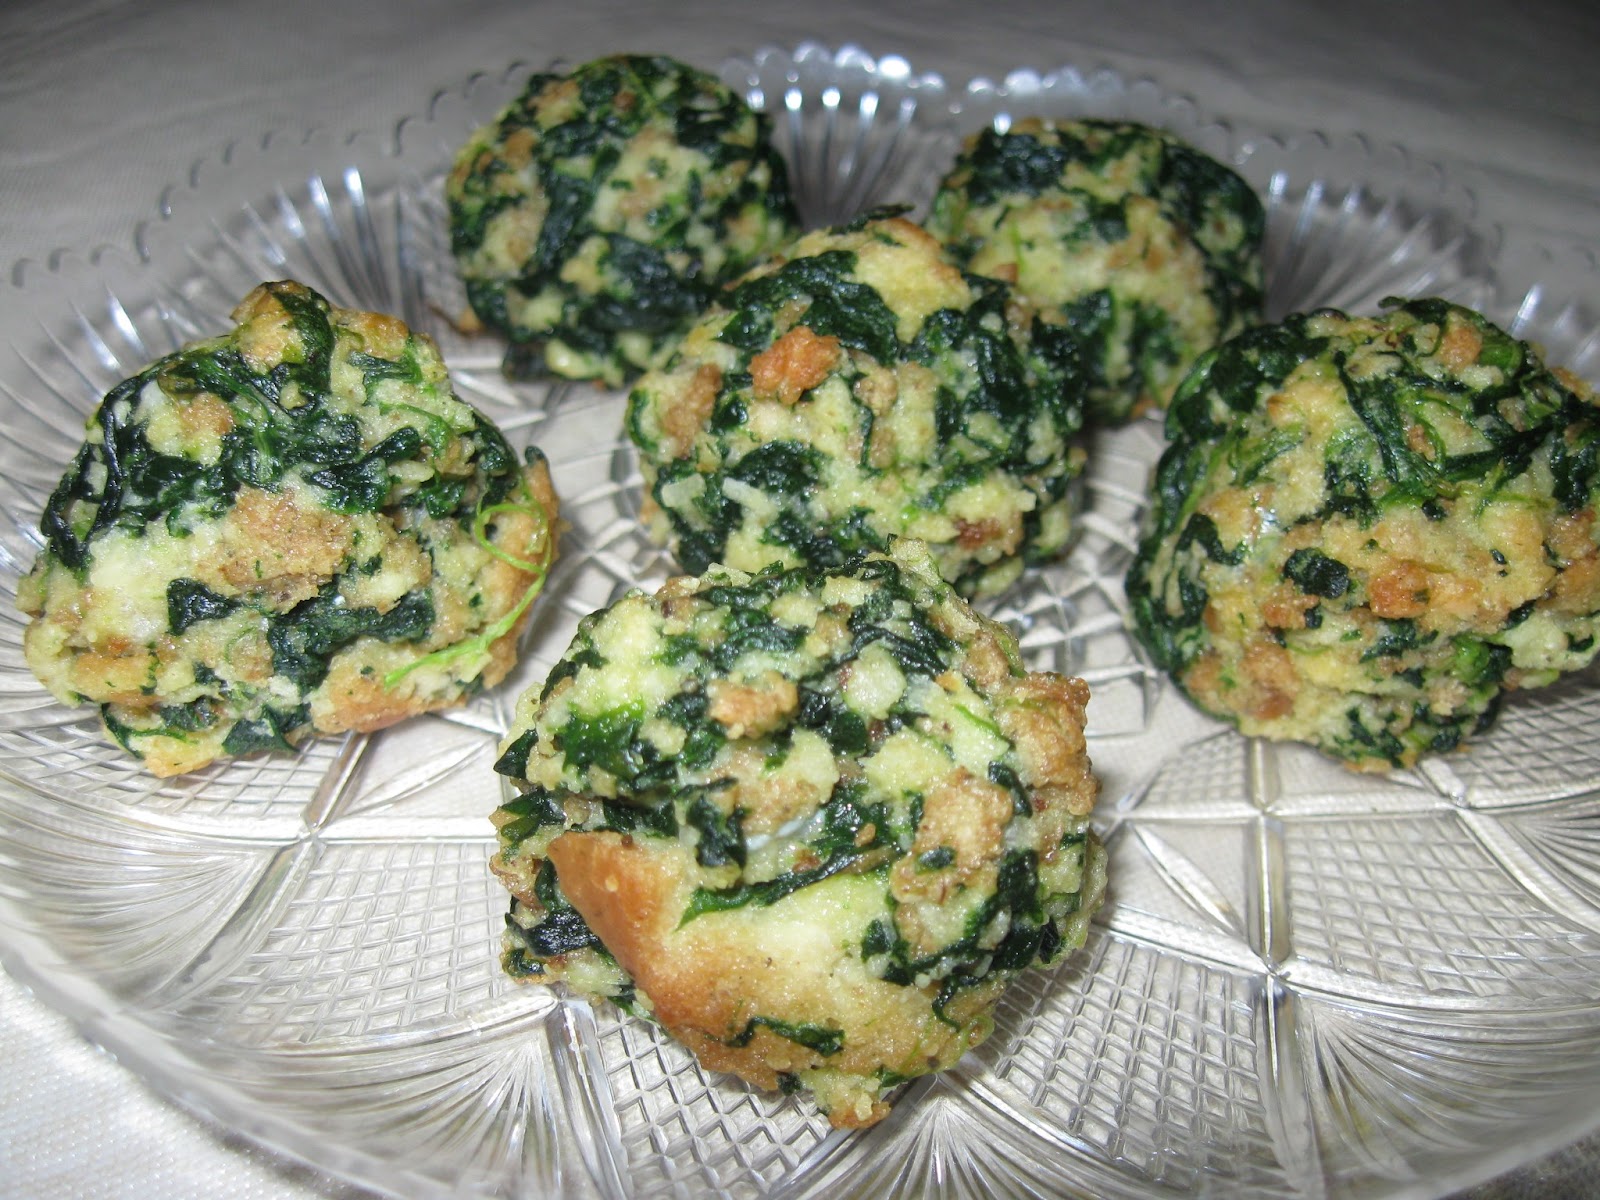
Spinach Balls


As I came across a recipe for these Spinach Balls, I thought that they would be great to serve along with the other holiday foods that I had planned to prepare.  I really like spinach, and knowing that there are so many good reasons to eat spinach, any way that I can include it in my diet I will.  These were even better than I had imagined and they were given the thumbs-up by those that tried them.  Some people don't like spinach though.  Can you imagine that?  Well to each his own as they say, or her.  I'll be making these again since they are so easy and so good.          


Spinach Balls


Ingredients:

  • 2 (10 oz.) packages frozen spinach, thawed & well-drained
  • 2 small onions, very finely chopped or 1 tsp. onion powder
  • 2 1/4 c. stuffing with herbs
  • 6 eggs, beaten
  • 1/2 c. melted butter
  • 1/2 c. Parmesan cheese (the type from a can), finely grated
  • 1/2 c. Fresh Parmesan cheese, shredded
  • 2 tsp. garlic powder or 1 clove fresh garlic, finely chopped
  • 1 tsp. black pepper
  • 1/4 tsp. salt


Directions:

Mix all ingredients until well combined.
Form into about 1" balls; place on a baking sheet sprayed with cooking spray, or lined with parchment paper
Bake at 350 for 20 minutes.  Makes approx. 60 balls

Note:
Spinach balls may be frozen, either baked or unbaked.
For pre-baked balls: Remove from freezer about 30 minutes prior to reheating. Reheat in a 350 degree oven for about 10 minutes.
For unbaked balls: Remove from freezer 30 minutes before cooking. Bake as directed (350 for 20 minutes).


recipe adapted from: Spinach Balls


Caramel-n-Nut Grape Bites


When I first heard of this idea it was claimed they tasted just like caramel apples.  I thought "what a great idea."  I knew I just had to try them for myself.  I've always loved, loved, loved caramel apples, so this sounded like something that I needed to try and hoped I would like too.  Let me tell ya...No disappointment what so ever!  And, they were a huge hit when I served them.  

So easy to prepare and it's a great little appetizer or snack.   I served these along with other mini appetizers over the holidays and they were a perfect addition.  Fruit, caramel and nuts, I think that's a perfect combination.


Caramel-n-Nut Grape Bites


Ingredients:

  • seedless grapes
  • package of caramels
  • chopped nuts
  • toothpicks (optional)

Directions:

Melt caramels according to package directions, dip grapes in melted caramel, then into chopped nuts.  Place on wax or parchment paper.   Serve.
(I placed them into the refrigerator after preparing, and then removed them to sit at room temperature before serving.)


Enjoy!...


Baked Brie Cups

These little treats are bite-sized appetizers that are perfect for the holiday season, entertaining, parties or anytime, easy to make and taste delicious.  I had these for the first time at a holiday party and was I surprised by how good they were, and they only require five ingredients - phyllo shell cups, brie cheese, honey, nuts, and brown sugar.  

You can change the recipe for these by using different nuts, and I've also seen several recipes with using figs, dates or jams, such as apricot or raspberry, or even using pepper jelly.  The first time I had these they were made with chopped pecans, which I do like, but most of my family prefer almonds, so that is what I used for my recipe.  Give these Baked Brie Cups a try for a snack, appetizer or for your next gathering. They are so good that they're additive, and they will disappear quickly!


Baked Brie Cups


Ingredients:
  • 1 package of mini phyllo shell cups (1 pkg=approx 15 shells)
  • Brie cheese - appox 4oz. cut into small cubes 
  • honey
  • pecans, walnuts or almonds chopped or sliced
  • brown sugar


Directions:
Preheat oven to 350.  Place a cube of brie in each phyllo cup, top with a drizzle of honey and a few nuts.  Sprinkle with a pinch of brown sugar.  It's best to not over fill the cups.  Bake for 15-20 minutes until the brie is melted.  Serve immediately.  Use more or less of the ingredients per your preference.


Enjoy!...


Hummus - Cheese & Red Pepper


I enjoy making Hummus, it's easy to prepare, tastes great, and is great for a snack or appetizer.  Hummus is good on crusty bread, crackers or pita bread slices, and I often use sliced cucumber instead of crackers (even better if you're carb conscience).  I use Garbanzo/Chick Peas beans in my recipes for hummus.  Beans are a good source of protein, little if any fat, and low in calories.  Which makes them a good choice for healthy eating.  There are many ways to make hummus and many ways to enjoy it.  For this recipe I use a few basic ingredients, items that I usually have on hand.


Cheese & Red Pepper Hummus


Ingredients:
1 can - 16 oz. Garbanzo/Chick Peas beans - drained
1/4 cup shredded cheese blend or preference
Roasted Red Peppers, 1/2 of one pepper - approx 2 Tbsp. chopped
Fresh Basil 3or4 medium size leaves - or 1 tsp. dried Basil
1 clove Garlic or 1/2 to 1 tsp chopped garlic
2 Tbsp. Olive oil
Black pepper and Salt - to taste

Directions:
In a food processor or blender add all ingredients.  Pulse, then blend until looking paste like.  If too dry add more oil or tbsp of water and blend more.  Serve.
Also can be chilled in the refrigerator and served later, cover or place in container with lid.


Enjoy!...


.

.

.

.
Tammy is the design enthusiast behind the blog, Tips, Treats & Treasures, where her creativity is explored with a mixture of her artistic abilities and style through her home decorating, thrifty finds, DIY and creative craft projects, along with her family favorite recipes. She shares through her blog her ideas and helpful tips on everything she has learned over the years and much of which she is passionate about in the hope of inspiring others, with her own unique style storytelling.