Showing posts with label Outdoors. Show all posts

Our Garden Perinnials


Sunshine and blue skies always makes me happy!

And, some of my favorite perennials in my garden.

This Privet has been blooming beautifully and so fragrantly for a couple of weeks.
I look forward to it’s white blooms every year, and it’s one of my favorite things in the Spring!
The sun was just popping up and casting a golden glow behind and to the left.


I’m happy to have this beautiful view to enjoy!


Liriope Big Blue, Liriope Variegated, and Hostas. These are easy low maintenance plants that keep on giving! And, they flower in the Summer, the Liriope blooms pretty purple-ish spikes and the Hostas tall white & lavender flowers.
In the Spring I trim the Liriope as the new foliage appears, the Hostas simply pop through the ground and look gorgeous.


My fun tip of the day!


And then it was June
~Time for more outdoor fun!


Well June has arrived and now Summer is right around the corner.  Time really flies when you're having fun!


My handsome companion while enjoying coffee outside this morning!

I visited the garden center on Sunday and shorty after getting the plants and flowers unloaded to the backyard we got a much needed rain shower!

}The rain was a welcome sight since we’ve had a drought here!


This is my happy place of a morning!
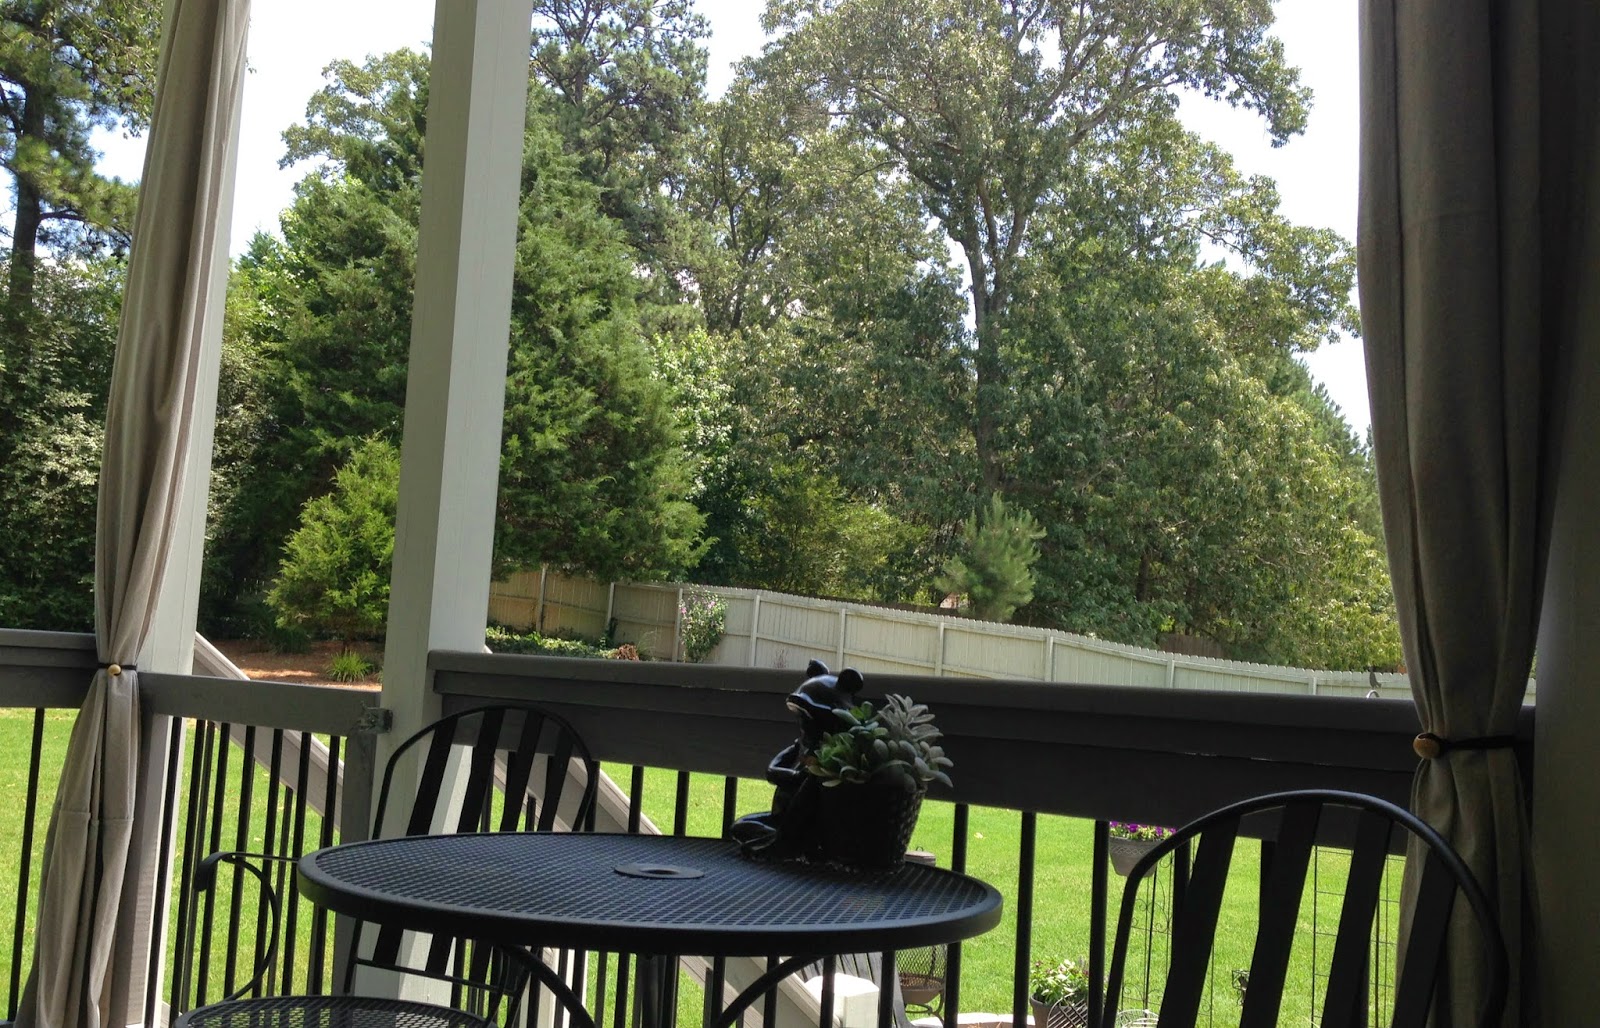
I enjoy my coffee out on our porch...My favorite way to start the day.  And end the day too!

We spend a lot of time out here, this space is a wonderful extension of our home.  Rain of shine we can enjoy spending time out here.  Morning, noon and night!


Happy June!...


May in Bloom


It's May already!  


Our beautiful Privet bushes are blooming their fragrant white flowers, it smells so wonderful!
The sweet fragrance fills the air!  This is a hardy perennial.  I love how it provides such beauty year after year.

[Some say “it’s an invasive plant and don’t like it” but, I love it for many reasons.  It’s evergreen, a privacy hedge, the birds love its berries, and I love the abundant pretty white flowers and sweet smell when it blooms!]

I look forward to these blooms every Spring!


Another thing I love about perennials is...I haven’t done a thing to this planting area yet this year, and Spring has it looking beautiful!  The Salvia, Hosta, and Liriope fill this area and are such easy plants!

This happy boy loves being outside, and chasing wildlife i.e. bunnies, birds, bugs, and lizards! Hence the big smile on his face ...and the decorative iron fence to keep him off my pretty plants!  Winning!*wink*

I usually tuck in some annuals in the currently empty pots, I like that I can change those plants with the seasons.

It's nice to enjoy beautiful mornings and afternoons out here!  And, it’s nice to slow down, unplug and just enjoy!


Wishing everyone a Happy May!...


Our Summer Patio and Porch

Time to say "so long to August" today.

The look and feel of Summer remains a while longer here in the south and that's OK with me, and it makes me smile!


This view of our back garden may look this way for only a few more weeks, so I'm enjoying it and all the beautiful summer color and watching the sweet hummingbirds that continue to visit.

It's been a great summer!  This area has done well this year.  I have enjoyed this garden area and the pretty flowers!

~ So long and goodbye beautiful August, see you next summer!


I enjoy this view of our covered porch and outdoor fireplace. We haven't changed much out here this season.  I added a couple of new plants, and found the pretty iron sections at an antique shop, they look nice on the fireplace so this is where they landed after I brought them home!

The weather is perfect right now for evenings out here enjoying a cozy fire and a glass of wine, and where we sometimes just listening to music, other times we can watch a movie or some football. We love our outdoor space!
Enjoying this last beautiful day of August.


Summer is so sweet, my sweet summertime!


Spring on the Back Porch and Patio

I hadn't shared any photos lately of our outdoor spaces.  We added on the covered porch and patio a few years ago, and they have become two of our favorite places to spend time.

We are fortunate to have good weather most of the year here in Georgia. We get some cold throughout the winter, but a fireplace and gas heater add warmth on those chilly evenings.


I added just a few Spring touches out here, a bit of greenery and lots of candles for night time ambiance.  In all honesty, I have a love/hate relationship with the TV out here.  I could have done without it, but the Hubby really wanted it and I do enjoy it part of the time.

I really enjoy being out here early mornings listening to the birds in the quiet.  It's especially nice on a bright and beautiful day!  I love a slow and easy morning out here on our back porch.
It's my "happy place" to begin and end each day!


This patio area next to our covered porch is a great spot for sunny mornings! It's also a great spot for planting pretty flowers, and attracting hummingbirds!
It's often a work in progress, because just like decorating inside, I like to make changes outside too!

My coffee mornings out here are a wonderful start to my day with the sights, scents, and sounds of nature.
This is just after I planted some new annuals. My clematis vine was just beginning to bloom its pretty purple flowers, and the grass greening up beautifully after dormancy.

I created the iron trellis wall as a blockage for our precious golden retriever who thinks he is suppose to cut through the planting area.(insert *eyeroll* here)  Well, not so fast boy, I've found a way to put a stop to that and make it pretty at the same time!  I like the way it turned out and it surely does the job!

It's a beautiful sunny day today so I feel the need to go enjoy it outdoors, I'll be out here doing just that!


Have a great day!


May has arrived!


Hello May!  As the saying goes...

April Showers Bring May FLOWERS 


I love my pretty chalkboard from Hobby Lobby it's so perfectly me, and I love to write fun things on it!
*Though "artist" I am NOT!*


Here is where it's on display in our breakfast area.  It has been so nice to open up the doors and windows again to let in some fresh air!   The pollen has subsided, somewhat, and the April showers have helped greatly with that!

The April showers have been doing a nice job of watering the trees, plants and flowers outside.  I've been adding some spring flowers to my planting area around the patio next to our covered porch.  Our covered porch is a wonderful extension to our home, it's another room, one we enjoy most of the year round!  I'm so happy it's May, we look forward to many good things this month!


Happy May!


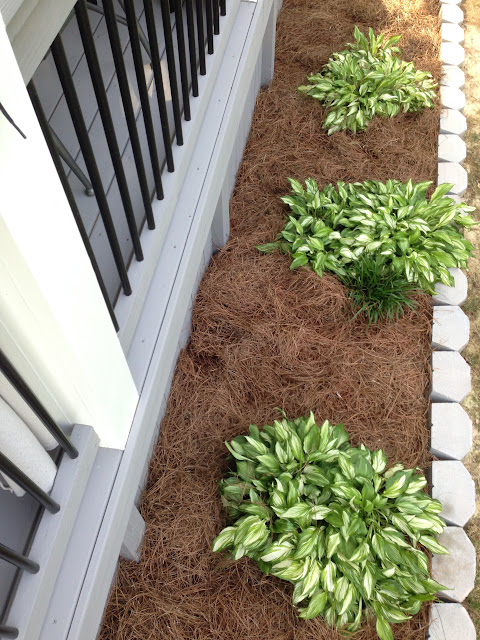
Hostas - A beautiful favorite


I love my Hostas!  These plants are an easy no-fuss type of plant and that works real well for me!  I definitely recommend them, especially if you are a no-fuss in the garden type, like I am.  I don't spend hours working the garden, I want instant gratification most of the time and little fuss, you know?  I like plants that almost take care of themselves.  And, this is one of them!  

There was a time I'd spend hours on end in my back yard gardening and such, but now I find I like to spend more time enjoying it, rather than working it!  I learned along the way to choose more plants and flowers that require less of me, but still give me something I can enjoy.

One of my favorite no-fuss plants are Hostas, because for one they are a perennial (comes back every year) and they really are an easy care plant.  And, I also think they are beautiful, plus they just get better and bigger every year!  They are ideal for the low maintenance gardener like myself!  

These plants are very easy to divide and replant around your garden.  They are a shade loving plant, but mine get ample sun and still do well.  Hostas can be planted in the ground or in pots.  They make a nice potted plant too, either big or small.  Whether planting in the Spring, Summer or Fall, these plants will be ones to enjoy, and to look forward to the next year and those to follow!  

Hostas flower late in the summer with tall shoots and trumpet-like flowers on the top, mine are white and purple.  The flowers change the look, they can be left alone or trimming them works well if you like, and you can use those cuttings as arrangements indoors, although trimming them is not necessary.    


My Hostas were looking like this a few days ago.


By winter they look like a dead plant, but not to worry, they will be back next year!  I get excited when I see them popping through the ground, because I know they are going to be beautiful in no time at all!
  

Early in the spring they start popping up through the ground.


Within just days they come in fast.  
This is a good time to divide them, but you can divide them almost anytime once they emerge.


In no time they fill out nicely.  I like that they get bigger every year.  I was given these three Hosta plants from a neighbor years ago who divided some of her Hosta plants.  I have divided these and used them on the other side of our deck, and in another planting bed.  And, I took some of the divides to Indiana years ago to share with my Mom, back when she still lived there.  These serve as a nice base plant and I can fill in around them with annuals, either in the ground or in pots.


These Hostas are on the other side of the deck which I mentioned, and were divides from the original three plants given to me by my neighbor.  I don't have to fuss with these at all and they look this beautiful!  I love that!   


And, I love my beautiful Hostas!...


Shutters Project

I'm so excited to be sharing the finish of our new custom made shutters that we recently added to our covered porch.  My Husband and a dear friend of ours, who oh so kindly, not only helped with the project, but also provided most all of the tools for it too.  Thanks again Tom!  Thank you, to both of them for all the hard work they put into this.  They both did an excellent job.  I am truly grateful.  They exceeded my expectations and I love the results! 


Over a year ago this past November we were almost at completion of the dream-turned-reality of our new covered porch and patio area.  You can read more on that here.  It was an adventure that lasted from the tear down of our old deck and patio in late July, through to right before and just in time to host our Thanksgiving holiday with family and friends.  

We use the added space quite regularly and even throughout the winter with the use of the fireplace and occasionally an out-door heater.   I shared a post on the curtains we made from drop cloths, and while they do a fairly good job for the most part with keeping the sun out, providing shade and privacy.  We also used them to help keep some heat in during the cooler months, and to cut down on the rain coming in as well.  We found that we get more rain and debris coming in from the west side, even if closing and securing the curtains.

I started thinking about shutters and wondering how, or if, that would be doable, affordable even?  After much looking, and searching, my ideas were then shown to the hubby for approval, and then also to the wood-working man extraordinaire/friend, Tom.  Who in short order put together a plan of action and list of needs.  With said plan a go, they were off to get supplies and begin the creation that proved even more to my liking and total satisfaction, than the original thought or vision.  To say I am pleased with the final result is definitely an understatement!  I'm loving the new shutters and I am truly amazed every time I look at them.   I have jokingly said to them that I better not be asking for more shutters for a while, but don't you think they would look good say, around the whole porch?  Or perhaps just on the opposite side for now!


With the help of my husband here is a brief description of the Shutters:
From 12' x 1" x 8" Cypress lumber they cut 6' and 3' lengths, and then biscuit-cut and joined them to make 1" x 16" panels.  Each panel was reinforced with additional 1" x 4" pieces of cypress, that were screwed horizontally across each joined panel, by counter-sinking the screws and filling the holes with wooden dowels.  Each completed panel was then connected with mortised hinges, creating a bi-fold 32" shutter.  A set of the 32" shutters filled each of the four openings on that area.

When all eight shutters are in the closed position, it provides weather protection for almost a 100sq ft area. Pintle hinges were used to mount the shutters to the deck.  He describes it as "A deceptively complex design that included 40 hinges connecting 32 pieces of cypress."  

We chose to paint the shutters white to match the rest of our porch and house trim using the same "Super Paint", and the black hinges were chosen to match the balusters in our railings which are black powder coated, as are all of the hinges.

We actually began this project in October, and worked mostly over the weekends doing what we could, when we could as time allowed, and allowing for the painting and drying time too.  We were finished just before ringing in the New Year!


Our work area for the painting.  Painted bottom sections completed.


Painted top sections completed.


All hinges added.  Ready for installation!


Installation Day!  This is the area where they will be installed


Hard at work installing the top portion, after the bottom portion has been added to this section.


 I'm loving the look already! "Looking good fellas...Keep up the good work!"


***


Installation complete!  Just a few details left to do, by adding some trim and latches on the inside to lock the shutters while closed.  They are doing a terrific job of keeping out the wind and rain, and the leaves and pine straw from the nearby trees.  I think the shutters are beautiful, and they're a nice addition to the whole look of our covered porch.


Trim added to the top and bottom of these sections and latches added.


Close-up of the trim and latches.  The latches keep the shutters securely closed, especially in windy conditions


***


A view from the outside when all shutters are closed.


View from the outside when just the top shutters are opened.


View from inside with the top shutters open.


(I took this photo before the trim and latches were added.)  The shutters are a beautiful and functional addition to our porch. We are very pleased with the whole process, and the completed look is even better than imagined!  Now we can close off the wind and rain, and maybe even laugh at the weather a little bit!


I just love it when a plan, goes better than planned!...


Table for the Big Green Egg


We knew we wanted one and weren't planning on one so soon, but there it was...

An Egg-cellent new nesting table for our Big Green Egg(BGE)!

A trip to the Ace Hardware store for some egg-cessories led us to the temptation of a fully assembled table that seemed too perfect to pass up.  A few measurements taken and the decision was made to go home and see if it would fit where we wanted it to be located on our patio.  Yes!...It will fit!  Now a plan of action to get it moved to it's new place at our home.  


Thanks to the help of our friendly neighbor and his pick-up truck, he and the hubby returned to lay claim to the table that would be ours and they loaded it up to bring it to it's new home.  The fellas made it look easy, and in short order the new table was parked where it would live and be on display nesting our BGE!  

It fits perfectly!

...__________________...


An afternoon of staining the table to match our deck made it all the better.  
Hubby did a fine job of it!


We previously used this BGE nest, it worked well enough and was on wheels.  
It also had lift-up shelves...  


And this is the new nesting place!  
The EGG sits on a metal table nest, which provides airflow beneath the EGG.  
The floor tiles were my great idea, and can be used as a cutting surface, heat pad, etc. 

We are very pleased with our new table!  
This adds even more enjoyment to our cooking experiences. 


Most egg-cellently!... 


Curtain Tiebacks - Easy/No Sew


I created curtain tiebacks for my outdoor curtains that were easy, no-sew, and inexpensive! 


After feeling quite pleased with my creative solution I wanted to share it and show how I did it.  

I was in need of something simple, easy to use and inexpensive, to be used as tiebacks for our curtains on our covered porch.  You can learn more about our inexpensive outdoor curtains project here.  We added the curtains not only for privacy, but also for added shade from the sun, and added warmth in the winter when we use our fireplace and an outdoor heater.

They also cut down on the rain that sometimes gets on the porch when it's really raining hard.  We had been using left-over clips from the curtain rings we used to hang the curtains, along with cup-hooks secured to the deck rail to hold the clips and curtains in place when we have them closed, and/or when the wind is blowing them.

However when the curtains are open or pulled back and the wind blows, there's also a need for something to keep them gathered and under control.  I had an extra set of long black shoe laces that worked as a temporary fix when tied around the curtains.  So I purchased a few extra packages of them since I needed several overall, plus they were inexpensive and I was ok with the look.

That works just fine most of the time, but if the curtains have not been tied back and a wind picks up, well I'm out there grabbing them from flight as I think to myself "Auntie Em, Auntie Em!", and I'm trying to tie the laces on quickly!  Whew!  


I knew I needed to come up with a better plan.  A quicker, easier plan!  My creative mind was stumped until the "Ah ha" moment arrived, and I had it!  I was thinking...bungees?  My kids have often called me the "bungee queen", because I can sure find ways where bungees do come in handy and are quite useful in life!

My thoughts are often "I can Tammy-rig it or bungee it!"{wink}  Similar to bungees, I've used stretch hair bands for cord control on many different items and I also did a blog page on that, you can see it here if you like.

(OK, back to the task at hand!)
My original idea was to use large buttons and stretch cord.  While shopping, I discovered some stretch headbands that were already about the perfect length that was needed, but I couldn't find the buttons that I'd had in mind, or that were just-right with large enough holes for the hair bands to fit through, or without metal, or that I thought would hold up well.

I then decided instead to look for some large hole beads and did find round, wooden beads about an inch in diameter.  "Perfect, that will do!"  These tiebacks were a cinch to make and inexpensive as well, which is what I was looking for since they are outdoors after all, and they are not unattractive.  The best part is how quick and easy these are to use, and they do the job nicely!  The cup-hooks secured to the deck rail help to keep them in place.


Now I can add these tie backs rather quickly, and remove them quickly too.  Even when it's windy!


... ... ... ... ... ... ... ... ...


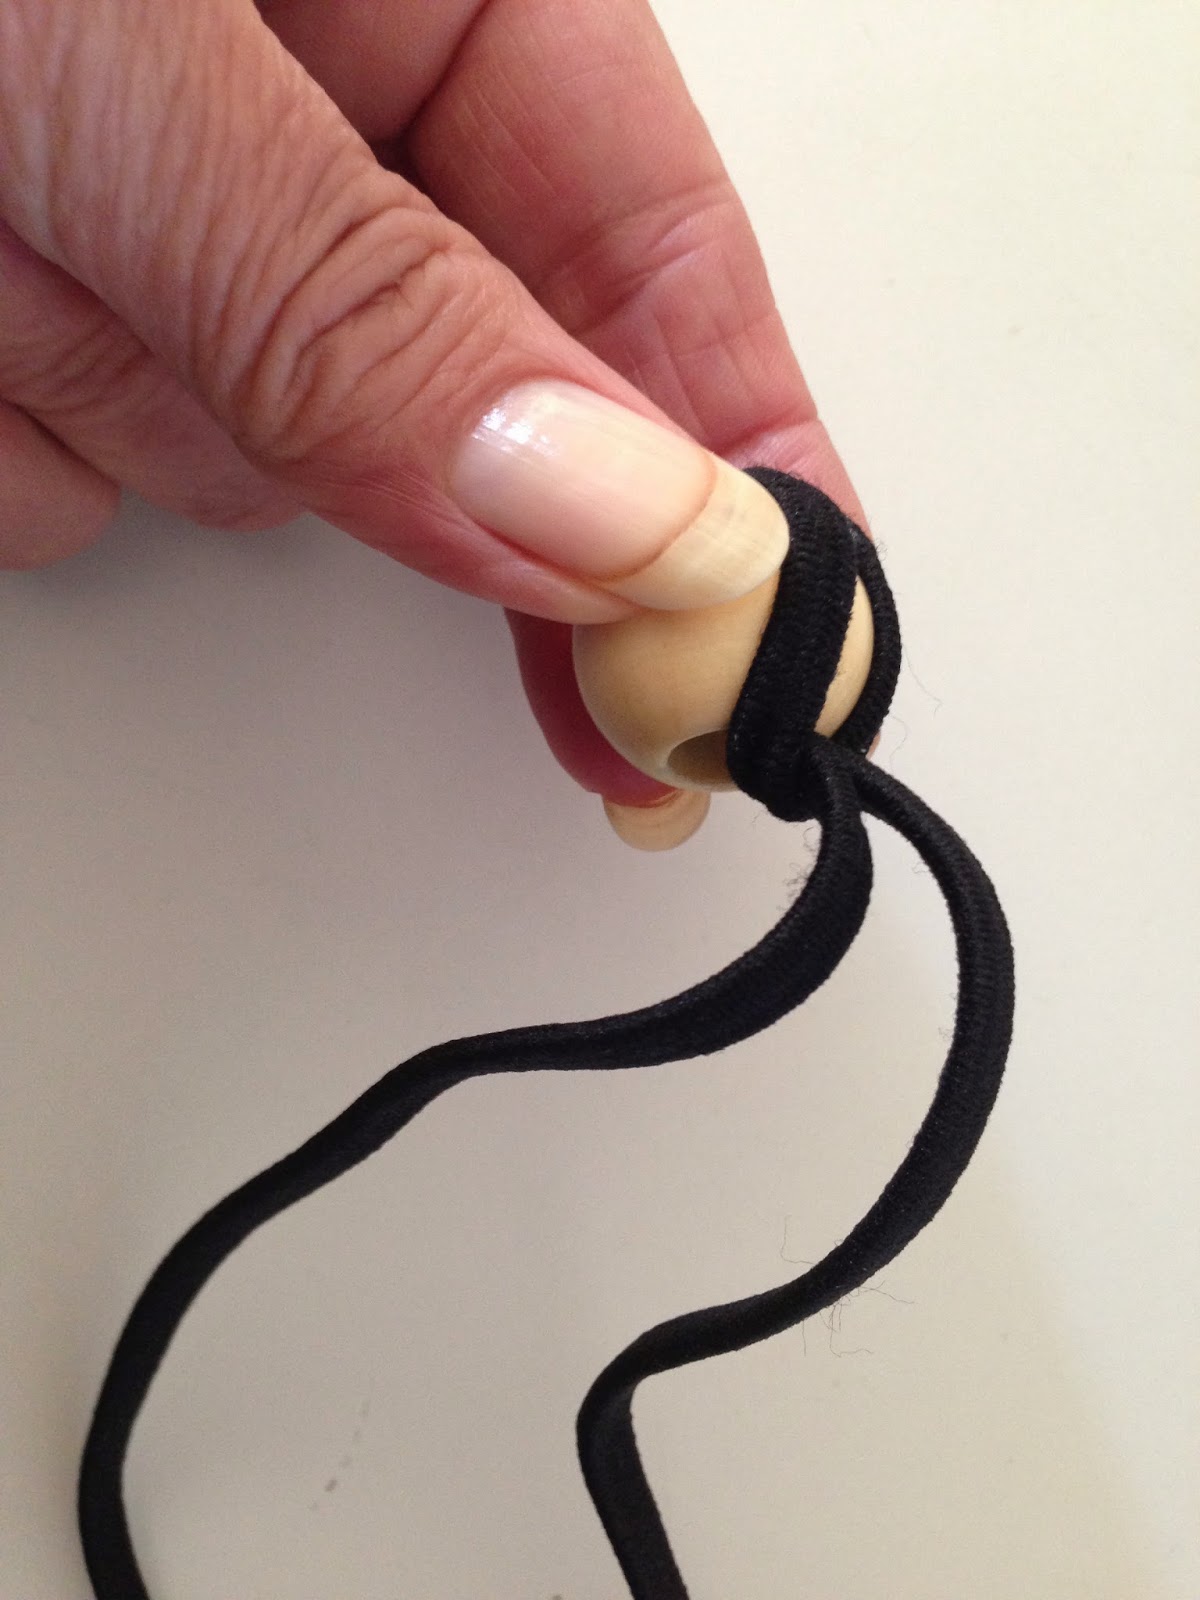
Elastic headbands and large hole beads = Curtain tiebacks


Here are the instructions for how easily I made the tiebacks.

Push elastic band through the bead.


Pull other end through the loop coming out of the bead.


Pull to snug up to the bead.


Loop though one side of the first loop that is around the bead now,
then pull snugly to lock the elastic band in place.


When in use the bead locks on by passing through the loop from the other end.
(These are similar to the pony-tail wraps that have beads on both ends)

ta-da!


A close-up of a tieback in action!


I love it when a plan (ahem)...curtain comes together!


.

.

.

.
Tammy is the design enthusiast behind the blog, Tips, Treats & Treasures, where her creativity is explored with a mixture of her artistic abilities and style through her home decorating, thrifty finds, DIY and creative craft projects, along with her family favorite recipes. She shares through her blog her ideas and helpful tips on everything she has learned over the years and much of which she is passionate about in the hope of inspiring others, with her own unique style storytelling.