Showing posts with label Fruits. Show all posts

Grilled Pineapple ~ A simple delicious dessert treat!


A simple, yet delicious dessert or treat we like to enjoy, is Grilled Pineapple.  This is a favorite when we are grilling.  And, since the grill is already fired-up, it's easy to add the pineapple near the end of cooking other foods on the grill, or just after finishing the other foods.  Fresh pineapple is best for this, but, in a pinch canned pineapple also works, I've used the canned, sliced pineapple rings.  I pick a fresh pineapple that isn't soft and by giving it a sniff at the bottom.  If I get a strong scent of pineapple then that is the one I want!

I like to prepare a fresh pineapple by first trimming off the top and bottom and then down the outside edges cutting off the rind.  Next, the pineapple is cut in half length-wise, then cut in half length-wise again, cutting it into wedges, and then cutting away the core area.   The pineapple can also be cut into round slices after removing the rind, then the slices can also be cut into triangles before serving.

Indirect heat is best for grilling the pineapple and as not to burn it.  It only takes about 10-20 minutes depending on how hot the grill is.  I like to make a simple baste by melting a little butter and adding some brown sugar, with a bit of honey and a dash of cinnamon.  Mmmmm it's sooo tropical!  If using canned pineapple use a splash of the juice in the baste, and/or omit the butter.  But, to me the butter is better!-(And, I mean real butter, not margarine!)  It adds a caramel-ly goodness that makes this extra special!


About 4 servings

Ingredients:
1 fresh pineapple cut into wedges or 1 can pineapple slices, drained and reserve juices
2 Tbsp. butter, melted
2 Tbsp. brown sugar
1 tsp. honey
dash of cinnamon


Directions:
Cut fresh pineapple by slicing off the top and bottom.  Trim off the rind, and cut in half length-wise, and half length-wise again forming wedges, cut off core.  Baste, then place on hot grill, baste as needed to keep moist and turn often for approximately 10-20 minutes, until golden and warmed thoroughly.  Serve warm.


Enjoy!...


Peanut Butter Caramel Dip


I have a tasty treat to share today!  Well the info all about it, anyway.  I enjoyed every last bit of what I made of it earlier all by myself.  But, had you been here with me I would have shared my treat with you.  I really would have!    

Doesn't it look yummy?  It is! ...or was!    


I noticed a recipe printed on the lid of my Smucker's Peanut Butter for Peanut Butter Caramel Dip.  Yum!  I was salivating as I read through the ingredients, while I made note of what would be needed on my next trip to the grocery store so I could make 'my own' version of the recipe.  I was making plans!

I love Caramel Apples and this dip got me thinking that it's almost that time of year when they start to make an appearance.  Dare I use the 'F' word and say Fall, even though we do have the better part of September to enjoy the remainder of Summer yet, since Fall doesn't officially begin until the 23rd of this month.  I don't really hate Fall mind you, I'm just one who likes Summer much better!


I altered the recipe printed on the lid above!  To make my Peanut Butter Caramel Dip I picked up some crunchy peanut butter, because I only had smooth at home, and I thought the crunchy would give me more of a 'caramel-apple' appeal.  After all there are usually nuts on caramel apples, and that's just one more thing I like about them.  I left out the cinnamon, and I used the regular sweetened caramel topping.  Actually, I didn't even see any of the sugar-free variety at the store, and I figured I'd prefer the regular caramel topping anyway.

I only used about two tablespoons each of the first two ingredients since I was making this only for myself, and I also added just a couple teaspoons of milk (you can use honey if you prefer to not add milk, either way works, I've done it both ways), this recipe can be altered to your preferences, and I sliced up one apple for dipping.  The Gala apples are a favorite of mine and were perfect with this delicious dip, but I'm sure what ever type of apple you prefer will be good too.


Peanut Butter Caramel Dip


Ingredients:
1/2 cup peanut butter, crunchy or smooth 
1/2 cup caramel topping
2 tablespoons milk / or use honey instead
2 apples cored and cut into wedges


Directions:
Mix peanut butter and caramel topping in bowl until blended.  Stir in milk to make a smooth consistency, adding more milk as needed.  Serve with apple wedges.
Makes 2 to 4 servings


Enjoy!...


Baked Stuffed Apples

{This recipe is part of my Slightly-Homemade recipes collection.  I like short cuts and easy to make recipes, my Slightly-Homemade recipes save time and often have ingredients that make it easier and quicker to create them.  I enjoy using these Slightly-Homemade recipes that are often easier, quicker and time saving, and I hope that you find they do that for you too!}


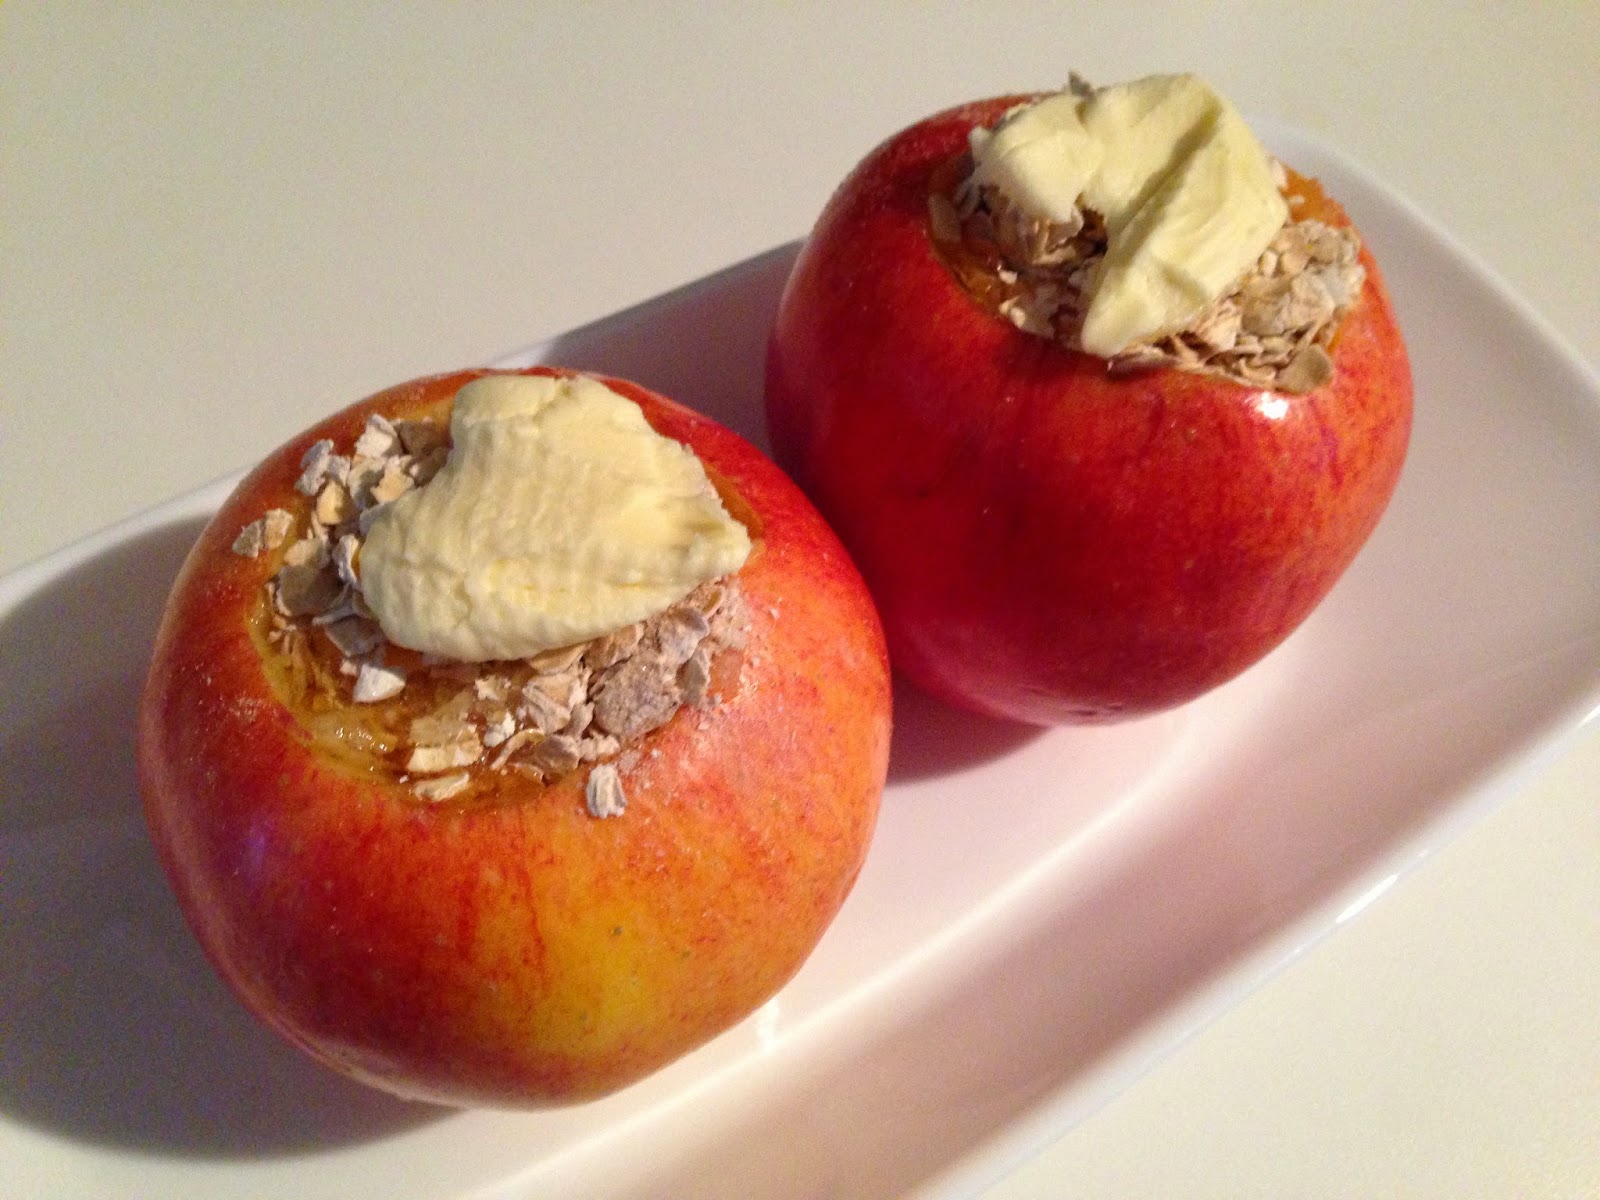
Sometimes the sweet tooth needs some satisfaction so after going on the hunt I found myself staring at a bowl of apples.  I wasn't in the mood for that, but a warm baked apple pie sounded real good.  That led to visions of bubbly apple crisp but, I didn't have oatmeal, and only had very little brown sugar, so that wasn't going to happen either.  Then it came to me, I did have a couple packets of instant oatmeal and fortunately they were of the maple and brown sugar variety.  I had a plan for joy to my sweet tooth and warmth to my soul ...warm, delicious, baked, stuffed apples! 


..._________...


The first steps of the preparation were to core the apples.  I made about a one and half inch opening, leaving about a quarter of an inch at the bottom.


After stirring well to keep it mixed, I added some of the instant oatmeal to about half way up the center, then added a couple teaspoons of water.  I then drizzled a bit of honey (just a little) on top of that.


I added more oatmeal mixture to fill the apples, then a little more water, and added another little drizzle of honey.  I topped them off with a touch of butter.


I placed the apples on a small shallow baking dish, then added a little water to the bottom of the dish, covered them loosely with foil, and then baked them to perfection!


After cooling I added chopped walnuts, and I made a sauce to drizzle over the tops.  In just a few minutes I had delicious baked, stuffed apples topped with a yummy warm sauce.


And here's something that is gonna make you love me, and if you loved me already ...well, you're gonna love even more!

That yummy sauce I put on top, it is as simple as simple can be.  Take a heaping spoon full of brown sugar and put that in a glass pyrex bowl and add to that about the same amount of butter.  Now zap that in the microwave for just a few seconds, I mean few!  Don't walk away, don't sneeze, don't do anything else, just stay right there watching it til you just see the butter melting, now stop!  Carefully remove it and stir it to combine well as the sugar and the butter have a happy union, and then you'll notice that it looks a lot like caramel sauce.  Uh huh!  You're welcome!  Now just drizzle that lovely sauce all over the top of those apples.  Mmmmm.  I know!  Trust me it sounds as good as it really is!  If you like apples, apple pie, or apple crisp, you'll like this.


..._________...


mmmmm, baked stuffed apples = sweet tooth satisfaction!  


Baked Stuffed Apples

Ingredients:
4 sweet apples, (I used Gala)
2 packets instant oatmeal-maple and brown sugar flavor
1/4 tsp cinnamon
1/8 tsp nutmeg
1/4 cup toasted walnuts, chopped or pecans (optional for topping)
1 tablespoon butter divided into four parts
approx 2 tablespoons honey
1/2  cup water


for sauce:
2 teaspoon butter
2 teaspoon brown sugar

Directions:
Preheat oven to 375F.  
Use an apple corer or paring knife to remove apple cores, cut within a quarter inch of the bottom.
Cut about an inch and a half wide opening for stuffing.  
Open oatmeal packets into a small bowl and stir well before filling apples half way full with oatmeal mixture.  Add a teaspoon of water on top of oatmeal to each.  Drizzle about 1/2 teaspoon honey on top of oatmeal mixture in each apple cavity.  Mix oatmeal again and repeat filling each apple with the oatmeal mixture, a small amount of water and finish each with honey.  
Top each apple with one piece of the divided butter.
Add water to the bottom of the dish and cover loosely with aluminum foil.
Bake in center of oven for 20 minutes, then remove foil. 
Continue baking up to 20 to 30 minutes until apples are soft and the skins appear wrinkled.  Test by poking a fork through the oatmeal and into the apple, if it goes in easily and if they feel soft the apples are done.
While apples cool slightly, make caramel sauce.  Drizzle sauce over warm apples and serve.


Enjoy!...


'Maters and Memories...


Tomatoes are another great thing that I love about the summertime!

I love tomatoes, especially fresh tomatoes. I picked up these lovely tomatoes at the local farmer's market.  I really do love me some fresh summer tomatoes, ehem ...tomaters or 'maters as some call them!  These were huge and they smell and taste wonderful, they're very delicious.  There is the whole argument of whether they are a fruit, or are they a vegetable?  Either way I love 'em just the same!


The smell of fresh tomatoes always brings back fond childhood memories of my grandmother, and of her walking with me through her garden.  She would pick us a fresh tomato from the vine, and she was on the ready with a dish towel tucked to her somewhere, along with a salt shaker.  She would carefully wipe the tomato clean, and then we would sprinkle them with salt and eat the tomatoes right then and there!...mmmm All the while the wonderful aroma of the tomato plants and fresh tomatoes surrounded us as we enjoyed the warmth of a summer's day, as we shared in our love for tomatoes!

These also remind me of the tomatoes my Mother and Father-in-law would grow.  But theirs were the biggest tomatoes I have ever seen!  I remember a photo of one of their tomatoes sitting over the opening of a one gallon paint can, that's how big humongous those tomatoes were!  They had lots of fresh tomatoes, and also canned quite a bit of them.  I remember those jars of tomatoes being proudly on display, on shelves in the kitchen.  They always shared those tasty canned tomatoes and still gave away plenty of fresh tomatoes too.  Their tomatoes were awesome, and very delicious.  I was always delighted when their tomatoes were ready to eat, and also when I was given those jars of tomatoes that had been prepared with love, with those tomatoes grown with love!  Maybe that was the secret?! *wink*


That is a 9 oz paper cup to give a little perspective.

 Look at that deliciousness!  This was the largest one all sliced up and on a saucer.  Yum!

I think I should make some yummy Bruschetta with these!  Oh yes, and Tomato, Cucumber and Onion Salad!
(I'll post the recipes for these soon)

These are mouth watering goodness!
Definitely drool worthy!...
~ Tammy ~


Here's a fun video I found about homegrown tomaters!
Enjoy!!


~ Tammy's Tip Today ~ Gone Bananas


I've gone bananas today, with a great tip for you!


I love bananas!...
I usually buy Bananas about every trip to the grocery store. They are my go to snack!  Plus they are a great take along snack, in their own package.  A Banana and some Peanut Butter or Nutella, and I'm all set for snack-city!  I just spread a little on before each bite and enjoy!...mmm so good!

Most people probably already know that ripe, or over ripe bananas are the best kind to use for Banana Breads and other recipes.


Bananas do get over ripe pretty fast though, so I put mine in the freezer when they are starting to get brown spots.  First I peel them and then place them into plastic freezer bags.  I use the frozen Bananas later to make Banana Ice Cream!  Yes...Banana Ice Cream!


Banana Ice Cream


This is soft serve version, right out of the food processor.

Place a couple of the frozen bananas in the blender or food processor, I use my Ninja machine it works well for this, with approx. 1/4 cup of (I use fat-free) Half & Half...then presto!  Banana Ice Cream!  If blended long enough the liquid isn't necessary.  If it is too soft-serve for your liking after you prepare it, place in the freezer for about 30 mins or more.  Then serve.
Add toppings: nuts, sprinkles, chocolate chips, banana or other fruit. (optional)


This is a healthy snack you can feel good about.

I also on occasion add frozen Strawberries, also Walnuts or Pecans.  Coconut would be tasty too. (I need to try that one!)  I don't always have half & half on hand, but usually do have fat-free Milk, and use it instead.  The milk although, makes it less creamy tasting, it's a preference thing.  This can also be made as a smoothie if you like, just add more of the liquids and/or plain yogurt can be used as well.

Being that I'm a big fan of Nutella, I added 1 tbsp. Nutella to the Banana mixture and had Chocolate Banana Ice Cream or correction: Cocoa-Hazelnut-Banana Ice Cream....Yummy!  Hershey syrup would work too!

Give it a try!  I bet you'll like it!


Bananas all gone!...
~Tammy~


.

.

.

.
Tammy is the design enthusiast behind the blog, Tips, Treats & Treasures, where her creativity is explored with a mixture of her artistic abilities and style through her home decorating, thrifty finds, DIY and creative craft projects, along with her family favorite recipes. She shares through her blog her ideas and helpful tips on everything she has learned over the years and much of which she is passionate about in the hope of inspiring others, with her own unique style storytelling.