Showing posts with label Wreaths. Show all posts

Christmas Holiday Decor ~ Our Family Room

Decorating for the holidays has always been fun for me.  I enjoy opening up my bins that have been stored away all year and start the process.

I don't always have a plan, and I don't always use everything that I have either.  I have collected plenty of holiday decor over the years, and well, I suppose one of the good things about that is I have options.

And, I've often purchased "after-Christmas" sale items that have been forgotten about until I see them!  That's always a fun surprise too!


Our fireplace area and mantel is a favorite to decorate, I enjoy changing the look to this space throughout the seasons as well as for the holidays.

I went with a green, gold, and cream or white color scheme this year.  I purchased a new wreath for this year however everything else I already had.  I liked the simple wreath and figured it would be perfect for after the holidays for winter decor too.  I have an iron piece layered over the mirror which I hung the wreath from.

I added an evergreen garland that had twinkle lights, a couple of small Christmas trees, and dressed up my candleholders with ribbon, pinecones and greenery, a pair of mini wreaths on the corbels, a gold beaded garland, and a "Merry Chrismas" sign completed the look.


Across from the fireplace is this cozy area of our family room.  I continued the same color scheme over here.  I used a variety of my pillow covers in green, gold and cream and a fun Christmas tree pillow.

Up on the wall sconces I used a pair of tree shaped plants tucked into terra cotta pots I'd painted gold long ago, and added a mini ball ornament on top of each plant so they'd look like mini Christmas trees.

I had purchased the pretty gold wreath back in the fall and decided to hang it on the metal wall piece, I loved the look for Christmas and that it worked well with the gold potted mini trees on the sconces.  Gold metallic leaves on the end table added more pops of gold, while more greenery and mini wreaths added more green!


Christmas will be here soon!


Fall Mantel

HOME is my favorite place to be!


Speaking of favorites…

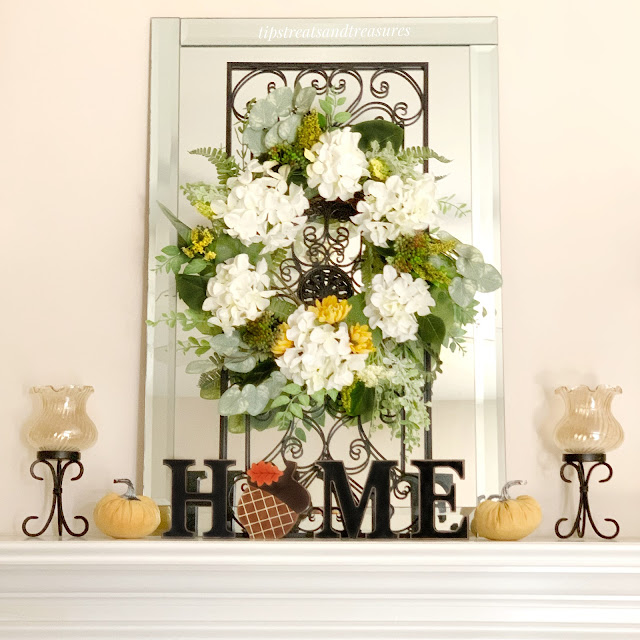
Decorating our fireplace mantel is a favorite thing for me.  This beautiful wreath from Kirklands is an all-time favorite.  I enjoy changing it up seasonally.  I've hung the wreath on an iron piece layered over a mirror.  I added a pair of iron candleholders with pretty ruffled glass globes I found at a thrift store, and two cute velvet pumpkins. 


And this “HOME” sign is a favorite too! Mine was a gift from my daughter. I’ve linked it in my amazon and shop.ltk shopping links below.

It has several interchangeable pieces for seasons and holidays, and there are additional pieces that can be purchased, which I did.  It's a fun decor item that can be used all year!  I just love decor with options for easy change, don’t you?!

I think it’s so adorable and makes a great gift!


Wreath Restyle for Winter


I've enjoyed restyling this beautiful wreath.  I purchased this lovely wreath from Kirkland's long ago and I have added embellishments to change it up for different holidays and seasons.


For winter I simply added some evergreen picks and buffalo plaid ribbon to change this beautiful wreath.  I just tucked the evergreen picks into it and then added the ribbon.  Just a couple items tucked into the wreath gave it a new look.  I can still use this favorite wreath seasonally by making simple changes by adding different elements.


Below is a view of it in its original form.  It's truly a favorite wreath of mine!


I love this beautiful wreath, and have enjoyed it for many seasons, and hope to enjoy it for many more!


Holiday Decor ~ Our Family Room


Ready for the Holidays!  I fell in love with Buffalo plaid this year.  So I got creative with some ribbon and fun pillow covers.

Feeling "Merry & Bright" on this bright and beautiful day!


There's no place like "HOME" for the holidays!


HOME sweet cozy home!


From our home to yours Merry Christmas!


Bye-bye winter! Hello SPRING!


Hello Everyone...I hope you’re all doing well and staying healthy!
“Home” is even more precious these days, isn’t it?! Our safe spot, shelter, a place of hope shared with family.  We are all facing this covid-19 pandemic and unsure about how long we will be sheltering at home, alone together!
“The strength of a nation derives from the integrity of the home.” – Confucius


I’m staying busy and finding things to focus on that bring joy and peace to my mind. What better time to “shop my home” and do some redecorating?!
Oh, and it’s the last day of winter, that makes me smile! And, we are expecting temps to reach 80° tomorrow, as we welcome spring!


~ Bye-bye winter! Hello SPRING!...


Happy Valentine's Day!
~My Beautiful Heart Wreath


Wherever you go, go with all your heart.
- Confucius


I was thinking ahead about February and Valentine's Day when I spotted this lovely heart!


I ordered this beautiful faux white-rose covered heart from target.com.  A little gift to myself, 'cause I just had to have it!

It originally had several tiny green leaves throughout which I simply removed because I prefer this all white look.  I’m so happy with it and I really love it!


I hope you are feeling extra loved today!


Framed Wreath Artwork/Decor


This beautiful art print was a gift to myself, for Christmas!  I purchased the beautiful mirrored frame for it from Amazon, and I love them together!


The talented artist is Melissa, I found her on Instagram @housefenway she has a vast array of artwork, sizes and styles to choose from in her shop!  I hope you will visit to see for yourself, I love viewing all of her beautiful artwork and definitely want to get more! What a lovely gift idea for yourself or someone special on your gift list!  

I’ve enjoyed displaying this “Christmas Olive Wreath with Copper Bells” print during the holidays and it’s perfect for winter too!


Hope you’re having an awesome day!


Fall Wreath


I made something pretty for our front door today!  This lovely Fall wreath.  We are just inside the second month of the Fall season and some of the beautiful Fall colors are appearing outside.  

It's been so hot and dry here that I've wondered if we will even see much Fall color change before the leaves just dry up and fall off!


We have a storm door, so a lower profile wreath is needed due to the narrow space between the two doors.


I chose to use a simple wire wreath form and covered it with burlap/mesh ribbon folded in half.


Next I cut-off part of the stems from two floral picks, placed them in opposite directions and attached them and a pre-made bow, using floral wire.


It was simple, easy and low cost!  And, I can easily change the look for another season or holiday, too!


- Items List, Sources & Prices:
Floral Picks - Hobby Lobby 1/2 off =1.99 ea
Ribbon - Hobby Lobby 1/2 off =3.98 per 10 yd roll (Used appox 1 yard)
Wire wreath - Dollartree =1.00
Bow - from a recent gift pkg =.00


This will easily adorn my door until Christmas decor makes its way there!

I hope you've found this easy wreath inspiring and you'll make something pretty for your door too!


Happy Crafting and Decorating!...


Our Welcome Space
~The Foyer

Home is where my heart is!

::: It’s my happy place where I feel most welcome. And, where we get to welcome others...


::: Our foyer is one of my favorite spaces in our home. Our “Welcome” space.

Currently, I’m enjoying this look for Summer.


~ I hope you’re having an awesome Summer day!...


Welcome SUMMER!


In welcoming summer I added this beautiful Butterfly wreath to my door.  I found this beauty and simply added a little embellishment!  Perfect for summer and as a sweet welcome on our front door!


We're expecting a beautiful first weekend of Summer!


Happy SUMMER!...


"Summer" Styling on Our Fireplace & Mantel


Sometimes all that is needed is just a few changes to make things fresh and new!  I found some beautiful corbels at Hobby Lobby and changed them out from the ones I'd had up on the wall above the mantel.  A new wreath I purchased back in the Spring was moved over here, also some newly thrifted planters and plants add some nice greenery to go with my beautiful wreath.  I shopped my home for the other accessories to pull this Summer look all together!


Here's a closer view of my wreath and mantel decor.  I’ve enjoyed displaying this beautiful wreath.  It’s a favorite find from Kirkland’s.  I love it and how it has worked well for both Spring and Summer!  It has become a new favorite on mine!


Speaking of favorites ... Summer you are my favorite!:)   


I dream of summers that last forever...


Holiday Wreath - Easy DIY Tutorial


I love seeing a beautiful wreath hanging on display.  I also love to decorate and make them.  I am often surprised when someone says they can't make or decorate one, or they don't have the time to.  I'm also quite surprised by the price on the decorated wreaths for purchase at the craft and home decor stores.  Especially when there is so much available to pick and choose from these days for decorating them yourself, for far less.


You can go from simple, to over the top, and still save money on decorating your own wreath.  Just adding a bow will look nice, and you can also add other items and embellishments.  It's easy to do, I'll show you how.

I purchased a faux evergreen wreath at 60% off just the other day and decorated it the next afternoon, in just minutes.  I spent just over three dollars for the wreath, and two and a half dollars for a holiday floral pick.  I got some wire-edged ribbon for another project, it was two dollars and used only a little in making a bow.  Total cost was under ten dollars for my finished wreath.  Compared to wreaths I saw that were selling for upwards of thirty dollars, and that was on sale!! *gasp*


Items used:

  • wreath
  • floral pick
  • wired-ribbon
  • floral wire


I began with a plain wreath and a fancy floral pick.


I bent the stem [or it can be cut off] leaving a short amount just past the bottom flower on the stem, and then attached it snuggly to the wreath with floral wire, which I had on hand.   


I pulled one of the smaller stems to the other direction once in place.  I could have called it done at this point, but I also wanted to add a bow to my wreath.


To start the bow I began making loops with the ribbon, leaving a tail longer than the loops.


I continued until I had three loops on each side of the center where I was holding it, and an even tail on both sides.  [Adding more loops will give the bow a fuller look-if desired]


Next I placed a good length of wire [about 8 in] over the center.


The wire was twisted firmly to secure the loops.  [An extra piece of ribbon can be used in place of or to cover the wire]


At this point it starts to look like a bow.


Each loop is pulled out and separated from the other loops, spreading out each side.


The bow looks like this after separating all of the loops. 


To finish off the tails of the bow I like to point-cut them.  Simply fold the tail in half, then cut upward from the outside edges, that's just how easy it is.  I cut the other tail the same way, and the same length. 


The point-cuts will look like this.


The bow is finished and can be attached to the wreath, then shaped and adjusted once attached.  A great thing about the wire-edged ribbon is the bow will hold its shape.


I placed the bow off to the side of the floral pick and then secured it to the wreath with the wire already attached to the bow. 


I chose to fan out my bow to the side because I liked the look, and since I have limited space between our front door and storm door, I didn't want it to appear smashed.

And, this is my finished holiday wreath.  It literally took me only minutes to make!  I'm hoping this step by step tutorial will help those who say they can't do this, and they will find how easy it truly is! 


Now my beautiful wreath hangs on my front door.  My holiday decor this Christmas is lots of sparkle.  My wreath certainly has that!  


Happy Crafting!...


Fall Mesh-Ribbon Wreath
~Easy How-to tutorial


I tried my hand at creating a mesh ribbon wreath, I've been wanting to make one like those popular types seen all over pinterest!  I actually tried to make one of them before, and well, instead of having one like those to hang on my door, my patience ran out the door on me!  

Still, I did mange to make a beautiful mesh wreath, even though it wasn't the type I set out to make in the beginning.  I worked it out by making one that I ended up loving, so it was all good!   You can see it here if you'd like, and I explained how I made it.-(also at the time of this post, the wreath I mentioned is featured in the photo at the top of my blog).  Now on to this wreath below! 


I suppose it got to me that I had not made one of those 'typical' puffy or poofy mesh wreaths yet, and that pushed me to give it another go.  I found several tutorials online and lots, and lots of photos.  I took all of them into consideration and applied what I had seen, and learned, to achieve this project once and for all!

I viewed several videos where the mesh is attached to a wire wreath form via twist-ties or chenille stems/pipe cleaners.  And, I also viewed several videos for making wreaths using burlap ribbon, where the burlap is pulled through the sections of the wire wreath form into loops.  I used the latter method to make my 'fall mesh-ribbon wreath' because I liked the effect and didn't want to fuss with all the twist-ties.  And, truth be told, I didn't have enough twist ties, let alone chenille stems at the time.

Also, this method made the project just seem to flow so easily, and it really went quickly as well.  And, I actually preferred the look overall, especially since it wasn't over the top poofy.  Either way would work, but this is the look I was going for! 

I used a small wire wreath form, and a roll of mesh ribbon in a burlap/tan color with a white band down the center of it.  I thought the color was perfect to go with my neutral decor and would also work well for fall.

I'm loving my new mesh wreath.  I think it turned out well and now it hangs on my door, on the inside, so I can view and enjoy it.  Hmmm, I guess I could say I technically still really haven't made a 'typical' mesh wreath.  Leave it to me to do things my own way.  It's what I do!

Below are the steps used and items needed to make this Fall Mesh-Ribbon Wreath.

Holiday Wreaths


I love the look of a wreath hanging on the front door, welcoming visitors, and dressing up the look of it from the outside, and also on the inside for something pretty to look at there as well!  I also like to hang a wreath from each of several windows outside my home for a beautiful look for Christmas.  

I enjoy making wreaths and I do make most of my own.  The holidays are the perfect time to make wreaths, and I like to have several around the house at that time.   Most supplies to make them are easily found around the holidays, and the after holidays sales are great opportunities for those items too!   

Here are a few of my handmade holiday wreaths that I've featured before.  Each one was easy and didn't require a lot of time, money, or materials to create.  I've heard others say, "I'm not crafty, and I don't have the time or extra money to make something."  I know I've said it before, but I feel that if I can do it, anyone can!

You don't have to spend a lot to make something beautiful.  A simple grapevine or evergreen wreath and pretty bow is all that's needed to make a wreath.  You could add more embellishments to dress it up, such as ribbon, ornaments, or use floral picks that you can tuck into the wreath.   I also like to change-up my wreaths and re-purpose them for different seasons too!  I hope these simple and easy wreaths, and suggestions, give you some ideas and inspire you to make a new wreath, or two, or more...


Evergreen and Gold Wreath

This beautiful wreath was created using only a few items and was simple to put together!
You can view more about this wreath and how I made it here.


Snowman Wreath

Just a few items pulls this cutie together in no time at all, and the items can be found at the dollar store!
You can view a tutorial and more about this wreath here.


Winter White Wreath

This wreath is surprisingly simple and inexpensive to create!  Items you probably already have on hand will have you making it in a short amount of time.  The kiddos can help with this one too!
You can view a tutorial and more about this wreath here.


Glittery-Gold & Gladiola Wreath

This wreath I actually made in the summer, but it works nicely for the holidays as well! 
I tucked in some fall colored leaves and a couple pine cones and displayed it as a pretty fall wreath this year also.
You can view more about this wreath and how I made it here


Happy Holidays and Happy Crafting!


Not so ordinary Fall Wreath


I took one look at the wrought iron piece and it screamed "I'm half off, you want me and you know it!", and I knew we needed to be together!  Then instantly in my mind I was planning something out of the ordinary ...crafting a wreath using it!  It was perfect for me.  Not only do I love just about anything wrought iron,  I also love wreaths and making them.  I see this having great potential for many different looks and changes in the future too.  It's one of those gifts that keeps on giving!


I wanted to decorate it and add to my Fall decor, but I didn't want to over do it!  I made a bow for it first.  You may recognize the material I used for the bow ...it's from a mesh bag, the type that contain oranges or grapefruits-which is what mine contained originally.  I can't tell you why I saved that bag, but I'm glad I did and I think it made the perfect Fall bow!  It works perfectly too with the Fall floral picks which I simply secured to the wrought iron with craft wire.  And also the pretty clip-on sunflower, which completes the look.  I added another bow too, one made from jute twine, because that jute twine just works so well with all things Fall!

I love my new 'Not so ordinary Fall Wreath', and I now have it hanging on my front door for all to see and to greet my visitors.  


Something out of the ordinary to extraordinary!...


Glittery-Gold & Gladiola Wreath


It was a gloomy and rainy day that led to my crafting this little lovely.  Hmm, maybe I should start that differently?...
"Once upon a time, it was a gloomy and rainy day, the sun was nowhere in sight.  I needed something to lighten my spirits, and brighten my day.  A craft project would be just the thing!"...

I had picked up a wreath form and some decorative mesh ribbon at the craft store some time ago.  I already had lots and lots, and lots of other ribbon in my stash - especially of the glittery and gold variety - from the after holidays sales.

I figured it was time to put those to good use and make something new and different for my door.  It is after all almost officially summer!  Yay!  Although this looks as if it could be used or the holidays, it goes quite well with my home's decor and suites my taste perfectly,  And, it adds a bit of glam to the 'inside' of my door, in our foyer area.  I can see being able to change it later on by adding different elements to it also.  I enjoy seeing it from different points of view, since I can see it from a couple connecting rooms, and I think it looks perfect there!


Decorative Mesh has become very popular.  I have seen many wreaths decorated using it, but I hadn't made one of that type yet.  I viewed a few tutorials on -decorating a wire wreath form using mesh ribbon- to get ideas.  I considered some of the methods used, then decided to use my own technique to make one.

I'm pleased with the results, and I'm lovin' the look of my new oh so 'glam' wreath!  Something I really like and enjoy about crafts and making things, is that sometimes I don't really have a firm plan and I just have fun with it, and it turns out well.  That makes it especially nice, and rewarding too.

-This was a quick and easy project, that took only minutes to complete.
I used a sixteen-inch wire wreath form, one roll of mesh ribbon measuring six-inches wide by ten yards long.  I simply pulled the mesh ribbon up through the inner, middle, and outer sections of the wreath form from behind, going around a few times and filling in each of the sections.

-I wrapped the mesh around and then through the wreath form covering all of the exposed wire that crossed the sections.  I used a gold wire edged ribbon on top, weaving it under each place where the mesh was wrapped around.  Adding a white gladiola, secured with craft wire, finished it off beautifully.


Glad it's so GLAM!...


Conversation Hearts

HUG ME   BE MINE   FOR EVER   LUV YA

On a recent trip to the craft store, I grabbed up a half priced bargain of a package of these Valentine Foam Candy Heart Stickers.  How cute are they?  They remind me of those sweet candy conversation hearts!  I knew I'd find a use for them.  With it being February now and Valentine's Day is just a short time away, also my love of all things heart, well, let's say they spoke to me!{giggles}


<3 <3 <3 <3   <3 <3 <3 <3   <3 <3 <3 <3  <3 <3 <3 <3  <3 <3 <3 <3  <3 <3 <3 <3


 I already had a pink foam heart in my craft supplies and so I simply used it for the base, then I layered on the foam candy heart stickers.  


I think it's very cute, and sweet too!


HUG ME   BE MINE   FOR EVER   LUV YA...


.

.

.

.
Tammy is the design enthusiast behind the blog, Tips, Treats & Treasures, where her creativity is explored with a mixture of her artistic abilities and style through her home decorating, thrifty finds, DIY and creative craft projects, along with her family favorite recipes. She shares through her blog her ideas and helpful tips on everything she has learned over the years and much of which she is passionate about in the hope of inspiring others, with her own unique style storytelling.