Showing posts with label Grilling. Show all posts

NOT Hot Wings!
Lighter Version -'Tip'


Well, it's that time of year where most of us make resolutions and say "we are going to eat lighter and healthier and vow to lose to weight!"

Every little bit helps so I try to find ways to lighten up or cut the calories of foods I love.

I’ve found a way to satisfy my craving for “Hot Wings” in a much healthier way.
I call this NOT wings!  Grilled Chicken Breast with Buffalo Wing Sauce.

I completed my meal with Roasted Broccoli and a simple side Salad with Chunky Blue Cheese-Yogurt Dressing.   All the flavor without all the guilt!


Yummy!  Enjoy!

You're welcome!


Grilled Pineapple ~ A simple delicious dessert treat!


A simple, yet delicious dessert or treat we like to enjoy, is Grilled Pineapple.  This is a favorite when we are grilling.  And, since the grill is already fired-up, it's easy to add the pineapple near the end of cooking other foods on the grill, or just after finishing the other foods.  Fresh pineapple is best for this, but, in a pinch canned pineapple also works, I've used the canned, sliced pineapple rings.  I pick a fresh pineapple that isn't soft and by giving it a sniff at the bottom.  If I get a strong scent of pineapple then that is the one I want!

I like to prepare a fresh pineapple by first trimming off the top and bottom and then down the outside edges cutting off the rind.  Next, the pineapple is cut in half length-wise, then cut in half length-wise again, cutting it into wedges, and then cutting away the core area.   The pineapple can also be cut into round slices after removing the rind, then the slices can also be cut into triangles before serving.

Indirect heat is best for grilling the pineapple and as not to burn it.  It only takes about 10-20 minutes depending on how hot the grill is.  I like to make a simple baste by melting a little butter and adding some brown sugar, with a bit of honey and a dash of cinnamon.  Mmmmm it's sooo tropical!  If using canned pineapple use a splash of the juice in the baste, and/or omit the butter.  But, to me the butter is better!-(And, I mean real butter, not margarine!)  It adds a caramel-ly goodness that makes this extra special!


About 4 servings

Ingredients:
1 fresh pineapple cut into wedges or 1 can pineapple slices, drained and reserve juices
2 Tbsp. butter, melted
2 Tbsp. brown sugar
1 tsp. honey
dash of cinnamon


Directions:
Cut fresh pineapple by slicing off the top and bottom.  Trim off the rind, and cut in half length-wise, and half length-wise again forming wedges, cut off core.  Baste, then place on hot grill, baste as needed to keep moist and turn often for approximately 10-20 minutes, until golden and warmed thoroughly.  Serve warm.


Enjoy!...


Ever had Beer Can Chicken?


We sure had a beautiful day on Sunday.  With one look at the forecast, we were ready to lay claim to Spring.  We quickly made plans for cooking something out on our Big Green Egg, and by something, I mean chicken and some corn-on-the-cob!   We actually prepared two chickens, because we made Beer Can Chicken.  If you have not made or enjoyed Beer Can Chicken yet, you need to get on it!  I mean, seriously!  It's delicious, it's so easy to prepare, and it never disappoints.  It is the juiciest chicken too!  

In case you have never prepared, tasted, or even heard of Beer Can Chicken, I wanted to share with you why we so enjoy it!  Beer Can Chicken, is simply chicken cooked while sitting over a can of beer, and it produces a very moist and juicy chicken.  It doesn't taste like beer, in case you are wondering.  We purchased a Beer Can Chicken holder (we found ours at the Ace Hardware store), and then we later picked up a second one the next time we were at the Big Green Egg shop, because we knew we would want to be able to make more than one at a time, especially if we had guests.  This holds the beer can, and the chicken nice and stable while it cooks.  You could maybe get away with not having the holder and just sit the chicken over a can, but the stability will be lacking.  

Here is what our holder(s) looks like when ready for the chicken.  It folds flat when not in use.  I've seen different types available at a few different stores, especially in the spring/summer.


This photo shows the chickens that have been placed over the beer cans in the holder, and they're ready for the grill, uh Big Green Egg that is, and ain't it a beaut?  We sure enjoy cooking our food on it!


We cleaned and prepared the whole chickens then added some seasonings for extra flavor.  We like to try different types of seasonings, but my all time favorite is Bad Byron's Butt Rub.  Boy, do I love that stuff!  There's a link there for you where I even wrote a post about it!  We also like the Whirly Bird seasoning from the BGE shop, it's great on chicken.  Oh and their Viva Caliente seasoning too, it adds a bit of heat and is also good for chicken, especially hot wings.  

We cooked our chickens according to their package direction, which suggested 20 minutes per pound at 350 degrees, or until a meat thermometer inserted in the thigh area, reads 180 degrees.  One of the great things about our BGE is being able to control the temperature, but the taste of the food cooked on it is the best reason to own one.  Nothing beats the flavor and taste of that lump wood charcoal, and the aroma while cooking is something else!

We prepared about a 5 lb and a 6 lb chicken, so just under two hours cook time was needed.  We cooked two so we could use the extra chicken for a cobb salad the next evening for our dinner, and also have some left-over for lunches.


Ta da!  Look at that deliciousness!  

I should have turned them around and gotten another shot of the 'breast' side, but we were so ready to get our chicken off of the beer can holder, onto the serving platter and sliced, that it was not as important as the desire to taste them!  And, that chicken tasted so delicious.  This method always produces the juiciest chicken!  I hope you'll give Beer Can Chicken a try real soon!


Enjoy!...


P.S.  I simply couldn't resist adding this little touch of humor!


source unknown


:)...


Stuffed Jalapeno Peppers


I thought I'd spice things up a bit today and share something hot!  These Stuffed Jalapeno Peppers are a must have lately when we are grilling up something outdoors.  We like to enjoy them as an appetizer while we are grilling other items, or before hand.  I mixed up a yummy cheese filling using cream cheese and some of my favorite store bought pimento cheese spread, because it is the perfect addition I discovered (and actually it's what I had on hand the first time I made them), along with some bacon bits, and a few other ingredients.  We really liked the results and enjoyed every bit of them.  Sometimes you just work with what you've got and then ...'new recipe' to enjoy!


I like the mix of cheeses for the filling with the added smokiness of the bacon bits, but if you prefer, you can always make them more vegetarian-friendly without bacon.  Also using shredded sharp cheddar cheese and a bit of mayo would work instead of the pimento cheese spread.  I look for nice medium to large sized jalapenos to use for preparing this.

We enjoy eating spicy foods and don't usually shy away from anything spicy, or on the hot scale.  Although, on one occasion when I made these I used one red jalapeno, and let me tell you it was like a five-alarm fire that I thought I would never extinguish, and I like hot!  But wow...that was flaming hot!  The green jalapenos are the right amount of heat for us!

I feel the jalapenos do mellow a bit and become milder during the cooking process, and also having removed the seeds helps in that as well.  Mild chili peppers or poblano peppers would most likely work well too, if jalapenos are not to your liking, or are too hot.  I have served these yummy Stuffed Jalapeno Peppers to family, and friends.  They are usually surprised by how good these really are, and that they are not as hot, as they are thought to be.  We love 'em!  


___________________________


___________________________


___________________________


___________________________


Stuffed Jalapeno Peppers


*this recipe makes 10 stuffed jalapeno halves
Ingredients:
5 jalapeno peppers, halved - *seeds and membranes removed
3/4 cup pimento cheese spread, (or 3/4 cup shredded sharp cheddar cheese, mixed with 1 tbsp mayo)
1/4 cup cream cheese, softened
1/2 clove fresh garlic, minced, or 1/4 tsp garlic powder
1/8 tsp onion powder
1 tbsp cooked bacon bits


Directions:
Prepare peppers by slicing each pepper lengthwise, then remove seeds and membranes. *Note: Careful with the juices, seeds, and membranes and don't touch your eyes after handling these cut jalapenos! (I often use disposable gloves when preparing these), wash hands thoroughly after prep.
Mix cheeses and the other ingredients in a bowl.
Divide the cheese mixture equally among the peppers, filling each about level.
Grill the stuffed peppers over medium indirect heat (300 to 350 F) until they are warmed through, slightly tender but still crisp, about 15-20 minutes. Serve warm, and enjoy after a couple minutes of cooling.


Enjoy!...


Table for the Big Green Egg


We knew we wanted one and weren't planning on one so soon, but there it was...

An Egg-cellent new nesting table for our Big Green Egg(BGE)!

A trip to the Ace Hardware store for some egg-cessories led us to the temptation of a fully assembled table that seemed too perfect to pass up.  A few measurements taken and the decision was made to go home and see if it would fit where we wanted it to be located on our patio.  Yes!...It will fit!  Now a plan of action to get it moved to it's new place at our home.  


Thanks to the help of our friendly neighbor and his pick-up truck, he and the hubby returned to lay claim to the table that would be ours and they loaded it up to bring it to it's new home.  The fellas made it look easy, and in short order the new table was parked where it would live and be on display nesting our BGE!  

It fits perfectly!

...__________________...


An afternoon of staining the table to match our deck made it all the better.  
Hubby did a fine job of it!


We previously used this BGE nest, it worked well enough and was on wheels.  
It also had lift-up shelves...  


And this is the new nesting place!  
The EGG sits on a metal table nest, which provides airflow beneath the EGG.  
The floor tiles were my great idea, and can be used as a cutting surface, heat pad, etc. 

We are very pleased with our new table!  
This adds even more enjoyment to our cooking experiences. 


Most egg-cellently!... 


Grilling it up - More Big Green Egg-ventures


As we are loving all things summer at the moment, our grilling and smoking on the Big Green Egg-(BGE) has become an almost daily ritual.  Hubby and I - aka Mr. and Mrs. Chef, are at least feeling like chefs with all of the tasty goodies we've been cooking,   We rang in the first week of summer with some delicious grilled goodies, so I wanted to share some of the images I captured of what Mr Chef and I were up to, and what we've enjoyed!


More Egg-ventures on the Big Green Egg


Can we say feast?  Well, that's a feast for sure.  Mr Chef came in with all of this food to prepare for dinner one evening.  We had cooked our first Beer Can Chicken about a week before.  It was just after we purchased a Beer Can Chicken Rack that folds flat for storage when not in use.  It's one of those "now why didn't I think of that" kind of items!  We really enjoyed the Beer Can Chicken.  It was one of the juiciest chickens we have ever cooked on a grill.  We knew we wanted to prepare another chicken and this was it.

Another new gadget is the Jalapeno Pepper Rack used to cook Stuffed Jalapeno Peppers.  I made whole stuffed jalapeno peppers, and some I cut in half, then stuffed.  I do think the halved type make a nicer presentation, and they go twice as far in servings.  We really enjoy them as a side dish and make them often!  Here is a link to my recipe for Stuffed Jalapeno Peppers. Skewers of Shrimp, Corn-on-the-cob, and BBQ Baked Beans were additional goodies that added to the meal feast.  I had already seasoned and prepped some boneless chicken breast as my original plan for dinner, so we decided to go ahead and prepare those too.  Needless to say we had some left-overs from all of this great food!


...__________________...


We hadn't grilled any steaks yet, so we decided it was about time that we did!  A nice juicy rib-eye steak was the ultimate main attraction grilled to perfection by Mister Chef, and he was quite proud of that too!  As he did the grilling I prepared the side dishes.

This was my first attempt at making this baked Swedish style of potatoes Hasselback Potatoes that originated in Sweden.  A different take on the baked potato, giving it a crisp outer texture and soft inside, I found lots of different recipes online for preparing these. The Spinach was a simple throw together I created by cooking a little onion in olive oil until nicely golden and caramelized. I removed the pan from heat and added the spinach, some crumbled cooked bacon, a dash of garlic powder and a sprinkle of salt, then gently tossed it all together as the spinach wilted down a bit.  it was delicious!
I made this dish again since this post and have perfected the recipe, Sauteed Spinach.


...__________________...


Our first ribs cooked on the Big Green Egg.  These Beef Ribs were the best ribs we've ever had, ever!  We put a plan together from different ideas and techniques that proved to be for us, the best way to cook ribs.  Tasty and very delicious with a perfect blend of sweet, smoky and spicy.  Can't wait to make some more of those!  I'll add details for that later!!


...__________________...


Our largest Pork Shoulder/Boston Butt to date, ten pounds!  Since we were having family visit us we wanted to share one of our new favorite specialties.  Perfect for serving more than a few people, and it is always a crowd pleaser too!

The pork was prepared in the usual way that we have prepared the others before.  We long smoked it over night for about 13 hours.  It was almost falling apart and off the bone.  This being the fourth and largest one that we have prepared, it was the best one yet.  Each time we've had one we are convinced that they are better and better.  We are so happy that our family also enjoyed this with us, and shared in our Egg-venture too.      


Egg-cited for more Egg-ventures to come!...


Grilling it up - London Broil / Boneless Beef Top Round


There has been some great grilling going on around here lately, and with it still being National Barbeque Month I wanted to share more of what we have been enjoying since we've been cooking with our new Big Green Egg-(BGE).  Grilling sure is a tasty way to enjoy both cooking and eating, and it's especially all the better when the weather is perfect, isn't it?  We enjoy cooking, and of course eating all the more now as we keep trying out new recipes, and also experimenting with different foods and techniques to prepare them.  This London Broil was a pleasing experience, it was quite delicious and I'm sure it will be something we'll do again and again.  I made a delicious marinade for the meat and it really added some great flavor to this London Broil.  It was over all quite impressive!


London Broil


1-1/2 to 3 pound - Boneless beef top round for London Broil
Cut approximately 1/4 inch cut lines in two directions forming a grid pattern across both sides of meat.


Marinade:

For 1-1/2 to 3 lbs - Boneless beef top round for London Broil 

3 garlic cloves 
1/2 tsp salt
1/4 cup balsamic vinegar
1/4 dry red wine
3 tbsp honey
1 tbsp soy sauce
1 tsp spice blend (I used Mrs Dash-Original and McCormick-Mesquite seasoning)

Crush garlic to a paste with a pinch of salt( I use a  pestle and mortar).  In a large ziploc or resealable bag add the garlic paste and all other ingredients and combine well by massaging bag.  Add meat to bag, press out excess air and seal. Place on shallow plate or baking dish. Place in refrigerator.  Marinate meat at least 4 hours and up to 24, turning occasionally.   


Cooking Method:
Bring steak to room temperature before grilling. Remove steak from marinade, letting excess drip off.

Keep in mind that cook times are basically guide lines and that using a thermometer is the best way to achieve and determine if your meat is done - 145 / med. rare - up to 160 for med. well.
Also remember that the meat will continue to cook when tented and resting!

(Method A) Place meat on grill grid set up at about 5 to 6 inches over glowing coals (about 500 F. grill temp.) for about 7 minutes on each side for medium-rare.

(Method B) Sear (very hot)on both sides, remove and cool down the grill to 350 F. Roast on a raised grid to your desired doneness.

4)) Transfer steak to a cutting board, tent with foil and let rest for 10 minutes. Holding a knife at a 45-degree angle, cut steak across grain into thin slices.


Enjoy!...


Grilling It Up- Pork chops / Chicken / Vegetable skewers


It's nice when the days have started getting longer and warmer, when so much of our time is enjoyed doing all things via the great outdoors, and the grilling time is more frequent too. We continue to enjoy cooking on our new Big Green Egg-(BGE).  We've used it as a smoker a few times now with great success, but we also use it almost daily for grilling.  I've taken a few photos of the delicious grilled eats we have been preparing and enjoying, so I thought I'd share some of those today.  Plus with May being National Barbecue Month, it's a perfect opportunity to spotlight, in celebration of a favorite for most of us...The Barbecue Grill!

Enjoy and try not to drool now!


One of our most frequent and favorites for grilling most often is boneless chicken breasts and vegetable skewers-kabobs!


I basted these with a little olive oil before grilling and added a few different seasonings!  Getting our daily veggies is easy, and it's great doing it this way!


I used a blend of herbs and spices for the chicken breasts.  I also prepared some tasty jasmine rice to go along with these juicy chicken breasts and veggies too.

...__________________...

Another meal favorite is thick cut pork chops, a do over of the vegetable skewers (because we like them that much), and corn-on-the-cob!  
[I soak the corn in water, for at least a half hour before grilling!  When only doing two, I find a large pitcher works well for this.  Drain, then keep them off to the side away from direct heat on the grill, and turned often.  I find the corn is better the longer it's on the grill, or on for the duration I am cooking everything else.]


I know I've mentioned it before, but I'll take one of my grilled thick cut pork chops over a steak any day!
It is one of my specialties, and a big favorite of mine!

...__________________...

I can't say enough good things about our Big Green Egg-(BGE)!  We truly love it, and it is a wonderful new addition to our lives.  Also for the most part, I feel we are eating more healthy with what we have been preparing on it as well.  Mostly grilled meats and veggies, and even some delicious grilled fruits! 

I've learned recently that the community of BGE owners are called Egg-heads, I'm OK with that!


Happy to be an Egg-head now!...


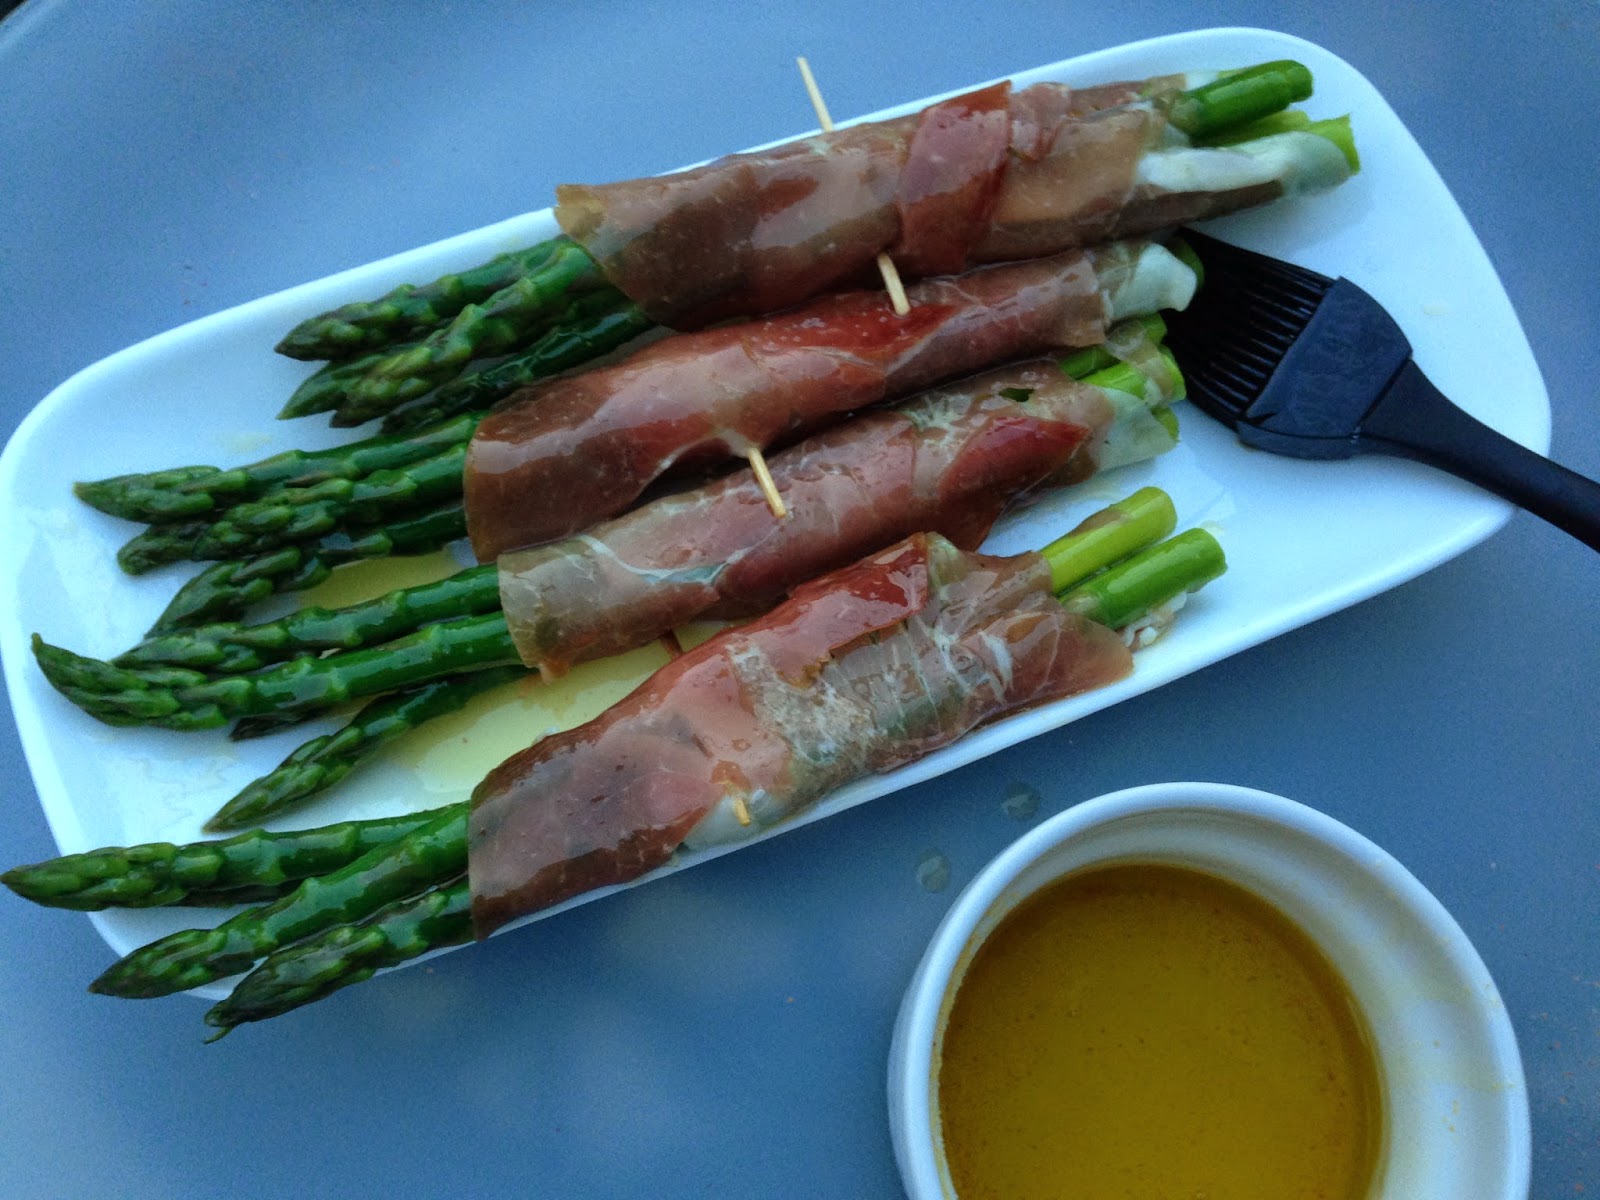
Asparagus - Prosciutto Wrapped Asparagus


Asparagus is one of those foods, you either love it or you hate it.  I happen to love it and find that it goes well with most dishes, plus it's easy to prepare. I have shown my grilled asparagus wrapped in prosciutto on a previous post,  I was asked "how I make it" so I wanted to share how I prepare and cook it.  This is a fancied version of asparagus.  We love asparagus, we also love prosciutto, so putting them together seemed a no brain-er to me.

Prosciutto is an Italian style cured ham, it is usually sliced paper thin.  It has a mild taste and is slightly salty.  My first experience with prosciutto was while dining at an Italian restaurant where it was served as an appetizer on a antipasto platter, along with other meats such as salami, also various cheeses and olives.  It was a nice beginning to the meal!  I have been making different versions of the antipasto platter since then using a variety of ingredients, but I always include prosciutto when I prepare one.  Prosciutto can be found at most deli counters these days and also in package form too, the thin slices are usually separated by layers of paper.  It costs more than most sliced meats, but I believe it is worth every penny!


Prosciutto Wrapped Asparagus


Ingredients:
fresh asparagus - 16 stalks=3-4 stalks per wrapped bundle, one to two bundles per person to serve 2 or 4
prosciutto - slices
1/2 cup olive oil
1 garlic clove crushed, or 1/2 tsp. garlic powder
black pepper

Tools Need:
toothpicks to secure bundles
large pot of boiling water 
large bowl of ice water 
hot grill

Directions:
Prepare asparagus by cutting hard stalk ends and making them even in length.  Blanch the asparagus in boiling water for 2 minutes until it turns bright green in color.  Immediately remove from boiling water and place in ice water to stop the cooking.  Drain asparagus.  Gather 3 or 4 pieces of asparagus, wrap them carefully with one slice of prosciutto, secure with a toothpick.  Continue making bundles of wrapped asparagus, then set aside until all bundles are completed.  Add garlic to olive oil  Coat each bundle with garlic-olive oil using a basting brush.  Sprinkle with black pepper-(I don't add any salt since the prosciutto already has a salty taste).  Cook on hot grill for about 10 minutes until prosciutto is crisp, flip once to brown both sides.  Serve.


A simple side dish that adds great color and flavor to almost any meal!  
If you like asparagus, give this a try!


Enjoy!...


Cooking Adventures - Pork Shoulder Boston Butt & Rub


~More cooking adventures on our Big Green Egg!~


May is National Barbecue Month!  We are definitely participating in that, and will be doing our part in celebration of all things BBQ!  Since our purchase of the Big Green Egg-(BGE), we have been enjoying cooking on it almost daily.  We are loving not only having a new grill now, but with it also being a smoker it adds another advantage for us that we haven't had in the past.  We enjoyed our first attempt at a smoked pork *Boston butt very much, so we smoked a second one.   The second time we smoked the pork in the same manner, and it was bigger and even better than the first one.  It made for a large amount of pulled pork bbq for sandwiches and was served as the main attraction for our Easter dinner with our family.   

The Mister found a spice rub recipe, and we adapted it to our liking and used that once again to prepare a nice rub for the pork.  We also learned that it's recommended to first rub on a generous amount of mustard, yep good ole regular yellow mustard!  After applying the rub the pork was wrapped in plastic wrap, then it sat over night in the refrigerator.  We long smoked it slowly for several hours [the average is 1-1/2 to 2 hours per pound] the next day on the BGE.  

The bark, [as they call the outside of the smoked meat], was nice and dark, crusty, full of spice and flavor.  It was delicious and enjoyed by all of us, and we were quite proud of it!  We have since smoked a third one this past week which we enjoyed with friends, we both think it was the best one yet!  Or maybe it's just that each one is so good that it is the favorite at the time, or we must truly be getting better at making them!


- Did you know? -
What is a Boston Butt?
* The Boston butt is cut from the hog’s shoulder, the front of the leg.  The Boston butt comes from the top half of the shoulder, and it’s perfect for pulled-pork sandwiches.

"Where does the name “Boston butt” come from? Barbecue used to be broken down by the best cuts of meat, which went to the wealthiest people, and the less valued cuts of meat, which went to the poor folks. That’s where we get the expression “eating high on the hog”. Interesting fact: many of the cuts of meat that were considered “low” on the hog are now considered the most delicious cuts for barbecue – like Boston butt. The low-valued cuts were packed into “butts”, or barrels. The folks in Boston used to cut their shoulders in a certain way that became the common way to cut up a hog, and we now call it “Boston butt”.


...__________________...
  
Naturally I took a few photos to share.  

Enjoy!  


The makings of a Spice Rub for the pork.


The spice rubbed pork sat wrapped over night in the refrigerator.


Pork Boston Butt #2 - Approximately 7 lbs - Just after putting it on the Egg to smoke slowly [and just as the rain was ending].  The cooking process is indirect heat, over a drip pan filled about half-way with water, which adds in keeping the meat moist.  We try to keep the lid closed and just check periodically while monitoring the temperature of the BGE and the internal temperature of the meat.  Our new cool gadget the -Dual Probe Remote Wireless Thermometer-, gives us the ability to monitor the temps via a wireless transmitter!


That is a nice hunk of perfectly smoked Pork! Trust me it is not burnt or over cooked!  That is the look of the bark I previously mentioned.  Oh and let me tell you it smelled terrific, and we wanted to eat all of it right then and there.  We did have just a little sample taste though{wink}

This was just after taking it off the smoker after 10 hours at 250°F to 275°F degrees.  Once it reached 190 internally, it was removed then wrapped in foil, then wrapped in a towel, after that it was placed into an empty cooler for an hour.  At that point it's ready to be pulled pork, or can be refrigerated overnight and reheated in foil the next day at 325°F for one hour.  


...__________________...


Pork Boston Butt #3 - Approximately 5 lbs - This is bout at five hours/just over half way into the cooking process.  Mmm looking pretty good!


Pork Boston Butt #3 - After smoking for 8 hours and ready to come off the smoker.  Nicely darkened bark on the outside!  Tender and juicy inside!
...__________________...


Oh and the Mister left this message on the frig for me.
Uh huh, he thinks he's pretty funny!  At least I didn't have to explain this to anyone who didn't know there was a Boston "butt" in the frig awaiting it's rub!


I did laugh, you are too...aren't you?

...__________________...


~ Rub Recipe for Boston Butt ~

Spice Rub


Ingredients:
2 tbsp sugar
2 tbsp brown sugar
2 tbsp chili powder
2 tbsp freshly ground black pepper
1 tbsp ground cumin
1 tbsp garlic powder
1 tbsp onion powder
1 tbsp salt
1/2 tbsp cayenne pepper
1/4 cup paprika

Mix all together well.
Optional: Rub meat liberally with bacon grease, then apply rub.
Store leftover rub in an airtight container.


...___________________...

Recap:
The cooking process is indirect heat, over a drip pan filled about half-way with water.
Cook at  250°F to 275°F degrees-[the average is 1-1/2 to 2 hours per pound], until 190° internally.  Once it reaches 190 internally, remove then wrap in foil, then wrap in a towel, after that place into an empty cooler for an hour.  At that point it's ready to be pulled pork, or can be refrigerated overnight and reheated in foil the next day at 325°F for one hour.  


...__________________...


A good homemade pulled pork bar-b-que is something special!  I think we have a new favorite to add to special occasions with food, fun, family and friends!


I believe the family & friends will agree!...


Cooking up something new!


We recently made a purchase that will change our way of life.  Well some of what we eat anyway, and how we cook it.  We are the proud owners of a Big Green Egg.  If you have never heard of that, it's a grill / smoker/ outdoor oven even.  It has us loving cooking and most importantly, eating!  We have been contemplating for some time now which way to go with getting a new outdoor cooker.

We have had a gas grill for the past several years, it was getting old and we missed the taste of a charcoal grill, so we converted the gas grill and used it as a charcoal grill for a while.  We have looked at other gas grill types and had done some comparison shopping on many different types of grills.  Shhh don't tell the hubby I said so, but I have been the grill master most of our grilling life, and I am glad that he is also taking an interest in becoming a grill master too!  

We decided on the Big Green Egg-(BGE) after much research and a trip to the local distributor, where we learned much more and also even tasted some BGE grilled food right on site.  We were hooked, or hooked-up that is with our large sized BGE and a few extra accessories, egg-cessories that is, which we just couldn't do without.  We have been cooking on it quite frequently since the purchase and we are very happy we made the choice of the BGE!

We have done some basic grilling such as chicken, burgers, and pork chops<--my specialty, along with veggies and side dishes, such as roasted corn-on-the-cob too.  We smoked a pork boston butt over the past weekend that has us wanting to do it again this weekend, and so we are and we will be enjoying it for Easter dinner with the family.  The BGE is a fantastic long slow smoker, which as I said we tried over the weekend with cooking the pork boston butt.  Oh my, that was some kind of tasty, not to mention impressive and it made for some delicious barbecue pulled pork sandwiches!

I look forward to even more experimenting using the BGE as an outdoor oven and cook pizza or calzones, it gets hotter than the oven in my kitchen!  I really want to try that out, how fun making homemade pizzas?!  Grilling is even better now that we have our Big Green Egg, and we love it!  It's good timin' grillin'!


~ The Big Green Egg ~


It is a little unusual looking, and it does indeed look like a big green egg!  Admittedly, I wasn't in love with the look of it when I first saw it, but I know now that what is does is by far much more important, and what it is all about!  I have been eyeballing some tables that are created to house the BGE and offer storage too.  So many ideas and different types of tables to choose from, we will take some time to figure out what choice is best for us, and our egg!


Now for some drool worthy food photos! 


~ Grillin' ~

Grilling up a feast with all of the dinner food on the grill.


My pork chops, corn-on-the-cob, and one of my recipes-potatoes cooked in foil.  I actually prefer my thick pork chops to a steak any day!


Grilled prosciutto wrapped asparagus!  That's some yummy good stuff.  Two things that I love, put together and making each taste even better. 


Grilled fresh pineapple too, mmm so delicious!  Grilled fruit takes on a whole new flavor!


~ Smokin' ~


Pork boston butt roast!  I wish this were smell-a-vision so you could enjoy the wonderful mouth-watering aroma of this baby.  Hubs found a butt-rub recipe that he put together, rubbed it on the pork, then wrapped it up and let it sit over night in the frig.  


The smoked pork boston butt after pulling it open, it fell apart easily!  The pork had been long smoked slowly for almost eight hours on the Big Green Egg.  It was tender, juicy, and quickly became pulled pork bbq sandwiches that were very tasty and delicious!  
Big Green Egg  <~ Learn all about the Big Green Egg on their website. 


We are very happy to be Big Green Egg owners!...


.

.

.

.
Tammy is the design enthusiast behind the blog, Tips, Treats & Treasures, where her creativity is explored with a mixture of her artistic abilities and style through her home decorating, thrifty finds, DIY and creative craft projects, along with her family favorite recipes. She shares through her blog her ideas and helpful tips on everything she has learned over the years and much of which she is passionate about in the hope of inspiring others, with her own unique style storytelling.