Showing posts with label Slightly-Homemade. Show all posts

Thoughts and Things - This week...Chocolate Crescents & More


One of the more frequently visited and popular posts here on my blog is my Chocolate Crescent Rolls.  They are a family favorite here at home, too!  We enjoy having them occasionally as a special treat for breakfast, but they are an anytime treat.  You don't need a special occasion, but we think they are pretty special though.  Hubby and I enjoyed some fresh baked Chocolate Crescent Rolls this morning with our coffee, while sitting out on the porch as we experienced beautiful Spring like temperatures.


I enjoy just about anything chocolate, and having it at breakfast is my way to start the day, mmm hmm!  A little something sweet with my morning coffee, yes please!  These Chocolate Crescents Rolls are so easy to prepare, very delicious, and everyone loves them.  You can find the recipe below, and try them for yourself.  You, and your family will be glad you did! 


***


If you're looking for more ways to enjoy crescent rolls, here are a couple from the good folks at Kraft, which caught my eye and have peeked my curiosity.  I think my taste buds are saying "yes please, let's give those a try!"


Oh and speaking of cream cheese, and bacon, I recently noticed that Philadelphia Cream Cheese has a 'Bacon' flavored cream cheese now to add the many other flavors that they offer!  Uh huh, I'll have to give that one a try!


Enjoy!...


Baked Stuffed Apples

{This recipe is part of my Slightly-Homemade recipes collection.  I like short cuts and easy to make recipes, my Slightly-Homemade recipes save time and often have ingredients that make it easier and quicker to create them.  I enjoy using these Slightly-Homemade recipes that are often easier, quicker and time saving, and I hope that you find they do that for you too!}


Sometimes the sweet tooth needs some satisfaction so after going on the hunt I found myself staring at a bowl of apples.  I wasn't in the mood for that, but a warm baked apple pie sounded real good.  That led to visions of bubbly apple crisp but, I didn't have oatmeal, and only had very little brown sugar, so that wasn't going to happen either.  Then it came to me, I did have a couple packets of instant oatmeal and fortunately they were of the maple and brown sugar variety.  I had a plan for joy to my sweet tooth and warmth to my soul ...warm, delicious, baked, stuffed apples! 


..._________...


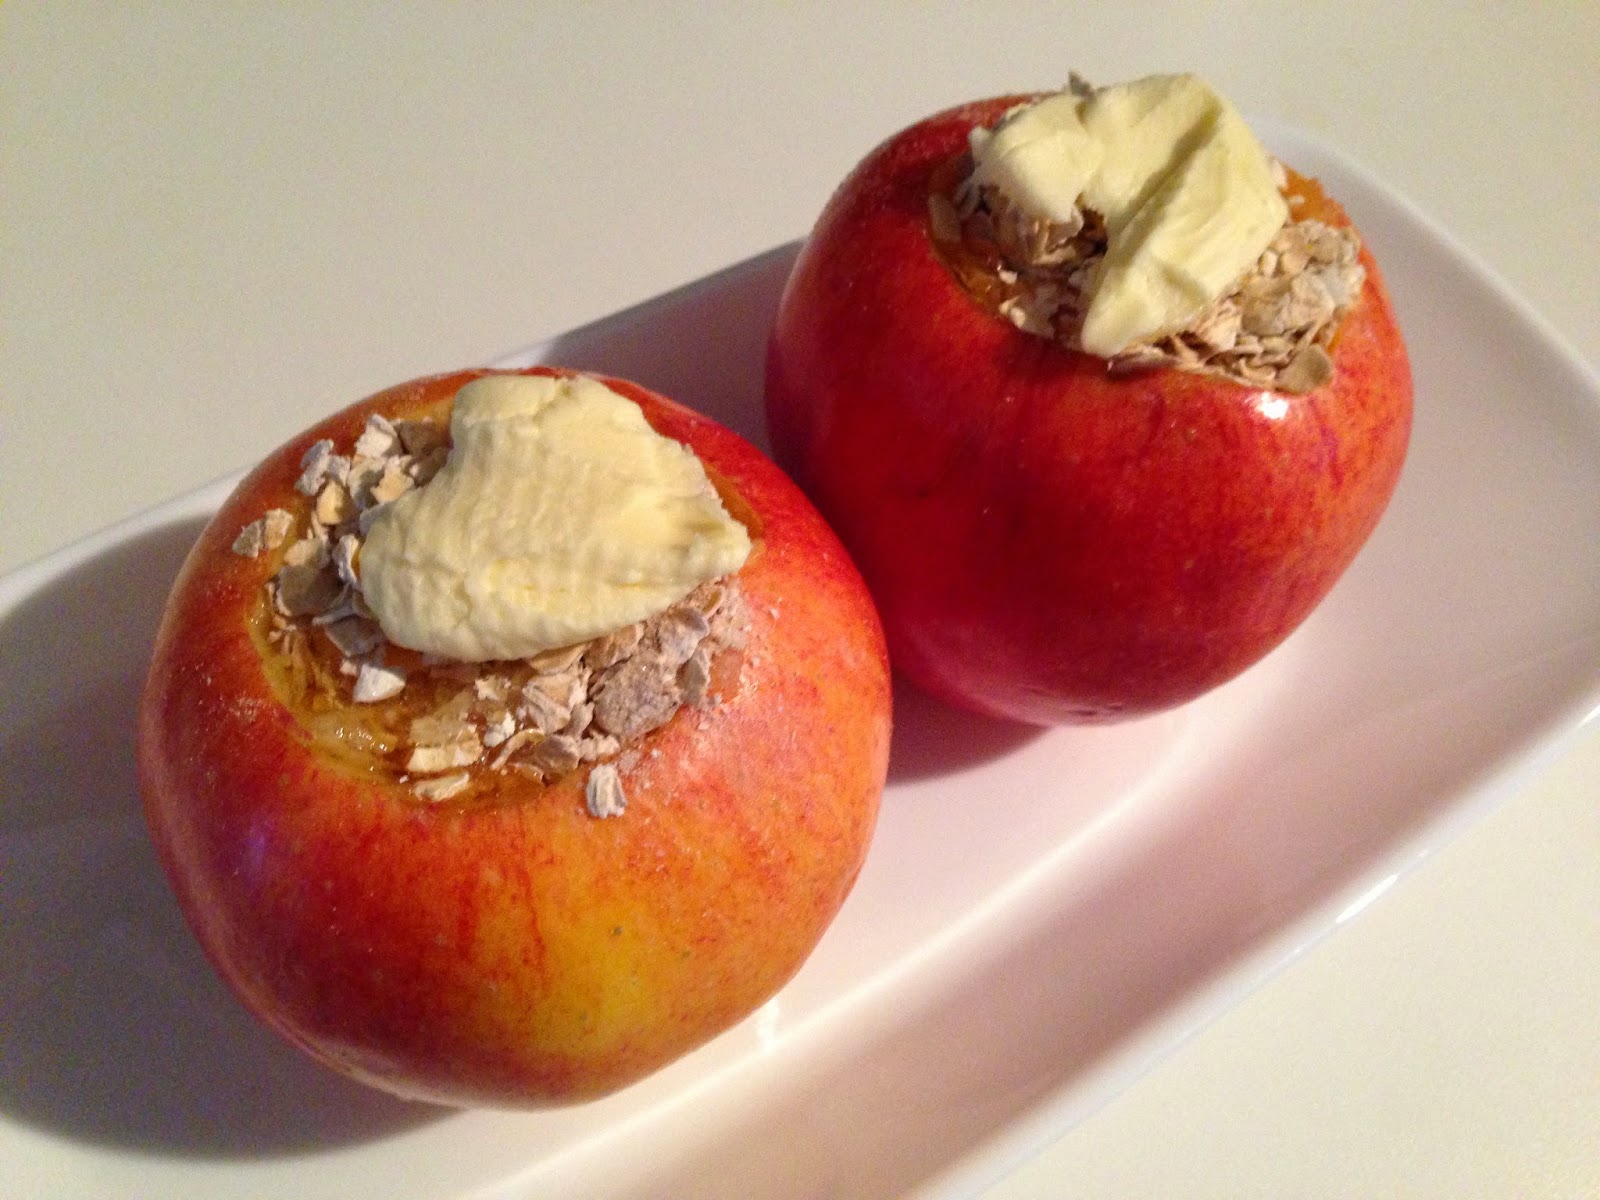
The first steps of the preparation were to core the apples.  I made about a one and half inch opening, leaving about a quarter of an inch at the bottom.


After stirring well to keep it mixed, I added some of the instant oatmeal to about half way up the center, then added a couple teaspoons of water.  I then drizzled a bit of honey (just a little) on top of that.


I added more oatmeal mixture to fill the apples, then a little more water, and added another little drizzle of honey.  I topped them off with a touch of butter.


I placed the apples on a small shallow baking dish, then added a little water to the bottom of the dish, covered them loosely with foil, and then baked them to perfection!


After cooling I added chopped walnuts, and I made a sauce to drizzle over the tops.  In just a few minutes I had delicious baked, stuffed apples topped with a yummy warm sauce.


And here's something that is gonna make you love me, and if you loved me already ...well, you're gonna love even more!

That yummy sauce I put on top, it is as simple as simple can be.  Take a heaping spoon full of brown sugar and put that in a glass pyrex bowl and add to that about the same amount of butter.  Now zap that in the microwave for just a few seconds, I mean few!  Don't walk away, don't sneeze, don't do anything else, just stay right there watching it til you just see the butter melting, now stop!  Carefully remove it and stir it to combine well as the sugar and the butter have a happy union, and then you'll notice that it looks a lot like caramel sauce.  Uh huh!  You're welcome!  Now just drizzle that lovely sauce all over the top of those apples.  Mmmmm.  I know!  Trust me it sounds as good as it really is!  If you like apples, apple pie, or apple crisp, you'll like this.


..._________...


mmmmm, baked stuffed apples = sweet tooth satisfaction!  


Baked Stuffed Apples

Ingredients:
4 sweet apples, (I used Gala)
2 packets instant oatmeal-maple and brown sugar flavor
1/4 tsp cinnamon
1/8 tsp nutmeg
1/4 cup toasted walnuts, chopped or pecans (optional for topping)
1 tablespoon butter divided into four parts
approx 2 tablespoons honey
1/2  cup water


for sauce:
2 teaspoon butter
2 teaspoon brown sugar

Directions:
Preheat oven to 375F.  
Use an apple corer or paring knife to remove apple cores, cut within a quarter inch of the bottom.
Cut about an inch and a half wide opening for stuffing.  
Open oatmeal packets into a small bowl and stir well before filling apples half way full with oatmeal mixture.  Add a teaspoon of water on top of oatmeal to each.  Drizzle about 1/2 teaspoon honey on top of oatmeal mixture in each apple cavity.  Mix oatmeal again and repeat filling each apple with the oatmeal mixture, a small amount of water and finish each with honey.  
Top each apple with one piece of the divided butter.
Add water to the bottom of the dish and cover loosely with aluminum foil.
Bake in center of oven for 20 minutes, then remove foil. 
Continue baking up to 20 to 30 minutes until apples are soft and the skins appear wrinkled.  Test by poking a fork through the oatmeal and into the apple, if it goes in easily and if they feel soft the apples are done.
While apples cool slightly, make caramel sauce.  Drizzle sauce over warm apples and serve.


Enjoy!...


Peanut Butter Cookie Cups


A cookie with a little something extra.  
Peanut butter cookie cups with mini Reese's peanut butter cups inside.

If you like peanut butter, peanut butter cookies and or Reese's cups, well this is thee cookie!  I happen to love all three so, when I got this idea I just couldn't wait to make them!  They were delicious and all I can say is mmmmm!


Peanut Butter Cookie Cups


Ingredients:

1 Peanut butter cookie mix
1 Bag of Reese's mini peanut butter cups


Directions:

I used a packaged peanut butter cookie mix and Reese's mini peanut butter cups.  Prepare the peanut butter cookie mix according to the package directions, fill mini muffin cups about half full, press cookie dough evenly down into cups.  Bake for approximately 10 minutes until puffy and light golden in color.  After removing cookies from the oven, cool slightly , then push mini peanut butter cups into center of the cookies until flush with the top.  Mini peanut butter cups will begin to soften and melt, carefully remove from muffin pan and let set until cooled and chocolate looks firm or hardened again.  Centers may be hot for a while so take care if you try them while still warm!(and yes I know from experience)  They are worth the wait though and even better the next day, if they are still around.*wink*  Enjoy!


Sweet-sational!


Strawberry Delight


I just whipped up this delicious dessert for the Hubby and I this evening.  I think I could have had a second helping because it really was that good.  It looked so good that I just had to take a few photos, and I thought it was worthy of sharing.  A simple and easy dessert that is sure to please and one that looks as delicious as it truly is.

It took me less than five minutes to put this delicious dessert together.  Slices of angel food cake topped with sliced strawberries and a nice drizzle of melted chocolate, then topped off with whipped cream.  Sounds pretty good doesn't it?  Well, it definitely was!  You can impress your sweetie with this sweetie!  It's a delicious and light dessert, which is why I named it Strawberry Delight!  


Strawberry Delight


Ingredients:

angel food cake (I used a ready made cake from the grocery store) 
package of strawberries 
2 tbsp. chocolate chips or other melting chocolate (I used semi-sweet chocolate chips)
1 tsp. vegetable oil  (I use this to thin the chocolate for drizzling)
whipped cream for topping - (optional)  (I used the type from a can)


Directions:

Slice angel food cake into serving sized pieces and place on plate.  Cut strawberries in half and then into slices.  Spoon sliced strawberries over the cake.  Place chocolate in a microwave safe bowl and melt chocolate in microwave approximately 1 minute, remove and stir in oil (this will thin the chocolate so it drizzles nicely), continue to stir until chocolate drizzles off of the spoon when lifted up above the bowl.  Drizzle the melted chocolate over the cake and strawberries.  Top with whipped topping.   


Slice angel food cake into serving sized pieces and place on plate.

Spoon sliced strawberries over the cake.

Drizzle with melted chocolate.

Top with whipped cream. (optional)


Enjoy!...


Baked Brie Cups

These little treats are bite-sized appetizers that are perfect for the holiday season, entertaining, parties or anytime, easy to make and taste delicious.  I had these for the first time at a holiday party and was I surprised by how good they were, and they only require five ingredients - phyllo shell cups, brie cheese, honey, nuts, and brown sugar.  

You can change the recipe for these by using different nuts, and I've also seen several recipes with using figs, dates or jams, such as apricot or raspberry, or even using pepper jelly.  The first time I had these they were made with chopped pecans, which I do like, but most of my family prefer almonds, so that is what I used for my recipe.  Give these Baked Brie Cups a try for a snack, appetizer or for your next gathering. They are so good that they're additive, and they will disappear quickly!


Baked Brie Cups


Ingredients:
  • 1 package of mini phyllo shell cups (1 pkg=approx 15 shells)
  • Brie cheese - appox 4oz. cut into small cubes 
  • honey
  • pecans, walnuts or almonds chopped or sliced
  • brown sugar


Directions:
Preheat oven to 350.  Place a cube of brie in each phyllo cup, top with a drizzle of honey and a few nuts.  Sprinkle with a pinch of brown sugar.  It's best to not over fill the cups.  Bake for 15-20 minutes until the brie is melted.  Serve immediately.  Use more or less of the ingredients per your preference.


Enjoy!...


Chocolate Crescent Rolls


Warm melted chocolate inside a fresh baked crescent roll.  What's not to love about that?  Add a drizzle of melted chocolate to the top after baking and even better!
A special treat for the chocolate lover in me, and you!  These Chocolate Crescent Rolls are one of my favorite goodies to make for my family, as well as for myself too, of course.  These tasty goodies are nice for breakfast, for dessert, or anytime.  And everyone will love them!  

These Chocolate Crescent Rolls remind me of a morning spent in Paris, France, where we woke to delicious fresh baked pastries and chocolate croissants, along with fresh strawberries and coffee.  After having those I knew I would want to have them again, and again, so I figured I could try to relive that tasty experience thanks to a can of crescent rolls and some chocolate chips.  I've been making these ever since. 


Ingredients:
  • 1  can-8oz. refrigerated Crescent Rolls - (8 per can usually, at least two crescents per person)
  • 6oz. or half a 12oz. pkg of Semi-Sweet Chocolate Chips or Milk Chocolate if preferred


Directions:
Open can of crescents and separate dough into 8 triangles.  At large end of triangle place 1 tablespoon of chocolate chips, fold up corners to make a pocket for the chocolate chips, then roll gently towards the opposite point.  Bake according to package directions on crescent roll can until golden brown.  

Meanwhile melt 2 tablespoons chocolate chips in microwave safe bowl for approximately 1 to 2 mins, remove then add 1/2 to1 teaspoon vegetable oil to the melted chocolate and stir vigorously.  Drizzle the melted chocolate over baked crescents after they have cooled slightly.  Allow the crescents to cool before eating because the chocolate inside will be very hot.  Serve warm.    


Separate and unroll crescents.


Place chocolate chips at large end of crescents.


Fold up corners to form a pocket.


Roll gently towards thin end to form crescent shape.


Bake according to package directions on crescent roll can until golden brown.


After baking allow to cool, chocolate inside will be very hot!


May serve warm with or without chocolate drizzle on top.


My preference is always more chocolate!


Ready to eat and enjoy!


Chocolate Chip Cookie Bars

Who doesn't like chocolate chip cookies, hmmm?  Well, those who do will also most likely enjoy these chocolate chip cookie bars!  I made these using a packaged chocolate chip cookie mix, and extra chocolate chips for the topping.  So easy and so good!  You could try this using your own chocolate chip cookie recipe if you prefer.  I don't mind letting Betty Crocker help me out, just follow the rest of the instructions and baking time below and it should be fine.  I like options too, and I really like...easy!


Chocolate Chip Cookie Bars

Ingredients:
1 package Betty Crocker Chocolate Chip Cookie mix (makes 3 dozen - 2 inch cookies)
1 or 2 eggs  (1 egg for cookie bars - 2 eggs for cake-like bars)
1 stick or 1/2 cup butter or margarine softened(not melted)
1+1/2 to 2 cups semi-sweet chocolate chips. (for topping)

Directions:
Heat oven to 350 F.  Stir softened butter and egg(s) in medium bowl.  Stir in cookie mix until soft dough forms.  Spread cookie dough in ungreased  9" pan.  Bake approximately 20-25 minutes or until golden brown.  Sprinkle with chocolate chips.  Continue baking 2 minutes or until chocolate chips are soft.  Remove from oven.  Spread melted chocolate chips with spatula or butter knife.  Let cool before cutting.     


 Betty Crocker Chocolate Chip Cookie Mix


Spread cookie dough into ungreased 9" pan and bake.


Spread melted chocolate chips and cool before cutting.

I cut them into 16 squares of goodness! 


mmmm...I love these Chocolate Chip Cookie Bars!...


.

.

.

.
Tammy is the design enthusiast behind the blog, Tips, Treats & Treasures, where her creativity is explored with a mixture of her artistic abilities and style through her home decorating, thrifty finds, DIY and creative craft projects, along with her family favorite recipes. She shares through her blog her ideas and helpful tips on everything she has learned over the years and much of which she is passionate about in the hope of inspiring others, with her own unique style storytelling.